DNS error generally occurs due to the incorrect DNS settings, changed IP Address and Firewall issues. Sometimes because of outdated data or incorrect information containing HOSTS file may also generate this error.
Still, if you don’t remember adding listings to a HOSTS file, it silently may contain listings, for the reason that some Internet accelerator tools edit them automatically without giving you any notification.
Open your HOSTS file by using Notepad and see if the website you cannot connect to is listed there or not. If it is in the list then delete the entry, and after it, you should be able to connect.
Before fixing the DNS error, apply the given things
- First of all, check the internet connection of your system.
- Verify the security software, and see whether or not it is jamming the websites.
- Also check that the error is only for some websites, or for all. If this error is only for some websites then it is probably a temporary issue.
- Also, make sure whether it is an internet browser issue or not.
After verifying the above-given things you are unable to fix the issue then it is sure that the DNS is unable to connect to the PC, and this issue can be fixed by the following steps.
How to Fix DNS Server Not Responding Error?
#Fix 1: Using Command Prompt
Follow the steps given below and you will able to connect your Windows 8/7 with DNS. using Command Prompt
- Open the command prompt window by typing cmd on the run box.
- In the command box type “netsh int ip reset c:\resetlog.txt”, to reset the IP of the system.
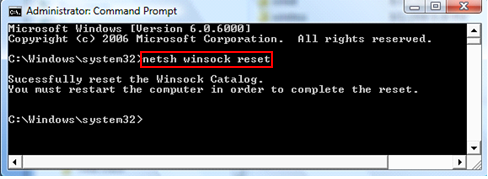
- Again type “netsh winsock reset”. This command will almost certainly prompt to restart the PC, but don’t do it now.

- Type ipconfig /flushdns, which will delete the stored DNS cache.
- After doing this restart the computer to check.
- After restarting the system if the difficulty still continues, then shut down the computer, and then the modem, and allow it to stay off for 5 minutes or so. Again restart the PC and modem to check.
- If the problem still not fix, then type ncpa.cpl in the Run window, this command will open network connections.
- Right-click on local area connection, and select properties. Then go to the Internet protocol version (TCP/IPv4). Click on properties.
- Modify the DNS address to global DNS value.
Preferred: – 208.67.222.222
Alternate: – 208.67.220.220 - You can also replace the DNS values with Google’s DNS value, that is
Preferred: – 8.8.8.8 - Alternate: – 8.8.4.4
#Fix 2: Modify DNS Address
Step 1: Click on the Computer icon on the taskbar – >Open Network and Sharing Center

Or go with the Start Menu – >Control Panel – >Network and Internet – >Change adapter settings

Step 2: Right-click Local Area Connection – >Properties

Step 3: Local Area Connection Properties window opens – >Internet Protocol Version 4 (TCP/IPv4) – >Properties
Step 4: Modify the DNS address by the help of the following DNS Server addresses
– Preferred DNS Server: 208.67.222.222
– Alternate DNS Server: 208.67.220.220
Mark Validate settings leading exit.
Click OK

Step 5: Open Command Prompt and type ipconfig / all and then press Enter
Key, remember or write down the Physical Address

Step 6: Again type ncpa.cpl in the Command Prompt, open Network Connections, right-click Properties – >Configure

Step 7: Select Advanced – >Network Address in Property.
In theValue field, type the Physical address which appeared in Command Prompt after removing dash present between them.
After it, click OK and reboot your computer.

After applying the above steps if you are unable to fix the problem, then make sure that security options of Windows 7 or 8 or other operating systems:
- First, disable the security of the system, and after it boots the computer in safe mode with networking.
- Make sure if the internet connection is working or not.
- If the system is unable to connect to the internet, then it is sure that other drivers and programs may be the cause of the DNS server not responding.
Automatic Solution: PC Repair Tool
Manual methods are tricky and time taking if you don’t have good computer knowledge you may find the steps difficult to perform, but still, if you try those steps and while performing the above steps a minor mistake can make you fall in much trouble.
So to be safe it is recommended to try the professional PC Repair Tool. This tool is easy to use and is a user interface and solves all types of PC related issues and errors. You can use this tool without the help of any skilled person. It will scan your PC detects the error and fixed them at once automatically.
Get PC Repair Tool to Fix Various PC Issues and Errors.
Conclusion
Here my job is done and your work begins. Try the above-given steps one by one to fix DNS Server Not Responding Error in Windows 8.
Hope this article helped you in solving your problem.
If you have any query or suggestion then don’t hesitate to share with us @ Facebook or Twitter.
Hardeep has always been a Windows lover ever since she got her hands on her first Windows XP PC. She has always been enthusiastic about technological stuff, especially Artificial Intelligence (AI) computing. Before joining PC Error Fix, she worked as a freelancer and worked on numerous technical projects.