Windows 10 Operating System contains lots of advanced features (like Automatic Maintenance Feature), if you are a Windows 10 desktop or laptop user then there is no other operating system available that could make you satisfied.
There are many eye-catching features available that make Windows 10 operating system powerful, attractive, and convenient. The latest versions of the Windows operating system i.e. Windows 10 is really very advanced and popular among every type of users i.e. home users and professionals.
As we know that Windows 10 is packed with lots of practical tools and Automatic Maintenance Feature is one of them. In this blog, I am going to discuss this useful feature of Windows 10,
Therefore, continue reading this article and get complete information about Windows 10 automatic maintenance features such as how to enable, disable, and more. So, let’s get going…
About Windows 10 Automatic Maintenance Feature
Automatic Maintenance Feature in Windows 10 is one of the well needed inbuilt tools that are responsible to maintain the performance of any computer or laptop.
This inbuilt utility is scheduled to run on a daily basis and execute different computer maintenance activities in the background.
For enterprise workstations, this Automatic Maintenance Feature in Windows 10 contains enterprise-level Network Access Protection scanning and security standards scanning suitable for all enterprise workstations.
Some of the background activities executed by Automatic Maintenance Feature in Windows 10 are: updating Windows software and installed apps, attending to Action Center messages, Disk Defragmentation, Disk Volume Errors, System Diagnostics, running background maintenance task, and more.
Things That Automatic Maintenance Feature Does
Automatic Maintenance is programmed by Microsoft’s engineers to address various types of problems that affect the Windows 10 system performance. Here are some features of automatic maintenance, go through them, and know more about it.
- It is Energy efficient
- Deadline scheduling
- It runs all the factors that can affect the Windows system and make them slow.
- The automatic maintenance process runs in the system background and doesn’t impact performance.
- A user can easily control the maintenance activity scheduling and configuration too.
- Resource utilization conflicts
- This feature is transparent to the user
Now, that you got to know about Windows 10 automatic maintenance features let’s move on and see how to manage i.e. disable and enable automatic maintenance.
How Automatic Maintenance Feature Work?
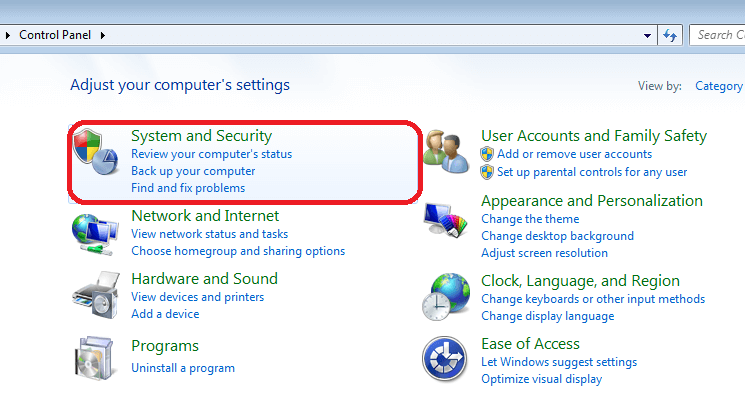
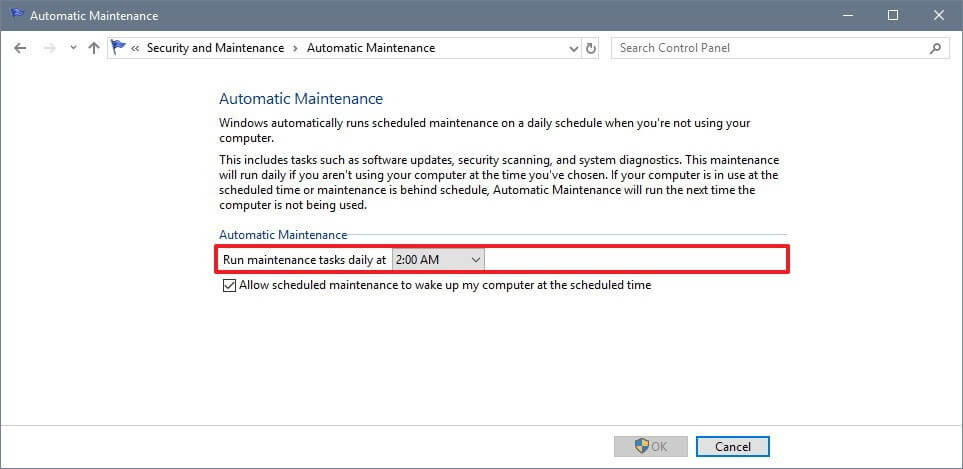
Even though the maintenance feature in Windows 10 works automatically, you can still manage to characterize the Automatic Maintenance feature manually. Follow the steps to do so:
- Press the Windows key
- Type Control Panel and hit the enter key
- Select System and Security section
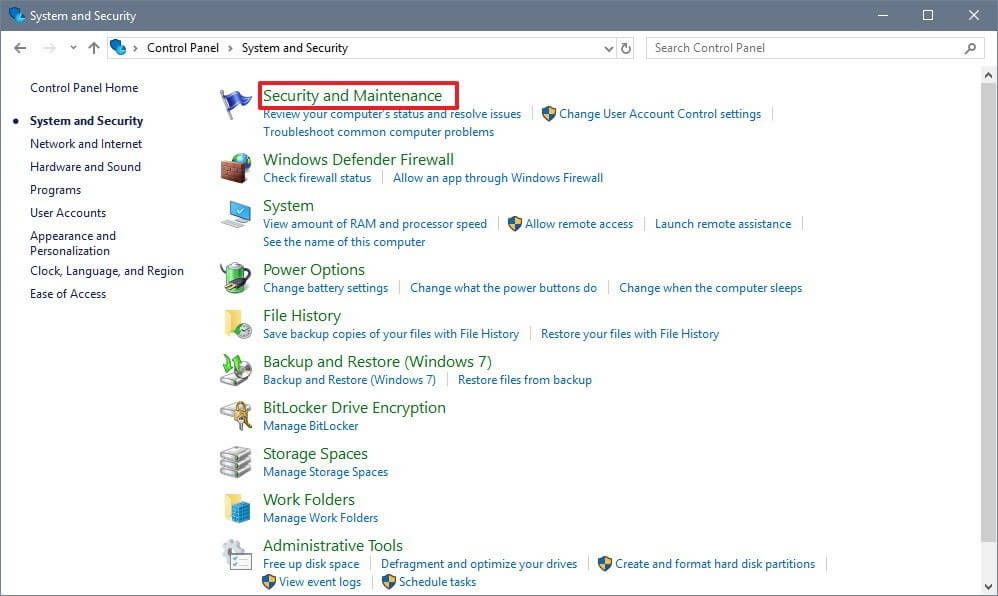
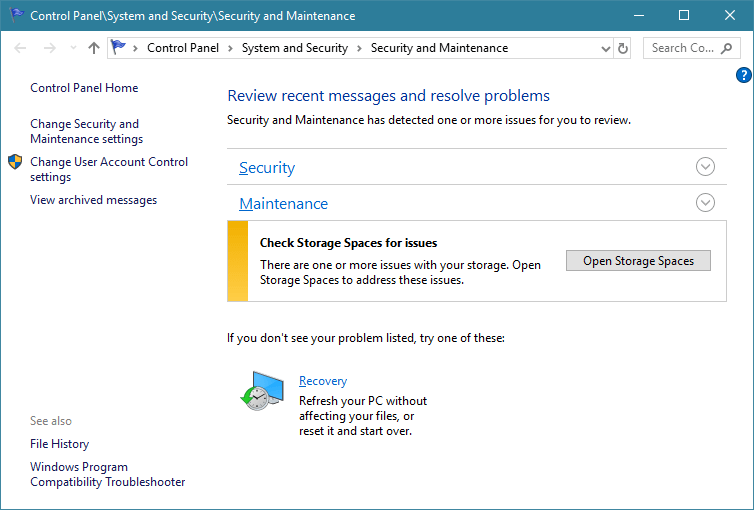
- Click on the Security and Maintenance
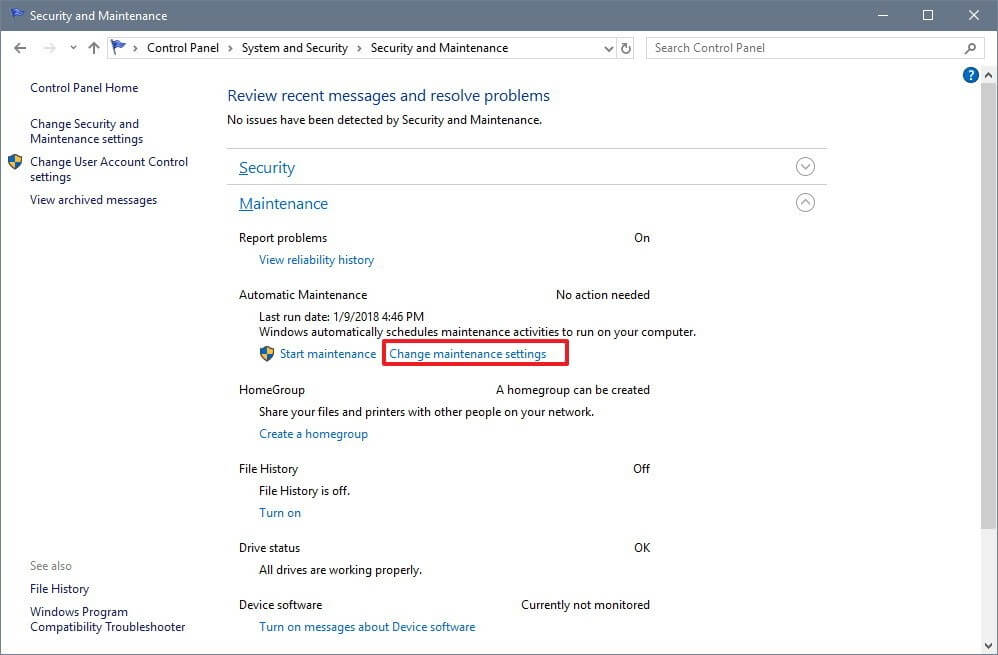
- Choose the Maintenance section to expand the Automatic Maintenance options.
- Click on Change maintenance settings link
- Select a time in Run maintenance tasks daily at under Automatic maintenance to perform the maintenance tasks
- Click on OK
NOTE: Clear the Allow scheduled maintenance so that your computer wakes at a scheduled time rather than at night.
After completing the above steps, your PC will perform the automatic maintenance regularly at a specific time for about an hour.
If you are using your device during the scheduled time then Windows 10 will skip the maintenance task and will try later.
In case you immediately want to run the maintenance task, click on the start maintenance option in the control panel. This immediate running of the maintenance task will continue even if you are using your device.
Now, that you know how automatic maintenance works, let’s move ahead and know how to enable and disable it.
How to Enable Automatic Maintenance Feature in Windows 10?
According to my opinion, it is strongly suggested to never turn off features like automatic maintenance, Windows Firewall, SmartScreen, and others.
As all of these features are specially designed by Microsoft to prevent Windows computers and laptops from slow or unresponsive issues, errors, outdated issues, harmful and malicious software/malware.
So, make sure that these recommended features are always set to on, if not then turn them on again and Play it safe!
Steps to Turn On the Automatic Maintenance in Windows 10
Follow the steps mentioned below to turn on or enable the Windows 10 automatic maintenance:
1: Open Control Panel and click on System and Security.
2: Click on Security and maintenance-> click on Maintenance to expand it.
3: Enable automatic maintenance: Click on the Start maintenance option.

Well, your Windows 10 automatic maintenance feature is enabled again to keep your Windows PC safe.
How to Disable Automatic Maintenance Feature?
Automatic Maintenance Feature in Windows 10 is set to on by default and designed to start its tasks on a daily basis at a time the user be likely to not use his computer or laptop.
However, if a user is busy with their computer at that time, then this advance maintenance feature will wait until the next time it detects your computer idle and gets to work.
Microsoft has provided the functionality to manually turn on / turn off automatic maintenance in Windows 10.
Steps to Turn Off the Automatic Maintenance in Windows 10
Go through the steps stated below to turn off or disable the automatic maintenance feature in Windows 10:
1: Open Control Panel and click on System and Security.
2: Click on Security and maintenance-> click on Maintenance to expand it.
3: In order to turn off automatic maintenance: Click on the Stop maintenance.

After the above steps are executed, the automatic maintenance feature in Windows 10 is disabled properly. You can also enable it by simply following the steps given below.
Best Method to Maintain & Speed Up Windows 10
As we know the Windows 10 operating system not only comes with various features but also with stubborn bugs that cannot be fixed with manual solutions if you are a novice person.
Therefore, here is an easy way that will help you in resolving all the Windows PC errors or issues as well as speed up your Windows 10 without any hassle. Try the PC Repair Tool.
This tool is designed by professionals that are easy to handle. Users just have to download this tool and the rest of the work will be done automatically. This tool will scan your entire system, detects the errors, and solves them.
Errors such as DLL, game error, update, BSOD, registry & others. It also repairs corrupt, damaged or inaccessible system files, prevents viruses or malware from PC, optimizes the performance and much more.
Get PC Repair Tool to Maintain & Speed Up Windows 10
Frequently Asked Questions
Conclusion
The automatic Maintenance feature in Windows 10 is one of the amazing features that maintain the performance of your OS. If you are new to Windows 10 and are unaware of this feature then this article is for you.
Get the overall information on this feature and make your Windows PC/laptop safe. Apart from this, you can also make your Windows 10 error-free by just scanning your PC with the recommended tool mentioned above.
Well, I hope that you liked this article and it turns out to be informative for you. Besides this, if you have any questions or suggestions then write to us by visiting our Facebook page.
We’ll be happy to help you to overcome your queries.
Hardeep has always been a Windows lover ever since she got her hands on her first Windows XP PC. She has always been enthusiastic about technological stuff, especially Artificial Intelligence (AI) computing. Before joining PC Error Fix, she worked as a freelancer and worked on numerous technical projects.
