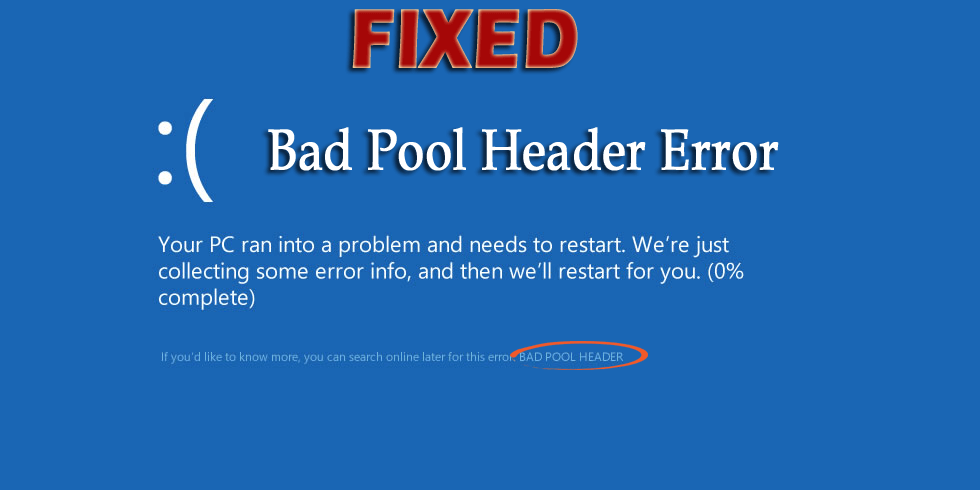
Bad Pool Header is a Stop error that occurs in Windows 10/8/7 with the error code 0x00000019 that indicates the pool header is being corrupted.
This error shuts down or restarts your computer in order to prevent any sort of damage to your system. When this error occurs, you find a message stating “Windows has been shut down to prevent damage to your computer”.
The Bad Pool Header Error occurs due to problems in Windows memory allocation and a few other reasons that are stated in this article.
If you are the one struggling with this pool header error in Windows and looking for solutions to fix it, then you are absolutely in the right place.
In this article, we will lead you to different methods on how to fix Bad Pool Header. You can go through them step by step to resolve Bad Pool Header in Windows with ease.
What Causes a Bad Pool Header Error?
There are several reasons due to which bad pool header error arises in Windows. Some of the common causes are mentioned below, have a look at them:
- Incompatible device driver
- Bad RAM or HDD/SSD
- Outdated Drivers
- Virus infection
- Corrupted or Damaged Windows system files
How to Fix BAD POOL HEADER ERROR?
In order to fix bad pool header error from your Windows system, try the below-stated methods one after another and overcome such error.
But before applying any of the methods first boot your Windows 10 into safe mode.
Method 1: Look For Windows Update
Sometimes bad pool header error can also appear if you have pending updates. To solve this issue update your Windows.
- Press on Windows icon
- You will find a list of icons hit on Settings
- Now you need to hit on Update and Security
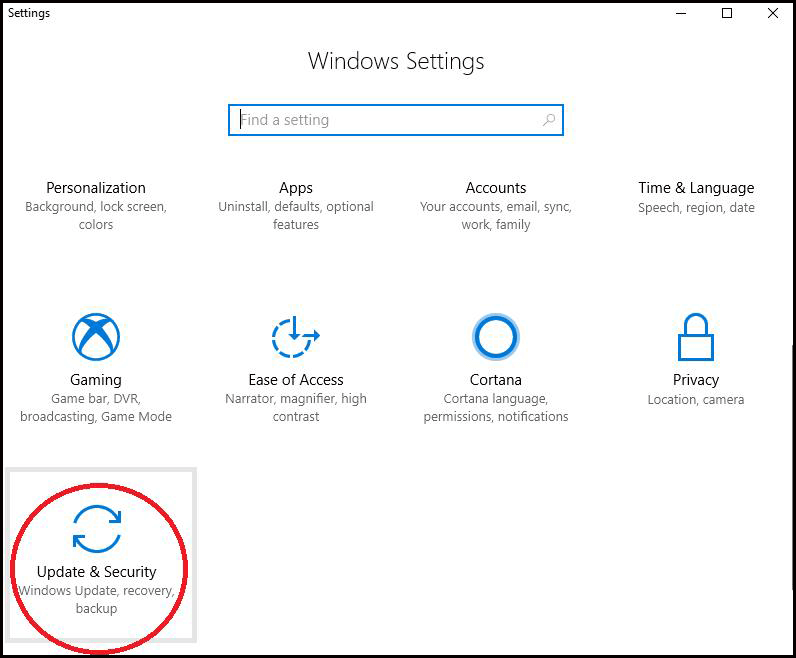
- Now move to Windows Update.
- Hit on Check for Updates. Now Windows will start “checking for updates…” Wait for few seconds till it finds any relevant updates.

- If your Windows system has any pending update then take further actions by hitting on Install Updates.
- Read and accept the appropriate terms and conditions and hit on it
After installing the update, restart your system and check whether the bad pool header windows 10 issue is solved or not.
Method 2: Go with the Compatible Antivirus tool
To fix the Bad Pool Header Error in the Windows system you have to turn off the protection by your third-party antivirus program. Sometimes the incompatible program causes this error in Windows.
- Turn off protection provided by your antivirus program.
- Windows 8.1 users can use Windows Defender to provide security to their Windows system. Windows 7 users can use Microsoft Security Essentials.
- So turn on either Windows Defender or Microsoft Security Essentials program.
You can also try Spyhunter to remove viruses from your computer if there is any and then turn on the antivirus protection to fix Windows Bad Pool Header.
Get Spyhunter to Remove Virus and Other Malicious Program.
Method 3: Test Your RAM
In order to test the system’s RAM issues you have to follow the below-given steps carefully:
- Click on the Start and then go to the search option. Then search for the Memory Diagnostics Tool.
- Right-click on the Memory Diagnostics Tool and Select Run as Administrator.
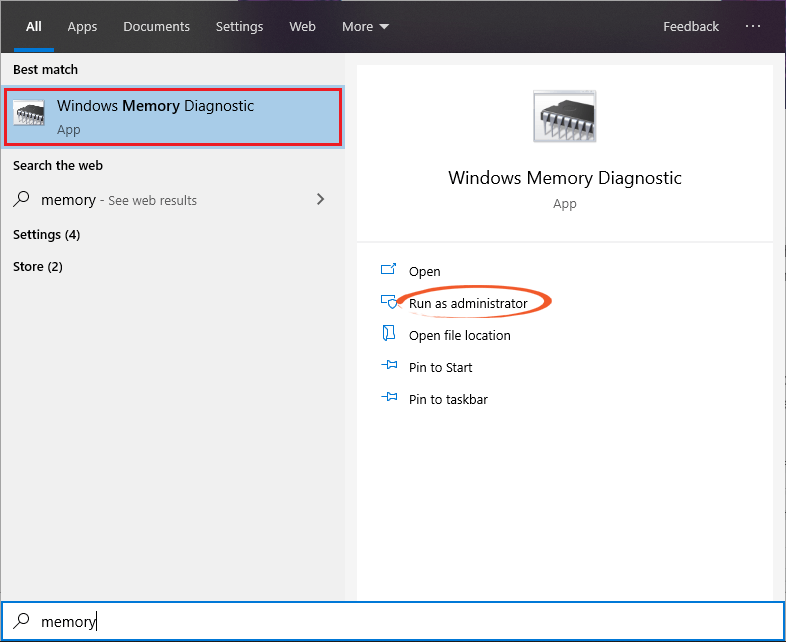
- Simply, follow the onscreen instructions to initiate the RAM diagnostic process.
Method 4: Turn off Fast Startup
- Open the run dialogue box by pressing the Windows logo key and R simultaneously. In the run dialogue box type Power Options and click on the OK.
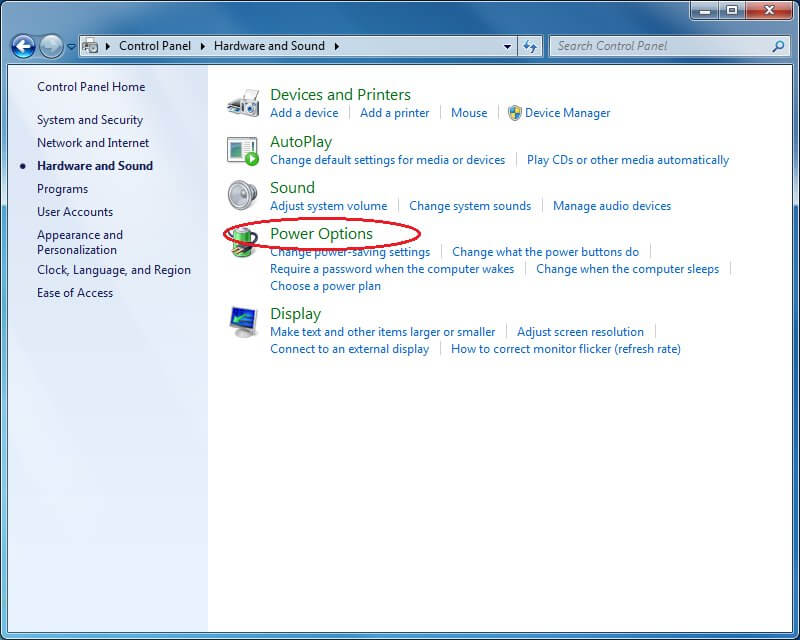
- Click on the Choose what the power button does
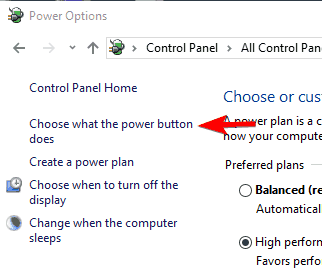
- Then again click Change settings that are currently unavailable

- Unmark the box present along with the Turn on fast startup (recommended), and then click on the Save changes
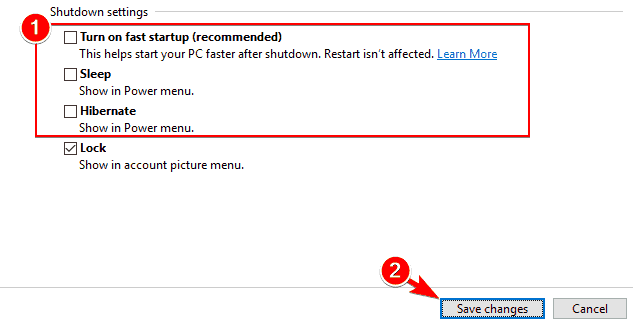
- Restart your PC and check for the error.
Method 5: Disable Indexing Service
In order to skip any corruption related to the indexing service, you need to disable indexing service altogether. Follow the given steps carefully:
- Open the Control Panel and navigate through the All Control Panel Items -> Administrative Tools -> Services.
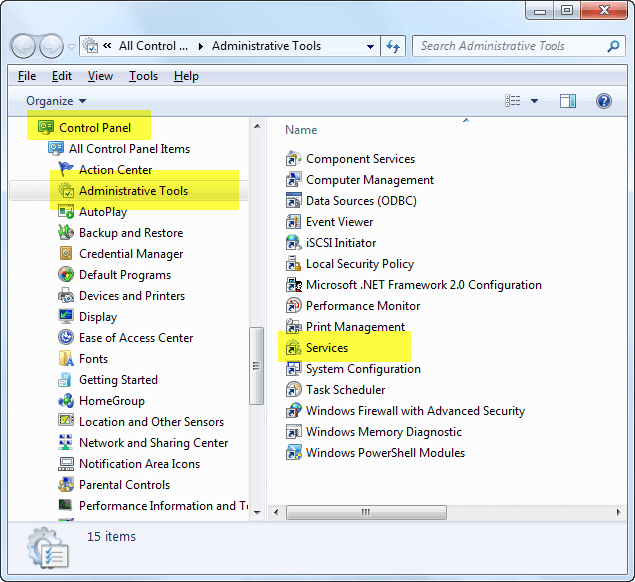
- Search for the Windows Service or Indexing Service from the list. Right-click on the Windows Search/Indexing Service, and then click on the Stop
- After it, select the Properties of Windows/Indexing Service and choose the Disabled as Startup type. Now you have to reboot your computer to save all the changes.
Method 6: Perform a Clean Boot
- First, you have to open the System Configuration dialog and then Disable startup programs that present under the General tab, here you have to uncheck the Load startup items.
- Disable all services by clicking on the Services tab-> Mark Hide all Microsoft service and at last click on the Disable All.
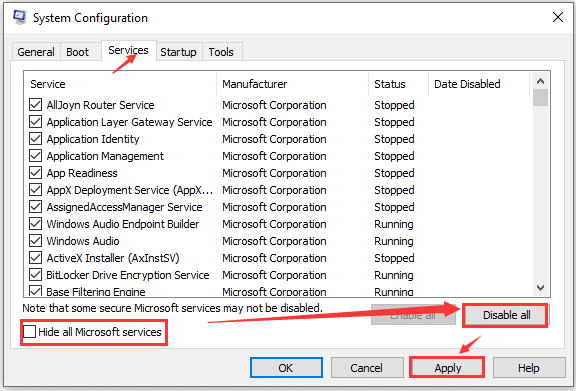
- Restart your system and check for the error.
Method 7: Update all the System Drivers
This is the third method to fix the Bad Pool Header Error in Windows.
- Ensure that all the drivers on your Windows systems are up to date. To perform this you can use Method 1.
- If you find any outdated driver on your system then try to update it.
- And, if you are receiving Bad Pool Header Error or Blue Screen Error after installing any particular driver on your system then the first thing you have to do is to uninstall it.
To update the driver try Driver Updater, it will automatically update the driver and fix all driver-related issues.
Get Driver Updater to Update Drivers Automatically.
Best & Easy Solution to Fix Bad Pool Header
Bad Pool Header Error was too rare in Windows 8 but it started increasing exponentially as users tried to install incompatible software in their PC.
If the above-given method fails to work or you are unable to perform them then try the PC Repair Tool. This is an advanced repair tool that will scan your system, detect the errors and fix them.
This tool not only fix errors such as DLL, registry, BSOD, game, update error, PC issue but also repair damaged, corrupted or inaccessible Windows system files and optimize the performance of your PC.
Get PC Repair Tool to Fix Bad Pool Header Error.
Conclusion
That’s all about Bad Pool Header Error.
I have tried my best in listing down the solutions that will help you to solve the bad pool header windows 10 error. Perform the above-mentioned manuals carefully one after another.
Even after applying the methods you are unable to solve the issue then try the easy solution provided above.
It is expected that you liked this article and it turns out to be helpful to you in solving your problems.
Hardeep has always been a Windows lover ever since she got her hands on her first Windows XP PC. She has always been enthusiastic about technological stuff, especially Artificial Intelligence (AI) computing. Before joining PC Error Fix, she worked as a freelancer and worked on numerous technical projects.