As a Windows 10 user, you must be aware of the Narrator feature. But if you don’t know the ways to disable and enable the Narrator on Windows 10 computer, then this article will ease your task. In this blog, I am going to demonstrate the different ways to turn the Narrator on/off.
Windows 10 is designed with an advanced feature called voice narrator that provides assistance to those who are visually impaired. Once you enable the Narrator in your Windows 10 computer, it will start reading all the keys pressed by you along with the text that is on the screen.
This advanced assistant feature of Windows 10 will also read the notifications and calendar appointments on your Windows computer. You can also use this feature in case the screen of your computer is not working.
Also, if you want to modify its settings like the narrator’s voice, the pitch of the voice, speed adjustment of the narration then you can easily alter all of these options according to your need.
Instead of its advanced feature, some users found it irritating. Because, sometimes it becomes very irritating and may also affect your privacy because whenever you turn on your PC, Windows Narrator starts reading menus, keystrokes, and other on-screen text.
So, it is your choice whether you want this feature enabled on your computer or you want to disable it. According to your preference, you can easily enable or disable the Narrator option using several tricks.
And, in this article, you are going to find all the different tricks one can use to activate or deactivate the Narrator on Windows 10 PC. So, try these tricks according to your need.
How to Turn On and Turn Off the Narrator in Windows 10?
Trick 1: Disable/Enable Narrator Using Narrator Properties
These are the steps to disable the Narrator in the Windows 10 computer:
- Click on the Windows Start button and type Narrator in the Search box. Select the Narrator from the results.

- Right-click on the Narrator and select Open file location.
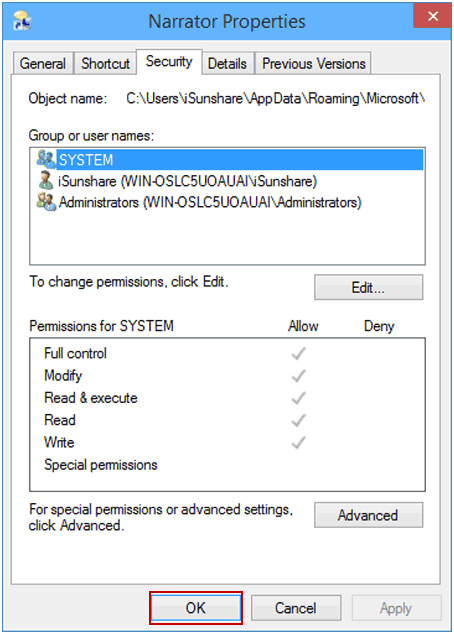
- Again right-click on the Narrator present in the next window, and select Properties.

- Navigate to the Security tab. Click on the Edit.

- Permissions for Narrator window will appear, choose the user for which you want to deny permission, check the box of the Read & execute and Read permission in Deny line, and click OK.

- A Windows Security dialogue box will appear, select Yes to continue.

- Select OK in the Narrator Properties window.
Below are the steps to enable the Narrator in the Windows 10 computer:
- Again open the Narrator Properties as given above.
- Navigate to the Security tab, and click on the Edit button.

- Select the user whose permissions for the Narrator are denied, deselect the permissions one by one, and then click on the OK button.

- Click on OK to save the changes.

Trick 2: Disable Narrator Shortcut Key via Registry Windows
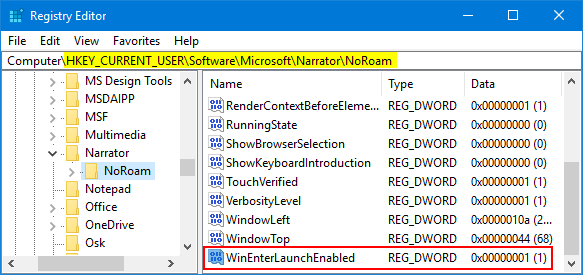
- Press Windows + R key to open the Run dialog box, then type Regedit in the Run box and click on the OK button to open the Registry Editor.
- In the Registry Editor window, you have to navigate to the below-given path:
HKEY_CURRENT_USER\SOFTWARE\Microsoft\Narrator\NoRoam
- Now, you have to double-click on the WinEnterLaunchEnabled value present in the right pane.
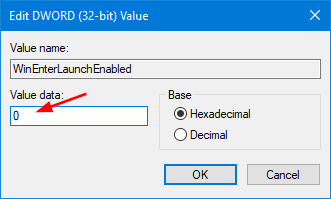
- When you see Edit DWORD (32-bit) Value dialog box, then type 0 in the Value data field and click on the OK.
- So, you have successfully turned off the Narrator shortcut key. Check it, by pressing the Windows + Enter or Windows + Ctrl + Enter shortcut; if it won’t start then you have successfully disabled the Windows Narrator.
Trick 3: Turn Narrator On or Off via Windows 10 Settings
- Go to the Windows Start button
- Click on the Settings icon
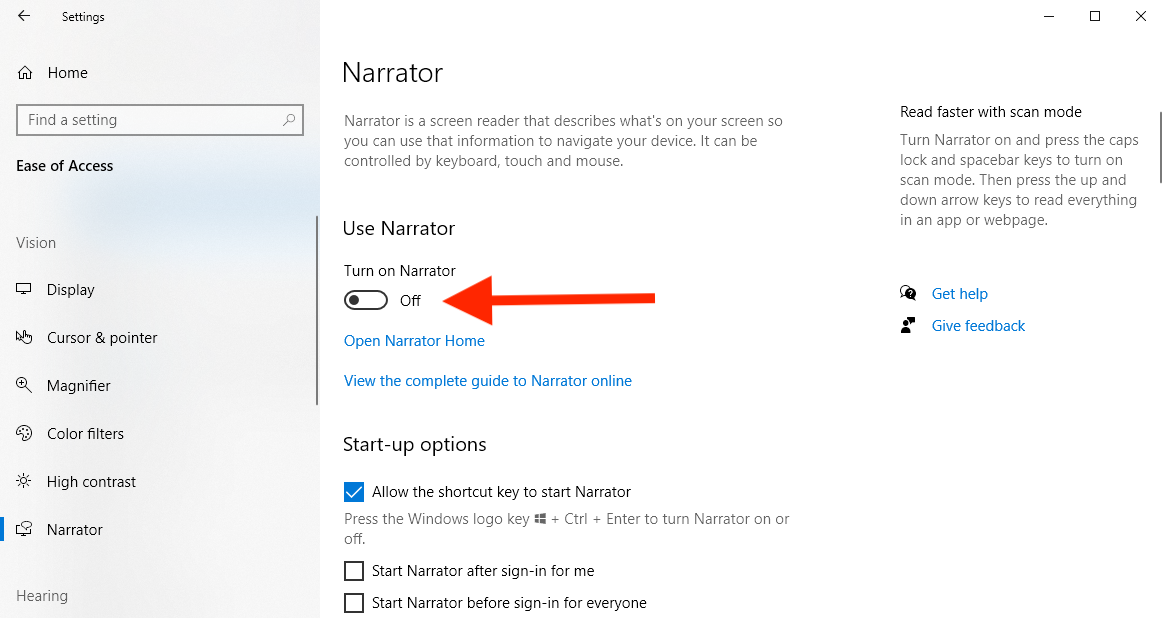
- In the Windows Settings, click on the Ease of Access.
- Now, select the Narrator from the left pane of the window.
- Go to the Use Narrator section and press the Turn on Narrator toggle button to turn on or turn off the Narrator on your computer.
Trick 4: Use Keyboard Shortcut to Turn Narrator On/Off
To turn-on the Narrator on Windows 10 computer, press the Windows + Ctrl + Enter key simultaneously. Now, the Narrator dialog box will pop-up, click on the OK button. Then, close the window.
Similarly, if you want to turn off the Narrator, press the Windows + Ctrl + Enter key together. This will automatically disable the Narrator.
Trick 5: Disable or Enable Narrator on Windows 10 Sign-in Screen
- While staring the Windows 10 computer, on the sign-in screen, click on the Ease of Access icon
- Now, toggle on/off to enable/disable the Narrator
Trick 6: Activate or Deactivate the Narrator in Control Panel
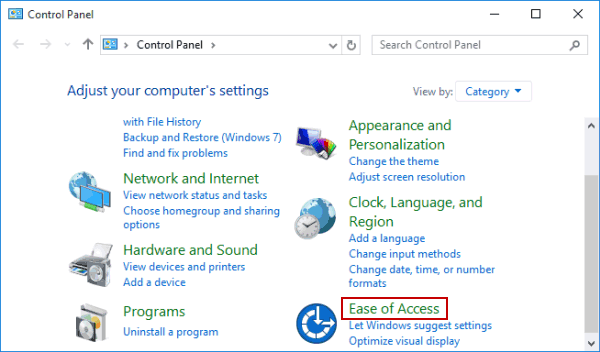
- Type Control Panel on the Windows Search box
- Click on the Control Panel from the result
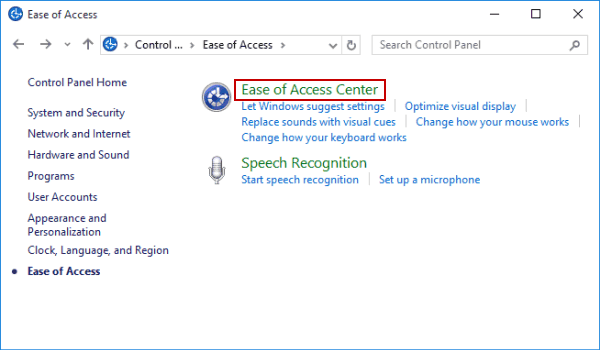
- In the Control Panel, click on the Ease of Access
- Next, click on the Ease of Access Center
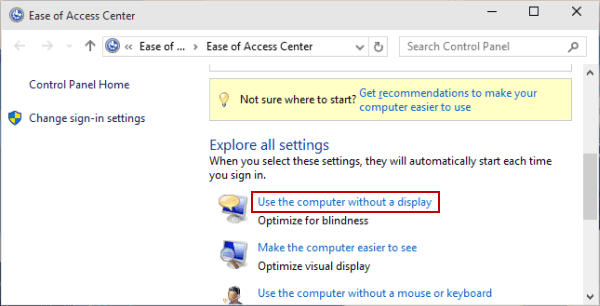
- Click on the Use the computer without a display option
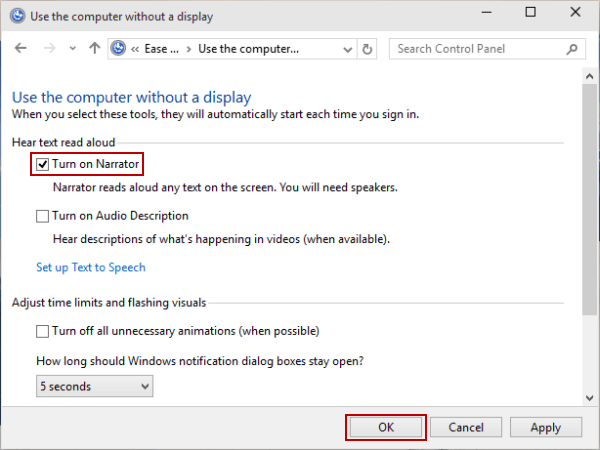
- Now, select the Turn on Narrator checkbox to enable the Narrator or if you want to disable it, then simply uncheck the box.
- Lastly, click on the OK button
FAQ: Know More About the Windows 10 Narrator
What is the Narrator in Windows 10?
Narrator is an in-built text to speech and screen reader feature of the Windows 10 OS. This tool reads and speaks all actions you take on Windows, such as text documents, web pages, and other files. The main motive behind developing this tool is to make visually impaired people able to operate a computer.
How does the Narrator work on Windows 10?
As the Narrator is a Windows 10 in-built app, hence there is nothing like you require to download from any source. If the Narrator is enabled on your computer, then it simply read out the actions you take and texts appear on the screen.
How to make Windows 10 Narrator read text?
If you want Narrator to read the text, then first enable the Narrator (you can try out any of the trick mentioned in this article to turn it on) and then simply move your cursor and select the text which you want Narrator to speak out.
The Bottom Line
So, this is all about the different ways to disable and enable the Windows 10 Narrator feature. Just follow the steps and turn on or off the Narrator as per your choice.
Apart from this, if you are experiencing any kind of error or performance issue on your computer, then you should scan your PC with PC Repair Tool. This tool is able to deal with performance-related issues as well as fix different Windows errors and issues.
Now, its your turn to let us know which the trick helped you and how much you like this blog. You can connect with us on our Facebook or Twitter page to share your reviews and other PC related issues.
Hardeep has always been a Windows lover ever since she got her hands on her first Windows XP PC. She has always been enthusiastic about technological stuff, especially Artificial Intelligence (AI) computing. Before joining PC Error Fix, she worked as a freelancer and worked on numerous technical projects.

