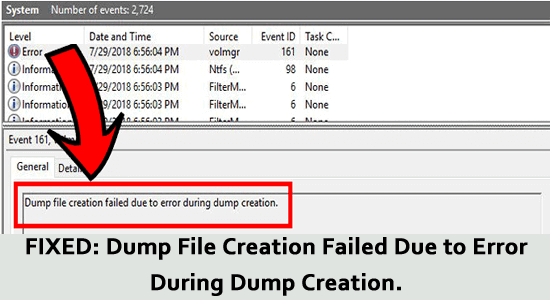
In some instances, upon checking the Event Viewer, you may see an error message Dump file creation failed due to an error during dump creation.
Commonly, when the blue screen of death error appears on the Windows PC, the users are advised to check the created dump file and show what is causing the problem.
But for many users, upon checking for the event viewer, they see the dumb file was not created, and the error message on their screen failed to create the dump file.
Although this problem is not exclusive to Windows 10 PC, this guide will cover all the troubleshooting methods that suit all operating systems.
To repair corrupted Windows system files, we recommend Advanced System Repair:
This software is your one stop solution to fix Windows errors, protect you from malware, clean junks and optimize your PC for maximum performance in 3 easy steps:
- Download Advanaced System Repair rated Excellent on Trustpilot.
- Click Install & Scan Now to install & scan issues causing the PC problems.
- Next, click on Click Here to Fix All Issues Now to fix, clean, protect and optimize your PC effectively.
What Do you Mean by Dump File Creation Failed Error?
Dump File Creation Failed Error means a dump file creation is failed due to an error in dump creation that could be caused due to an outdated and unstable BIOS version.
What Causes Dump File Creation Failed Due to Error during Dump Creation?
We have looked into various user reports and repair strategies used to fix failed to create dump file error messages. As it turns out, this issue can be caused due to a number of factors, as listed below.
- Third-party cleanup apps: If you are using a third-party app to clean your computer, this app may delete your dump file storage, so you are getting the discussed error.
- Corrupt system files: There are a few corrupt files, folders, or components on your PC that spoils the dump dependencies so the files can no longer be used.
- Corrupt disk: The storage driver may also be corrupt and prevent your system from creating a dump file when your PC faces BSOD.
- Outdated BIOS: Your BIOS has not been updated for a while and thus, you are facing this issue.
- RAM issues: Sometimes, dump files may be written to RAM, which can trigger the discussed problem when the RAM is not configured properly.
- Windows Error Reporting Service issue: A few essential Windows services, like the Windows Error Reporting Service, is turned off intentionally or automatically on your device. Thus, it prevents the creation of a dump file.
- Problematic drivers: The drivers in your device are corrupt, outdated, or damaged and thus interfere with the normal system processes.
- Misconfigured Windows: Sometimes, your Windows PC may be corrupt or incompatible entirely, leading to a problem that can only be resolved when you reinstall a fresh copy of Windows.
How to Fix the “Dump File Creation Failed due to Error during Dump Creation” Error?
This section summarizes a list of all troubleshooting methods that fix the dump creation error. You can follow the steps in the same order until the issue gets resolved.
Solution 1: Perform DISM and SFC Scan
This issue is mostly reported on Windows PCs with some system file corruption issues. If this applies to your case, you must resolve every logic or corruption bug that prevents your PC from creating a dump file. Two system-inbuilt utilities, System File Checker and Deployment Image Servicing and Management help you to minimize the system file corruption.
The DISM tool downloads the healthy copies of any corrupt files and replaces the broken copies. Meanwhile, the SFC tool uses the locally cached archives to do the same task. Try running both utilities simultaneously, as instructed below, to repair corrupted Windows system files.
- Go to the search menu and type cmd on it.
- Next, tap on the Run as administrator option to open it with admin rights.
- Then, type the following command in the command window and press the Enter key on the keyboard.
sfc /scannow
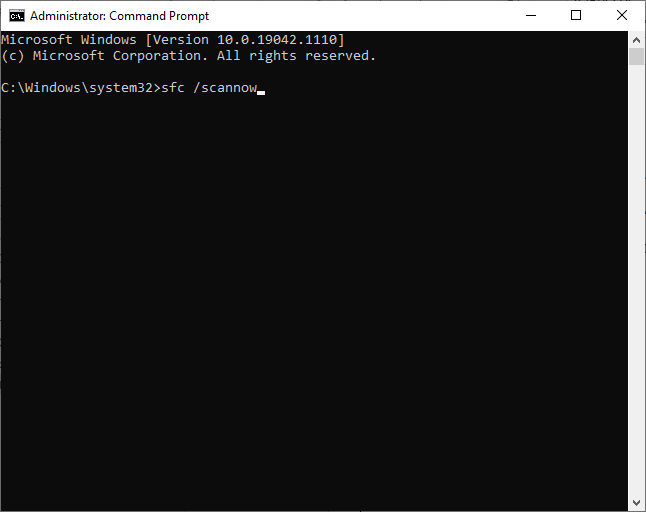
- Ensure that you get Verification 100 % completed message and once you receive this message, check if the dump file creation error is resolved now.
- Still, if you face the problem, reboot your computer, open the command prompt as an admin again, and execute the following commands.
dism.exe /Online /cleanup-image /scanhealth
dism.exe /Online /cleanup-image /startcomponentcleanup
dism.exe /Online /cleanup-image /restorehealth
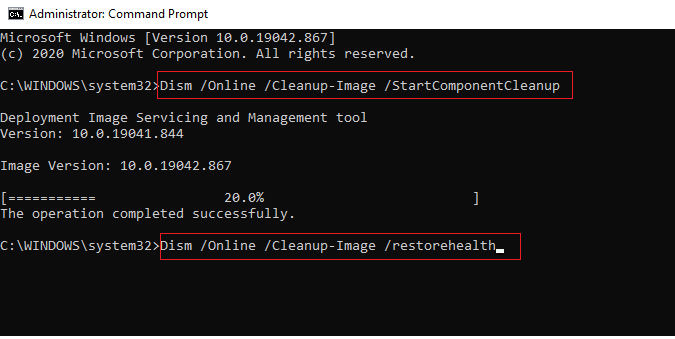
- Wait until the listed commands are executed, and re-do the SFC scan to ensure you do not face the dump file creation error again.
Solution 2: Check Windows Error Reporting Service is Set to Manual
Windows Error Reporting (WER) service is essential to be enabled on your device to gather any information about the software and hardware issues (like application faults, kernel faults, unresponsive applications, and other application-specific problems) that your Windows cannot identify. This service also provides suitable solutions or updates to troubleshoot the problem.
Check if this service is enabled on your PC to fix the dump file creation error.
- Hit the Windows key and type Services.
- Now, click on the Run as administrator.
- Next, scroll down to the entire list and double-click on the Windows Error Reporting service.
- Then, tap on the Startup type and fix it to Manual from the drop-down list.
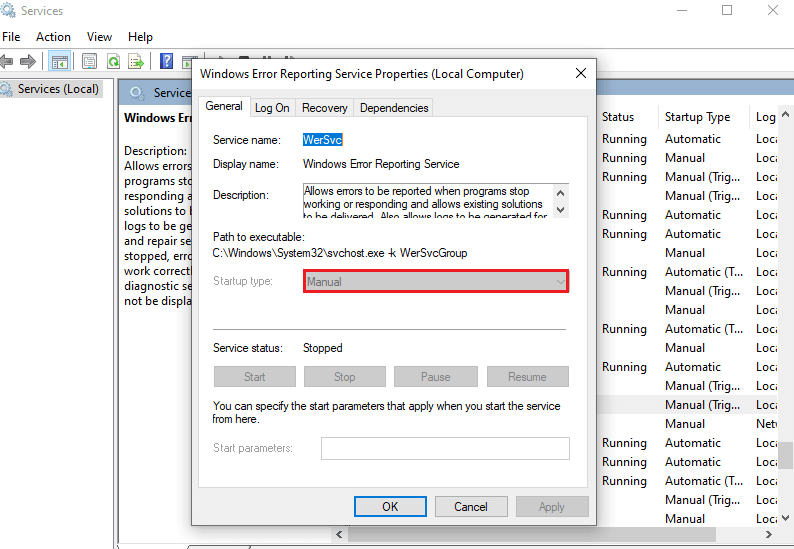
- Check if the Service status is stopped; if so, then tap on the Start
- If you find the Service status is Running, tap on Stop, wait for a few seconds, and then tap the Start button again.
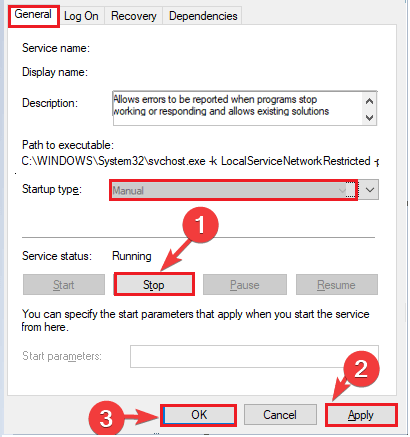
- Save the changes by tapping on Apply and then OK.
Restart your PC, and now the dump file will be created on your computer without any errors.
Solution 3: Disable the Automatic Restart Option
If you have enabled the automatic restart option on your PC, it may prevent the creation of a dump file due to a misconfiguration issue that occurs when your computer automatically reboots. Follow the below instructions to disable the automatic restart option on your PC.
- Press the Windows key, and type View advanced system settings. Then, click on Open.
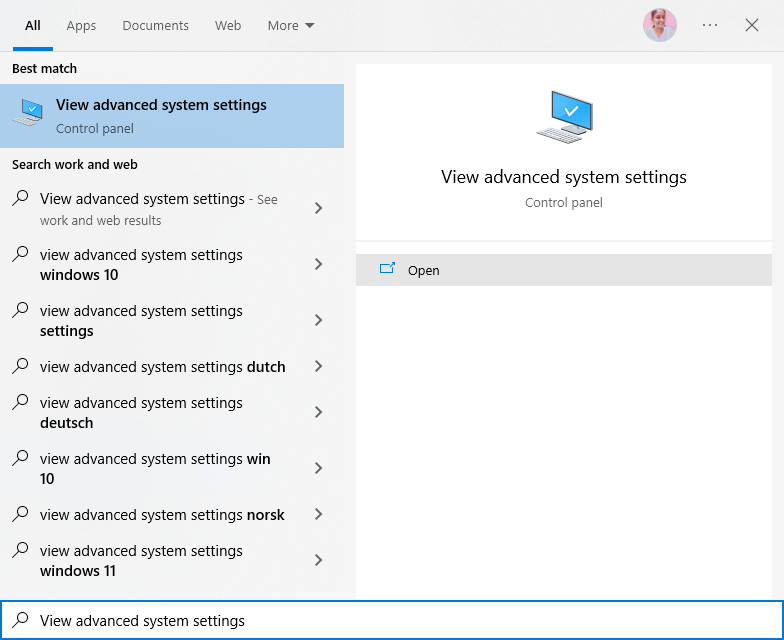
- Now, switch to the Advanced tab, and click on the Settings button under the Startup and Recovery menu.

- In the Startup and Recovery window, deselect the Automatically restart box under the System failure menu as shown.
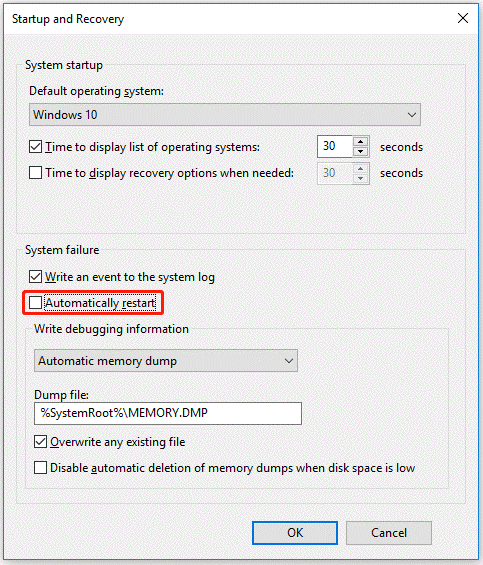
- Press the OK button to save your changes and reboot your computer.
Solution 4: Change Debug Settings
Your PC will have a set of preset configurations that will instruct it to perform certain actions when it encounters a crash. When these set of preset configurations are set up in a way that prevents creating a dump file, you may face the dump file creation failed error. Follow the below instructions to change these settings on your PC to fix the problem.
- As you did earlier, go to the View advanced system settings window and switch to Advanced.
- Tap on the Settings button under the Startup and Recovery menu.

- In the Startup and Recovery window, select the Complete memory dump option under the Write debugging information menu.
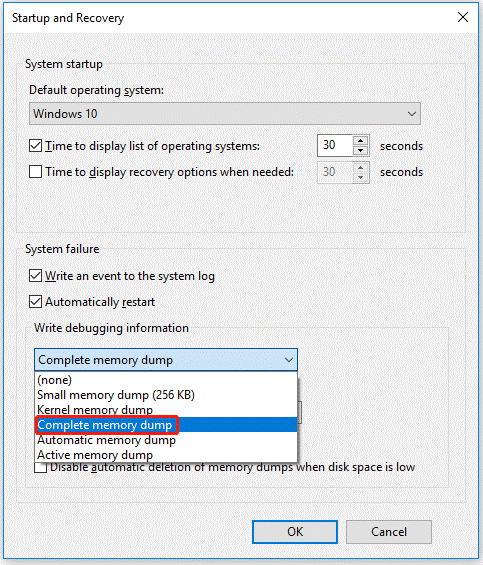
- Finally, click on OK to save the changes. Restart your PC and check if this helps you fix the dump file creation error.
Also Read: How to View Windows 10 Crash Logs, Error, Event & BSOD Logs?
Solution 5: Reinstall Problematic Drivers
Incompatible drivers on your computer will disturb the normal system processes, including dump file creation, when your PC encounters a crash. In this case, you have to reinstall every single problematic driver on your system as instructed below.
- Press the Windows + S keys and type Device Manager. Tap on Open to launch it.
- In the Device Manager window, open the View.
- Then, tap the Show hidden devices option from the list.
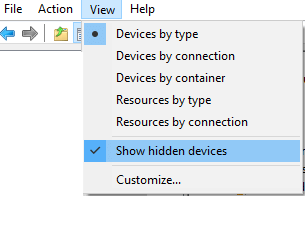
- Check for any device drivers that have a yellow triangle in front of it with an exclamation mark inside the driver.
- Right-click on that driver (display adapters are taken as an example here) and press the Uninstall device
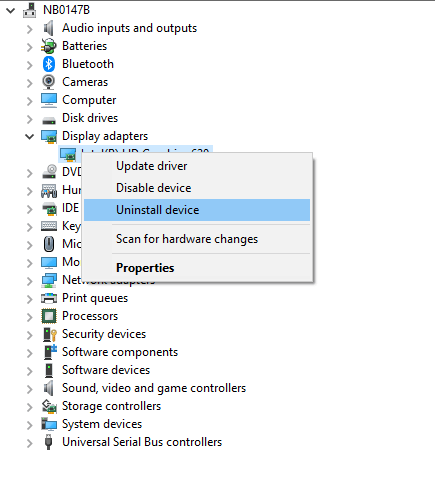
- Proceed with the upcoming prompts and uninstall the problematic drivers.
- Launch a new tab on the browser and open the driver’s manufacturer’s website.
- Check your Windows version and install the drivers concerning them.
- Wait until the drivers are downloaded, go to My downloads, and double-click on the .exe files to run them.
- Allow the drivers to be installed on your PC and reboot your computer.
In addition, Driver Updater can be used to update or reinstall the device drivers automatically. This tool selects which driver is suitable for your computer, scans it, and installs it on your PC.
Get Driver Updater to update system drivers automatically
Solution 6: Check the Page File Settings
You must ensure that the page file in your system is located in the same drive as your operating system and enable a setting on your PC that allows Windows to automatically allocate the paging file size on the drive.
- Again, go to the View advanced system settings window and switch to the Advanced.
- Tap on the Settings button under the Performance menu.
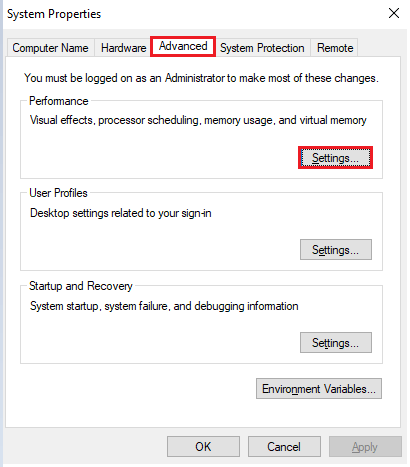
- Next, switch to the Advanced tab in the Performance Options window and press the Change button under Virtual memory.

- In the Virtual Memory window, choose your system drive (usually C: drive) and choose System managed size.
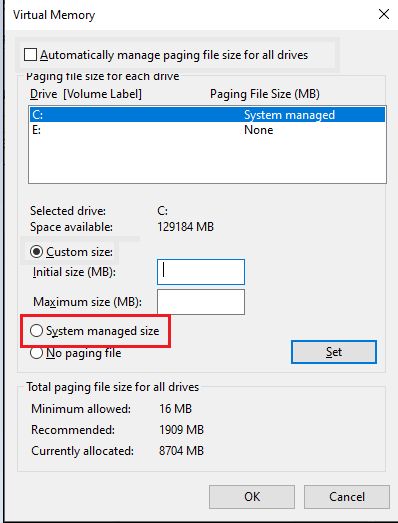
- Then, press the Set button and click the OK button to save the changes.
- Restart your computer for any changes to take effect.
Solution 7: Tweak the Registry Keys
Sometimes, dump file creation failed due to an error in dump creation error can be fixed by tweaking a few registry settings as instructed below.
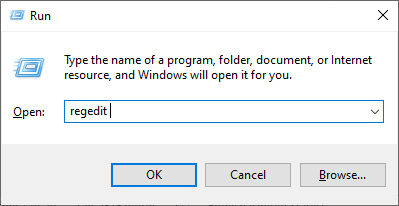
- Launch the Run dialog box by pressing the Windows + R keys
- Next, type regedit and click on OK.
- Now, navigate to the following location in the registry editor.
Computer\HKEY_LOCAL_MACHINE\SYSTEM\CurrentControlSet\Control\CrashControl
- Now, right-click on the space on the right screen and click on New > Key.
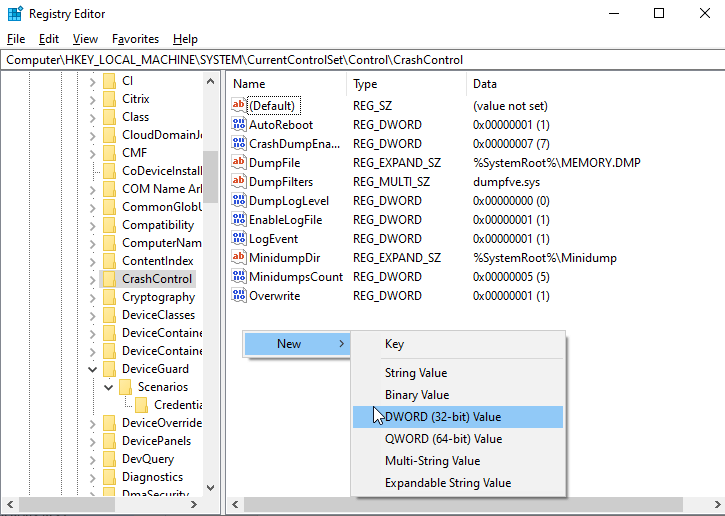
- Name the key as DisplayParameters.
- Right-click on this DWORD (32-bit) value string key and fix the Value data as 1.
Note: The default value will be 1; changing it to 0 will disable the key.
- Press the OK button and close all the windows.
- Reboot your computer.
Solution 8: Run the Memory Diagnostics tool and Change the RAM if necessary
The memory diagnostics tool helps you to identify if there are issues with the physical memory. So, if there are any RAM issues contributing to the dump file creation error, you can use this tool on your computer, and clean/replace the RAM if necessary.
- Press the Windows + R keys simultaneously to open the Run dialog box.
- Now, type mdsched.exe in the run command box and hit Enter.
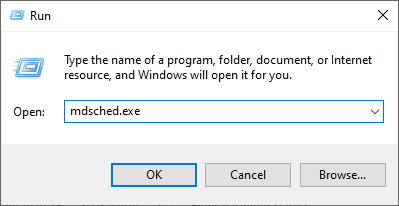
- In the next window, click on Restart now and allow your PC to check for any problems.
- If any issues are associated with your RAM, you must troubleshoot it in the following ways.
- Before you go for a replacement, open your CPU, find RAM and clean any dust or foreign objects in the RAM slot. This speeds up your BIOS and clears any glitches meanwhile.
- If you find any external damage in RAM, consider seeking a professional repair center or replacing it if possible.
Solution 9: Update BIOS
An outdated and unstable BIOS version will cause the discussed error on your device. Therefore, try updating the BIOS to resolve the problem. The exact steps to update BIOS can vary according to your configuration. Yet, you can follow the below-listed instructions regardless of your manufacturer.
Step 1: Find your BIOS version.
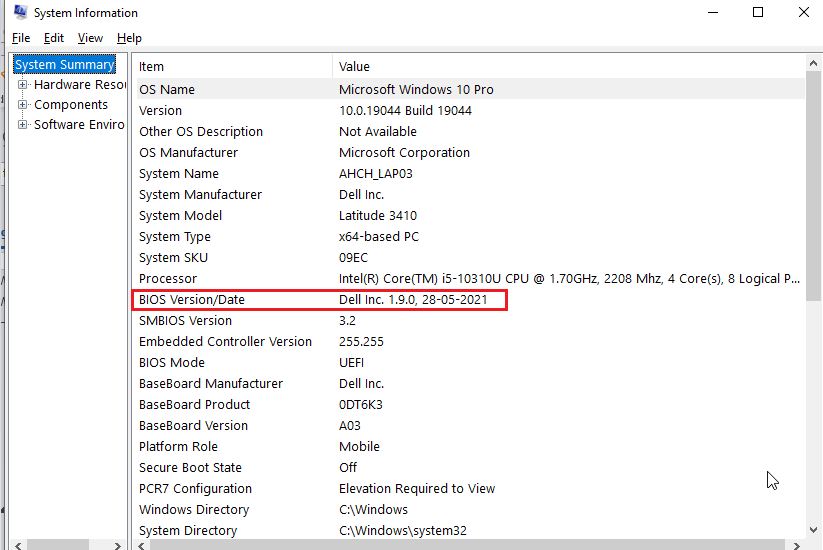
- Press the Windows + R keys together and type msinfo32.
- Now, click on OK.
- In the System Information window, you can see your BIOS Version/Date info on the right screen as shown.
Step 2: Proceed to update your BIOS.
- Now you know the BIOS version of your PC, you can easily update the BIOS by searching for the latest version by surfing the internet.
Note: Before updating your BIOS, ensure that your computer is connected to a power source (i.e., AC adapter). This is advised because if your PC turns off in the middle of the process, the BIOS settings will corrupt, and you cannot use your Windows again.
- Go to your browser and navigate to your PC or laptop support assistance like https://support.hp.com/.

- Tap on the Software and Drivers menu.

- Choose your device that needs a BIOS update. Click on the device for which you want to update the BIOS.
- Now, note down the serial number of your device (if you do not know it, type wmic bios get serialnumber in the cmd window, and hit Enter)
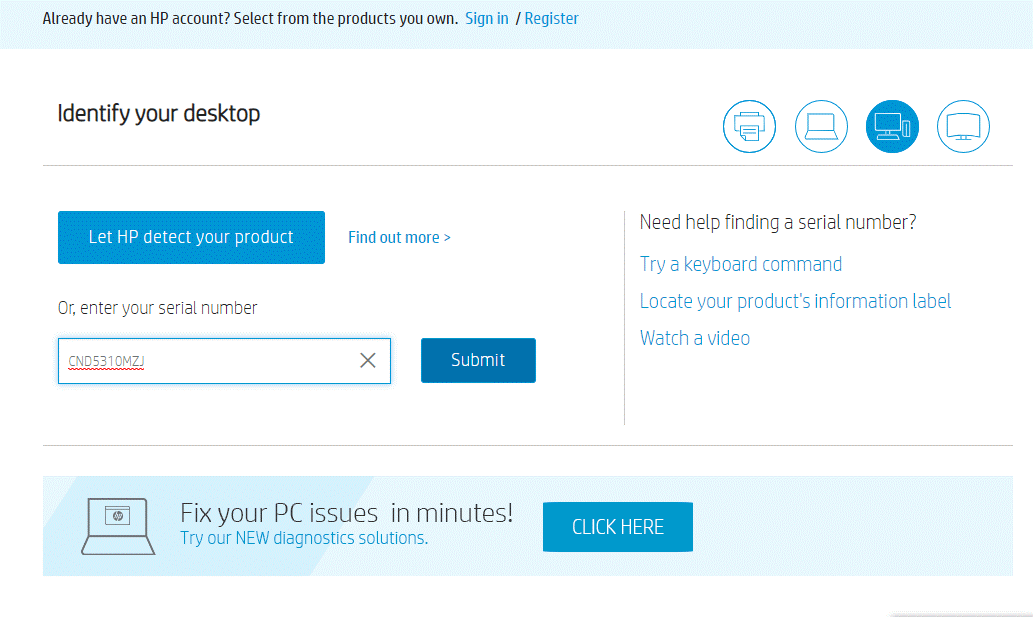
- Then, type the serial number in the required box in your browser screen as shown and press the Submit.
- If there is more than one device associated with your same serial number, you must enter the Product Number of your device(on the computer’s label).
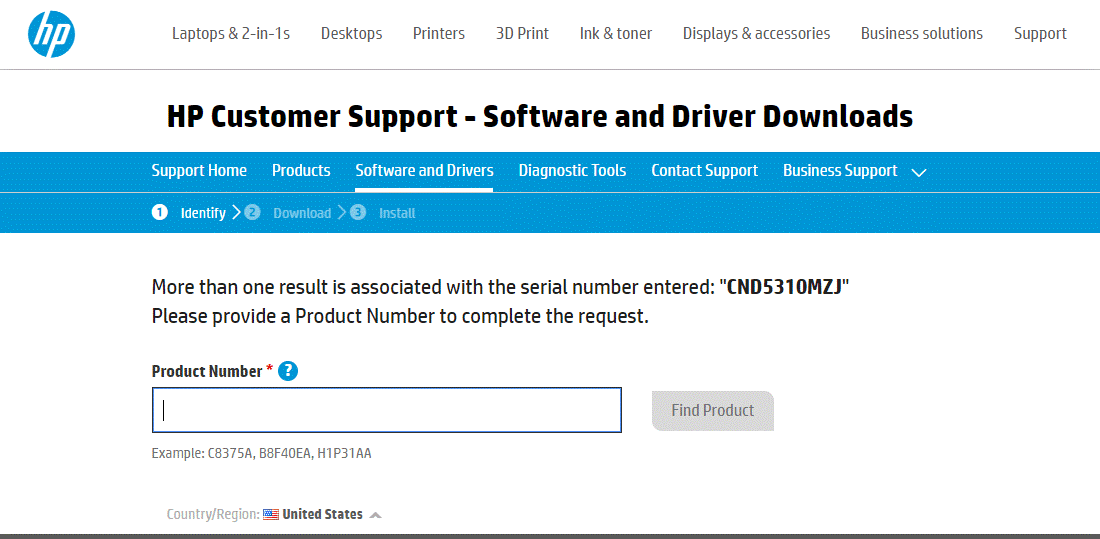
- Now, press the Find Product button.

- Scroll down the list and click on BIOS.

- Now, check the latest version of your BIOS (if available) and click on the Download button.
Note: If your BIOS is already updated to its latest version, do not download the same version of BIOS again.
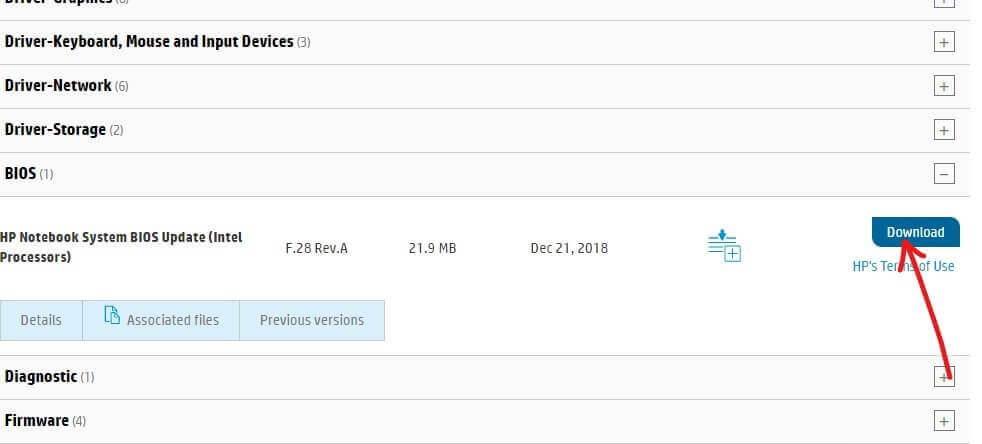
- Then, save your file once it is downloaded and double-click on this file.
- Press the Next button to continue.
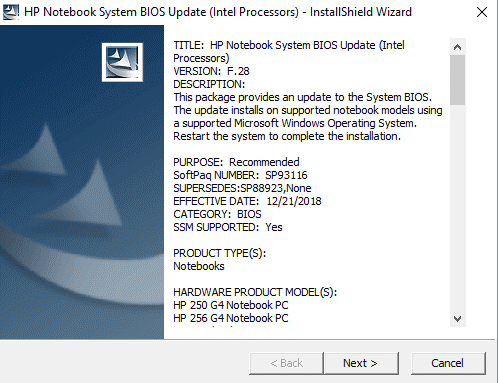
- To begin the BIOS update, press the Next button again.
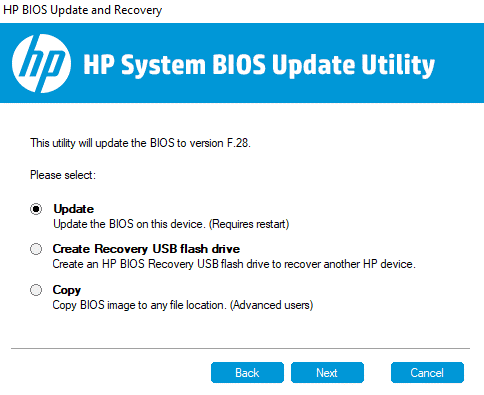
- On the next screen, click on the Update radio button and press the Next button.
- Plug in your PC to AC power, or ignore this window (if you have already plugged it in) by pressing the Next button.
- Press the Restart Now button to finish the update.
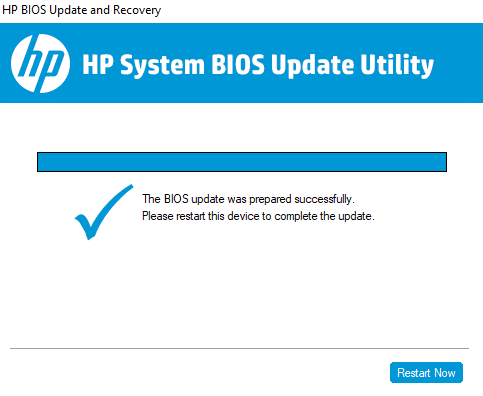
- Wait until the process is complete, and once the PC restarts, your BIOS will be up to date.
Solution 10: Use System Restore
If all the above-listed solutions fail to fix failed to create dump file error, try restoring your PC to the previous working point where you did not face any error. To perform the task, here are the notable steps,
Note: Firstly, boot your computer to safe mode before beginning a system restore process. In some instances, you cannot perform a system restore function normally due to faulty errors and drivers. Therefore, we advise you to boot your PC to safe mode and restore it as instructed below.
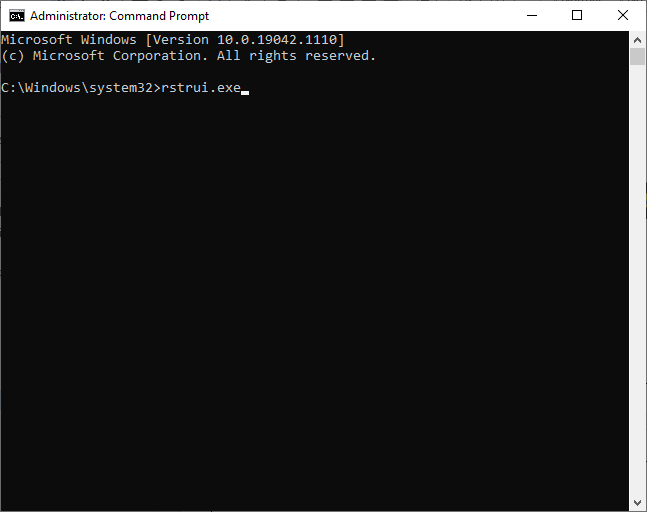
- Now, open the command prompt window with admin rights.
- Then, enter the following command and press the Enter
rstrui.exe
- Tap on the Next button in the System Restore window as shown.
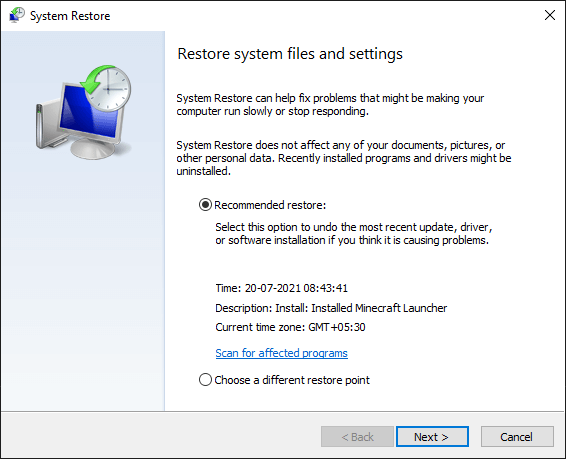
- Finally, choose any restore point and then tap on the Finish
Solution 11: Reinstall Windows
Sometimes, even bootstrap data can be corrupt or damaged, causing trouble. The simplest way to fix this problem is to reinstall your Windows. This will delete the hard drive and apply a fresh copy of the operating system; meanwhile, all the glitches in the existing setup will be sorted out.
- Launch Windows 10 settings by pressing the Windows + I keys
- Click on the Recovery > Get started option under Reset this PC as shown.

- This will allow you to keep your current files or delete them completely. Choose either of them according to your requirements.
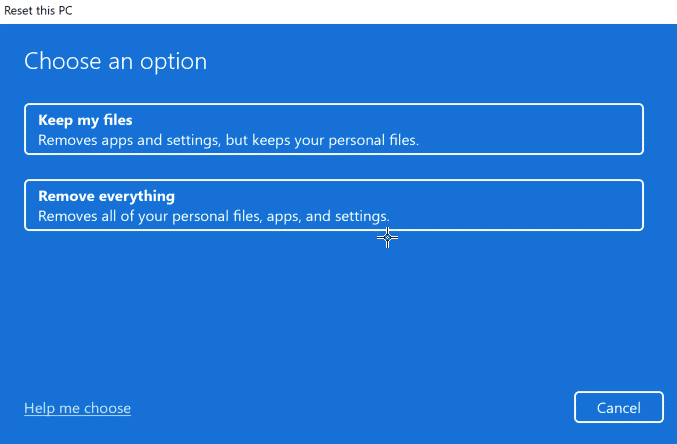
- Confirm your choices in the next window and follow the on-screen instructions.
- Finally, click on Reset to begin the reinstall process.
- Once the PC restarts, you will now have a clean Windows installation that will not throw you any errors.
Frequently Asked Questions
1: What is a dump file?
A dump file is just a snapshot of an application at any instance when the dump is taken. This file what modules are loaded and executed in addition to the application’s memory.
2: Where is dump file located?
The dump file is located in C:WindowsMinidumpMinidump.dmp
3: How to Read a DMP File?
You can read a dmp file by following this easiest way.
- Go to the Microsoft Store app and install Windbg on your PC.
- Then, open the installed file on your PC.
- Now, move to the File Tab.
- Then, press the Start debugging tab on the left screen.
- Click on the Open dump file option on the right screen.
- Browse the dump file and open it.
- Now, type !analyse -v command in the command box and press the Enter key.
- Wait until the analysis is completed. Now, the analysis results will be in the readable format displayed on the screen.
Recommended Solution- Fix Various PC Issues & Errors
If your Windows PC/laptop system is running slow or showing various issues and errors, then scan your system with the PC Repair Tool. This is a powerful repair tool that, just by scanning once, detects and fixes various Windows issues and errors.
The tool fixes common PC errors like system file corruption and protects from file loss, malware, hardware failure, BSOD error, and more.
Well, this not only fixes errors but also enhances Windows PC performance.
Get PC Repair Tool to Fix Various PC Issues and Errors
Conclusion
In this guide, I have covered all possible solutions to fix the dump file creation failed due to error during dump creation on your Windows 10 and 11 PC.
Here I tried my best to list down the potential fixes that worked for users to get past the error in Windows. So, try the fixes given one by one till you find the one that works for you.
If there is anything I missed out, or you have any suggestions or queries, then feel free to share with us on our social media handles – Facebook and Twitter page.
Good Luck!!!
Hardeep has always been a Windows lover ever since she got her hands on her first Windows XP PC. She has always been enthusiastic about technological stuff, especially Artificial Intelligence (AI) computing. Before joining PC Error Fix, she worked as a freelancer and worked on numerous technical projects.