
Dxwsetup.exe – Bad Image is a common error message encountered by the users while trying to run any program or game that uses DirectX. The problem is commonly seen while running the downloaded game it end up showing the error message on the screen:
DXSETUP.exe – Bad Image
C:\Windows\System32\XAudio2_7.dll is either not designed to run on Windows or it contains an error. Try installing the program again using the original installation media or contact your system administrator or the software vendor for support Error status 0xc000012f
Originally posted in Microsoft Community
However, for some users downloading and installing the DirectX runtime on their Windows computer worked to solve the error. But for some, they are can’t install DirectX and still see the error.
Well, there are a variety of reasons that might be responsible for the Bad Image Error status 0xc000012f.
So, here this article has outlined the possible fixes that may work for you to solve the error on your Windows 10 system. But before heading towards the fixes it is important to have a look at some of the common culprits why see the error.
What Causes Windows 10: Dxwsetup.exe – Bad Image Error?
When Windows software doesn’t run properly, dxwesetup.exe – Bad Image error occurs. The cause for this could be the corrupted program’s files or libraries, or the interrupted operation. However there are many others, below have a look at some of the common ones:
- DLL mismatch
- Corrupted supporting modules
- Excessive system cleaning
- Deletion of critical program files
- Virus or malware infection
- Lack of the required Microsoft Visual C++ Redistributables files
- Misconfigured system settings
- Corrupted registry entries
- Corrupted game file
So, these are the common causes, now follow the solutions listed below that will assist you in resolving this issue.
Note: Before starting to fix the Windows Bad Image error, make sure to back up your files.
How Do I Fix Dxwsetup.exe – Bad Image Error?
Solution 1 – Run SFC Scan
It is well known that 0xc000012f – Bad Image error status is generally caused by a damaged system file. You may use the System File Checker (SFC) to run a thorough check of file integrity.
Thereafter it can automatically repair all your corrupt system files.
Follow the steps given to do so:
- Open “Command Prompt (Admin)” by pressing Windows + X simultaneously
- Type the following in the Command Prompt and hit Enter after each
-
- sfc /scannow
- sfc /scannow /offbootdir=c:\ /offwindir=c:\windows
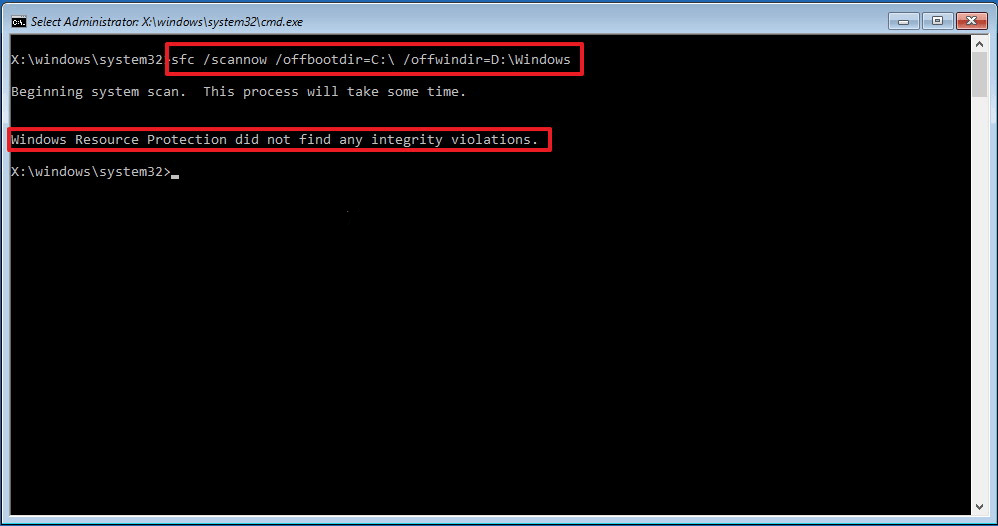
- Press Enter
The system file checker will start and all your corrupt system files will get repaired. Restart your system to check whether the bug has been resolved.
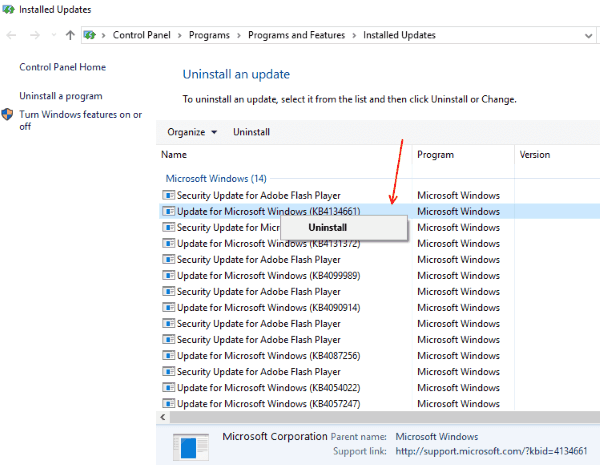
Solution 2 – Uninstall Windows Update
If the error occurred after the installation of a particular Windows Update, try uninstalling the update.
Follow the steps to do so:
- Open Control Panel from the search box
- Click “Programs and features“

- Then click “View installed updates” on the left panel
- Click “Uninstall” on the Windows update version and restart your computer
Note: This could be a repetitive process. To make sure that the defective update is not reinstalled later follow the below steps:
- Launch Windows Update
- Click on Check for updates

- Windows will display a list of all available updates for your system
- Locate the defective update
- Right-click on the defective update
- And click on Hide update
This will prevent Windows Update from reinstalling the erroneous update the next time it checks for updates. But if you still see the error then head to the next potential fix
Solution 3 – Check for New Updates
Microsoft frequently releases small and big updates and patches that fix various errors. It is important to keep a check on the new updates.
Follow the steps given to do so:
- Click Windows button
- Type “Update settings” in the search bar
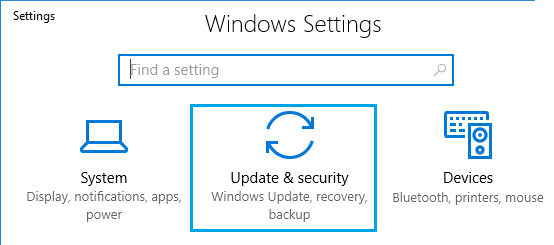
- Under Update & Security, click on Windows update
- Click “Check for updates”
This will initiate an update request to the Microsoft servers, and you will be notified of any new updates available.
Solution 4 – Reinstall the Program
There is a possibility that the program/game you installed is outdated or some of the files gets corrupted. Simply, uninstall and then reinstall it.
Follow the instructions given:
- Hit the Windows start button
- Click Control Panel
- Go to Programs & Features
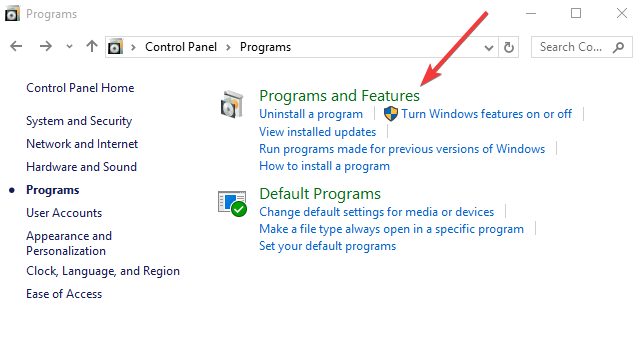
- Locate the particular program and right-click on it and then uninstall the program that is causing the error
- Run the program’s setup again to reinstall it
Hope this works for you but if not the head to the next fix.
Solution 5 – Try Running the DirectX Diagnostics Tool
Here you need to try running the DirectX Diagnostics Tool as this may work for you to solve the DirectX error. Follow the steps given to do so:
- Press Windows key + R on your keyboard.
- And in the run box > type dxdiag and hit Enter
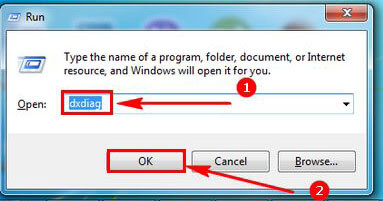
- Now click the Yes button, as you see the prompt if you need to check all the drivers are signed digitally.
- Next, verify if you face any problem with the display or sound tab.
Solution 6 – Install the Visual C++ Redistributable for Visual Studio
Installing the newest version of Microsoft’s Visual Studio Redistributable worked for many users to solve the Dxwsetup.exe – Bad Image error on Windows 10.
So it is suggested to try installing it, follow the steps given to do so:
- Visit the Microsoft official website
- Choose the correct program version (Eg. 32-bit for 32-bit Windows users, or 64-bit for 64-bit users)
- Open the installation file
- Follow the on-screen prompts
Check after the installation to see if the error persists.
Solution 7 – Perform a Clean Boot
A clean boot can help determine the reason for the error code. The issue usually arises from a third-party app or launch process running in the background.
- Click the Start button and type MSConfig in the search bar
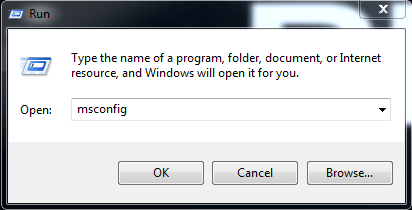
- Then select System Configuration, open the “Services tab”
- Click the check at the checkbox “Hide all Microsoft services”
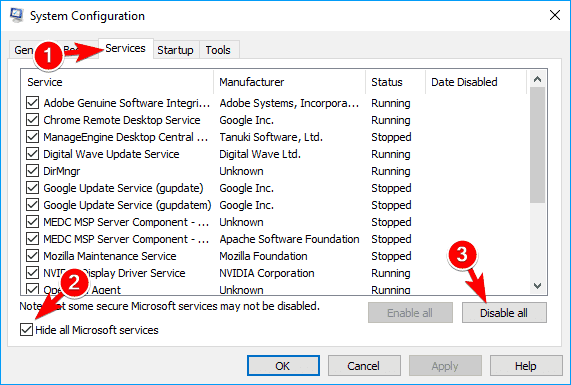
- Click the “Disable all” button
- Now open Task Manager by pressing Ctrl + Shift + Esc keys
- Right-click on all startup items and click Disable
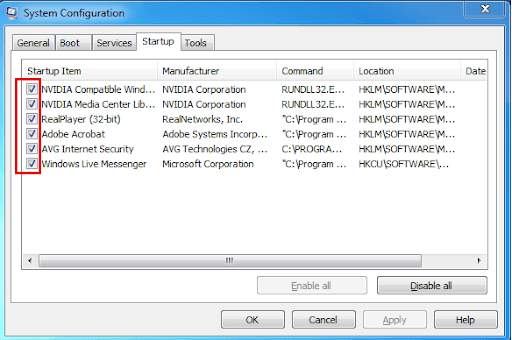
- Lastly close Task Manager
Disabling and re-enabling start-up processes one by one can assist locate the error and thereafter correcting it instantly. But if this won’t help you then solve Bad Image Error on Windows 10 by running the automatic repair.
Solution 8 – Run Automatic Repair
Here it is suggested to run the automatic repair that is already installed in your system under Advanced options.
Here follow the steps to run it:
- Boot your Windows and as you see the blue screen press the Power button again shutdown and repeat this.
- You will see Windows Recovery Environment (Windows RE) screen
- Go to Repair your computer option

- Hit the “Troubleshoot” button
- Click on the “Advanced” options
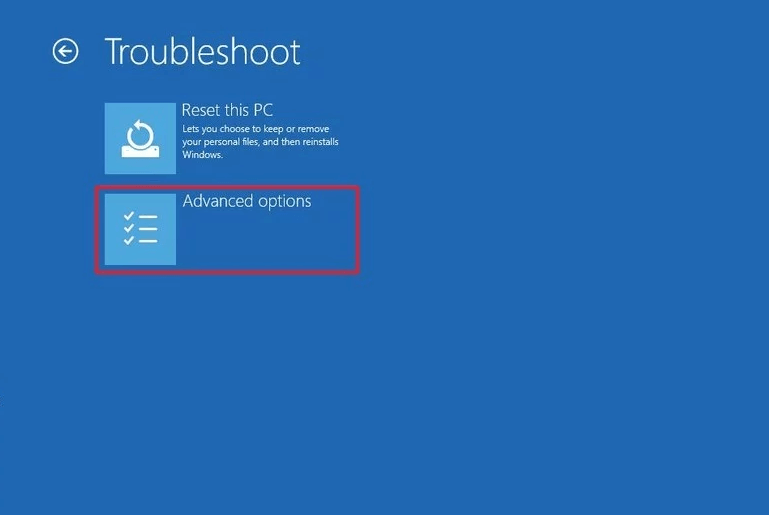
- Click “Automatic Repair“
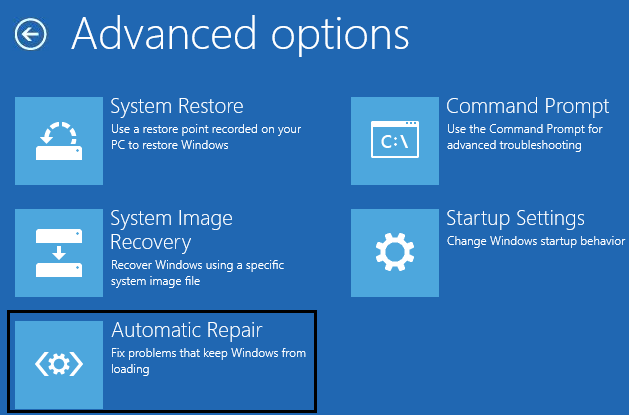
Wait till the Windows Automatic Repair is finished. Post-finishing restarts your system. This should get you rid of the bad image error.
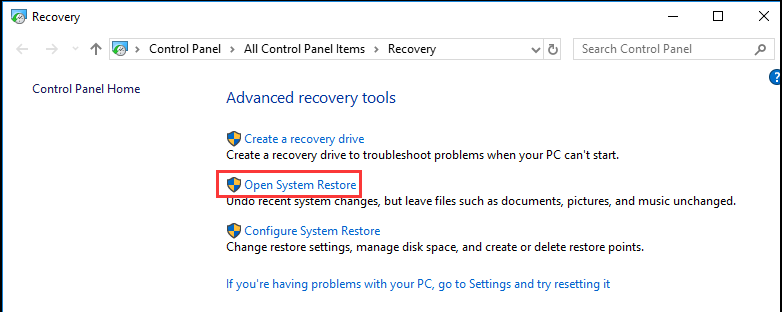
Solution 9 – Run System Restore
If none of the above-listed solutions works for you and you’ve already enabled System Restore and generated a system restore point, ideally, this should be your last step for resolving the Bad Image problem.
Follow the steps to do so:
- Open System Restore
- Choose a restore point prior to the error
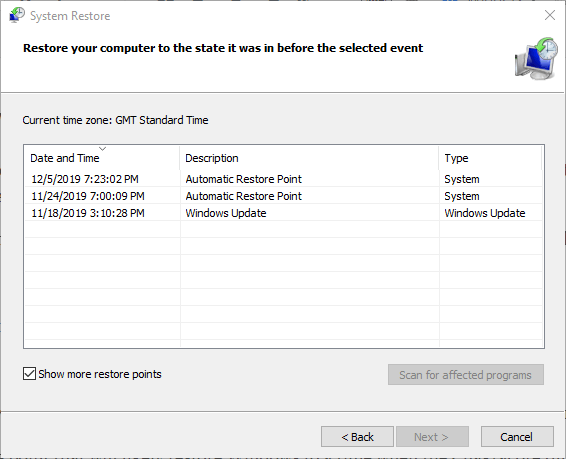
- Hit Next, and follow the wizard
It will perform the system restore to get back to the system point with no error.
Recommended Solution to fix Dxwsetup.exe – Bad Image Error
Here it is suggested to run the PC Repair Tool this scan your Windows system and solve the common internal problem that causes the Bad Image Error on Windows 10.
This is an advanced and multifunctional tool that just by scanning once detect and fix various stubborn computer errors.
With this, you can also fix many computer fatal errors like BSOD errors, DLL errors, Runtime errors, repair registry entries, and much more.
This scans your PC regularly, repair corrupted Windows system files to optimize its performance
Get PC Repair Tool, to Fix Bad Image Error Windows 10
Conclusion:
So, this is all about the Dxwsetup.exe – Bad Image Error on Windows 10.
Make sure to follow the solutions given one by one till you find the one that works for you. It is estimated that one of our solutions managed to circumvent the error without having to reinstall Windows.
If you have any queries regarding the error then share your questions on our Facebook page.
Don’t forget to like, share, and follow it.
Good Luck..!
Hardeep has always been a Windows lover ever since she got her hands on her first Windows XP PC. She has always been enthusiastic about technological stuff, especially Artificial Intelligence (AI) computing. Before joining PC Error Fix, she worked as a freelancer and worked on numerous technical projects.