Summary: This article is all about the Windows 10 errors in Lenovo laptop. So, if you are one of those Lenovo laptop users who are experiencing issues after Windows 10 update/upgrade, then this article is for you. Just apply the best working fixes mentioned in this article to fix various Windows 10 issues on a Lenovo laptop.
When it comes to choosing a well-priced and reliable laptop, Lenovo comes to mind first. Lenovo is a well-known brand and is the first choice of many Windows users across the world.
But, just like other PC/laptops, Lenovo is also not an exception. Even Lenovo laptops get issues after upgrading to Windows 10. Some issues are very complex but some are very simple.
While going through several forums and discussion sites, our team found users complaining about the several types of issues and errors after upgrading Lenovo Laptops to Windows 10.
Some of them are issues with webcam, some of them unable to use keyboard and touchpad, and more after upgrading to Windows 10.
So, if you are one of those users who are experiencing any issues just after upgrading your laptop to Windows 10, then you are in the right place. In this article, you will get the complete solutions to fix Windows 10 errors in Lenovo laptop. So, let’s go!!
Windows 10 Lenovo Laptop Issues and Their Solutions
Issue 1: Lenovo Laptop Won’t Boot After Failed Driver Installation
After upgrading the Lenovo laptop to Windows 10, sometimes the booting process goes away from the display of the Lenovo logo, this issue is directly related to the software.
Boot your Windows 10 laptop in safe mode and remove the problematic (outdated or corrupt) driver to troubleshoot damaged system drivers. You can also use the Windows Recovery option to fix this issue. To do this, follow these steps:
- Windows recovery option appears automatically when you are not able to successfully boot into the Windows environment after attempting more than two times.
- From the Windows Recovery environment, choose Troubleshoot

- Choose Advanced options on the next screen

- In the Advanced Options window, choose Startup Settings
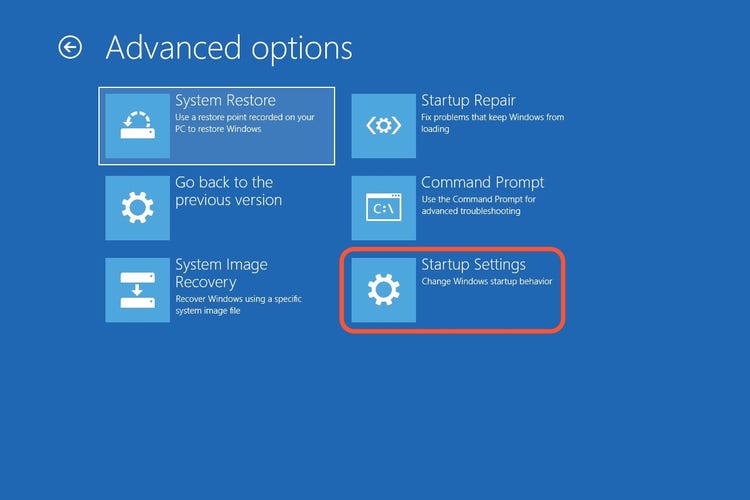
- In next Window, choose Restart
- Now, in the Startup Settings screen, press F4 to enter Safe Mode
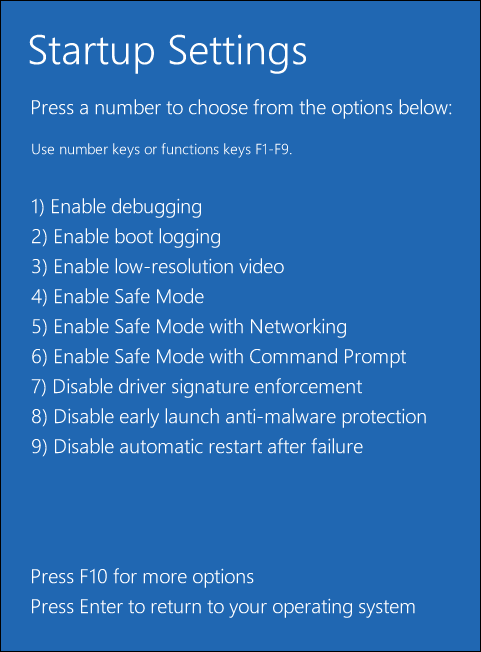
- Once you enter into Safe Mode, uninstall the problematic Driver
- Go to the search and type Device Manager, choose Device Manager from the list of results and go to the problematic device driver
- Choose the device and click Uninstall and after uninstalling reboot your laptop
Issue 2: Activation Error After Performing a Clean Install of Windows 10 On Lenovo Laptop
In order to upgrade your laptop to Windows 10 for free, you need to upgrade from Windows 8/8.1 to Windows 10. If you will try any other way to download Windows 10, the server will not recognize your Windows key as valid.
The main cause of this issue is: upgrading from Windows 10/8.1/8 will also upgrade the product key. To fix this issue, you again need to perform a clean installation after upgrading your laptop to Windows 10.
Issue 3: Lenovo Easy Camera Does Not Work After Windows 10 Upgrade
This is a very common issue that comes into view just after upgrading to Windows 10. This Lenovo laptop camera not working issue is directly related to the outdated System Driver.
Hence, to fix this issue you need to update the camera driver. You can easily troubleshoot this issue by following the given steps:
- Go to the Search box and type Device manager
- Choose Device Manager from the list of devices.
- Open Device Manager and go to Imaging Devices. You must see a yellow exclamation mark (!) for Lenovo Easy Camera. This confirms that the issue is related to the system Drivers.
- In order to fix, visit Lenovo website and download Lenovo Easy Camera Drivers
- Download and install Lenovo Easy Camera Drivers setup.
- Reboot laptop
If you want to fix the driver’s issues automatically then you can go with a professional Lenovo Windows 10 laptop driver update tool.
This tool is one of the best ways to get rid of all types of Windows 10 driver issues without the need of doing anything manually.
Issue 4: After Starting The Laptop, The Lenovo Screen Shows Up
Sometimes, it happens that after starting the Windows 10 Lenovo Laptop, the Lenovo screen shows up and stuck to that window only. Well, in order to fix this issue, you should perform the Flee-Power and BIOS reset.
Here, in the below steps, you will get to know how to resolve Windows 10 Lenovo laptop issues.
- You need to first remove the battery and other peripheral devices that are connected to the system.
- After this, you have to hold the power button for not more than 10-15 seconds and then connect the AC adapter and again try to turn on the system.
- If you notice that the issue still exists then you need to perform Flee Power and then resetting BIOS to its defaults.
- After this, you have to access the BIOS menu and press the NOVO button. It is located beside the power button after you turn off the system.
- Now simply select the BIOS utility option to enter BIOS.
- Now, in order to reset Lenovo laptops BIOS to its default, you have to click on “F9” keys and then select YES.
- Last but not the least, click on the “F10” key just to save the changes made in the BIOS. And then the system should automatically restart.
Issue 5: Touchscreen, Speakers And Battery Indicator Icons Are No Longer Working
Some of the Lenovo users have complained about the touchscreen, speakers, and battery indicators are not working anymore after updating Windows 10. Well, usually these kinds of errors or issues appear due to the incompatible drivers or outdated drivers.
Even Microsoft experts suggest updating your driver after the installation of new updates to avoid any kind of issue. So, to resolve the touchscreen, speakers, and battery icon not working issue, update the drivers.
You can easily update drivers of your Lenovo laptop either by visiting the Lenovo’s official website or by following the given steps:
- Press Windows + R key to open the Run dialog box
- In the Run dialog box, type the devmgmt.msc to open the Device Manager

- In the Device Manager window, click on the device category to expand the section
- Right-click on the device and select Update driver
- Now select the Search automatically for updated driver option.
Well, manually searching for outdated drivers and then update on your own is a quite lengthy task. So, it suggested using Driver Updater, an automatic tool that scans the entire computer and updates drivers automatically.
Get Driver Updater to Update Device Drivers Automatically
Issue 6: Lenovo Laptop Stuck in Boot Loop
After updating the Windows 10 many Lenovo users found their laptop stuck in a boot loop. In this issue, the screen turns in black, and users couldn’t access the Windows 10 boot menu.
However, you can easily fix this Windows 10 issue on your Lenovo laptop by using the fixes mentioned below:
Fix 1: Unplug All The External Devices and Perform The Hard Reset
Some hardware of the device may be interfering with the boot process of Windows 10, and this may lead the device to stuck in the boot loop. Hence, remove all external devices from your laptop to fix this issue.
For this, unplug all the external devices from the computer, such as Scanners, Media Card Readers, Printer, Digital Cameras, USB devices, etc. Then, take out the battery of the laptop for 2-3 minutes and then put it back.
Fix 2: Reset BIOS to The Default Settings
Resetting the BIOS settings to its default settings may help you to fix the Lenovo laptop stuck in the boot loop issue. You can do this by following the given easy steps:
Firstly, restart your laptop -> Press F2 or any other key to enter the BIOS ->Follow the on-screen tips to set default settings -> save the changes you have made -> press the ESC key to exit from the BIOS.
Fix 3: Reset Laptop to Factory Settings
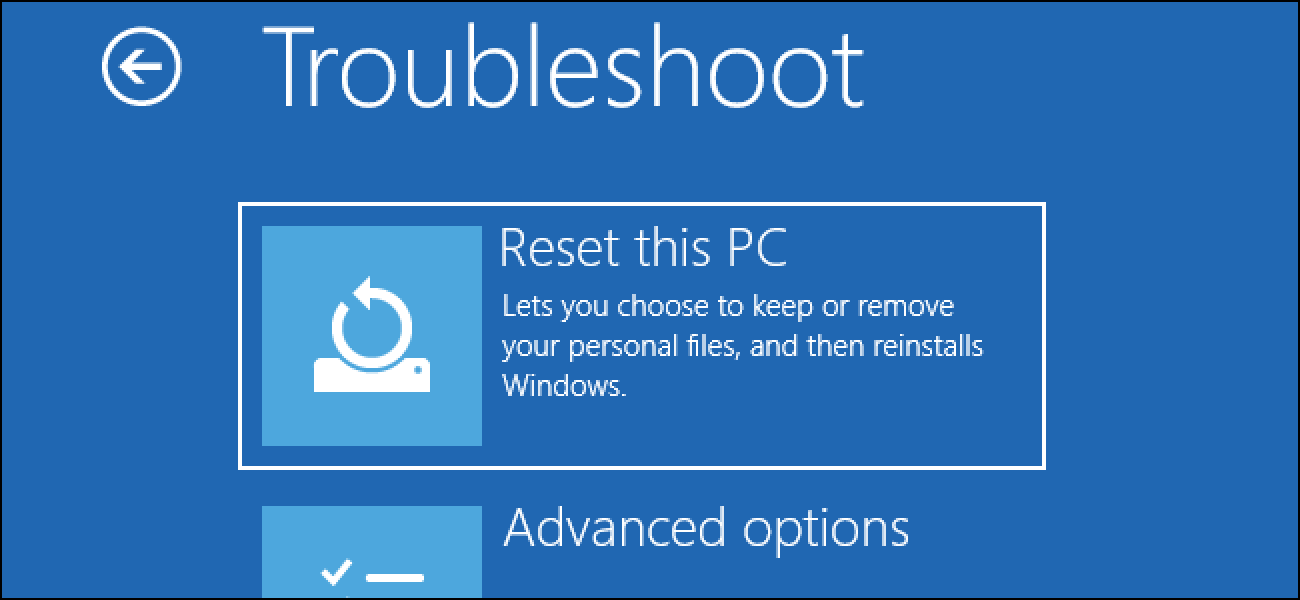
If the above two fixes don’t work for you, then reset your laptop to the factory settings. This might work for you to resolve this issue. Here is how you can do this:
- Go to the Power button -> press F9 key to open the Automatic Repair window
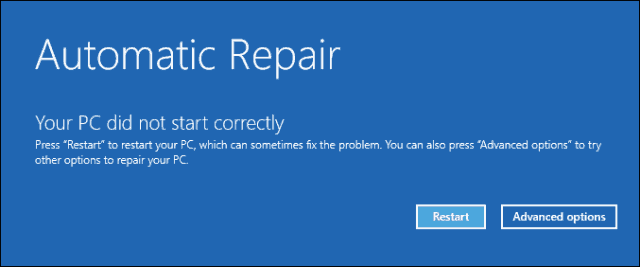
- Go to the Advanced Options -> click on the Troubleshoot -> Select Reset this PC option
Issue 7: Lenovo Laptop Keyboard Not Working After Windows 10 Update
Many Lenovo laptop users are frustrated with this issue. Their laptop keyboard suddenly stopped working after installing the Windows 10 update. Well, there could be various reasons behind getting this issue, but it mostly happens due to the outdated keyboard driver.
You can update the keyboard driver by following these steps:
- Go to the Windows Search bar, type Device Manager
- Click on the Device Manager
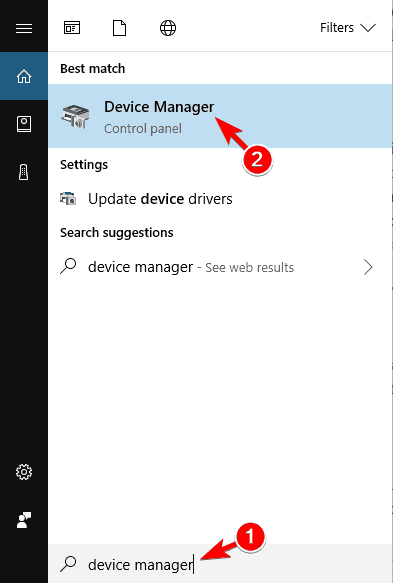
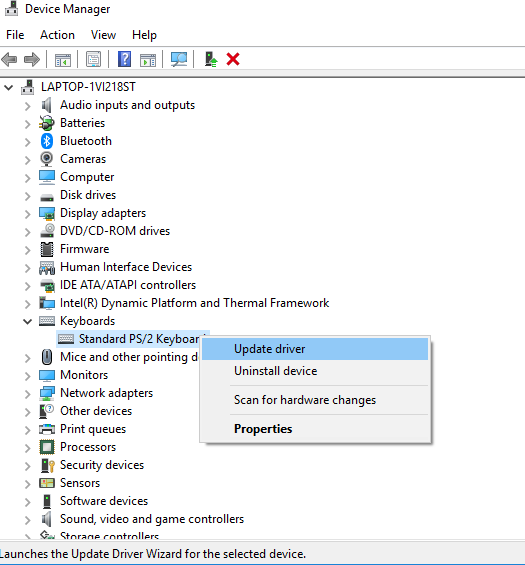
- In the Device Manager windows, click on the Keyboard to expand its section
- Right-click on your keyboard driver name and select the Update driver
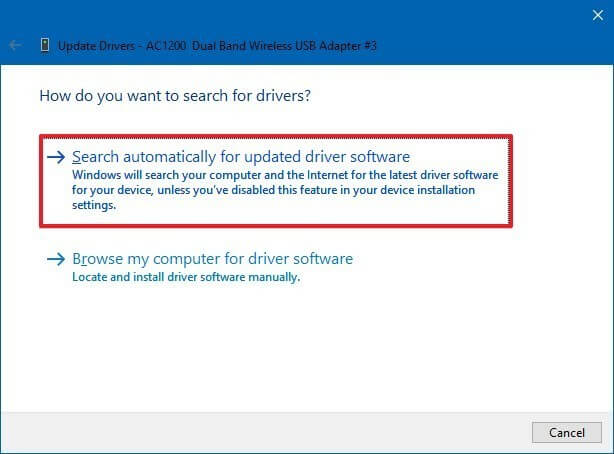
- Click on the Search for automatically updated driver software
Issue 8: Dolby Home Theater Does Not Work On Lenovo Laptop After Windows 10 Upgrade
There are so many Lenovo laptop users who are facing the issue with Dolby Home Theater after Windows 10 upgrade. Users found various issues with this application, such as Dolby Home Theater is not launching, equalizer doesn’t move, the Dolby Digital Plus features don’t work, etc.
These issues are mainly found in Lenovo IdeaPad and ThinkPad models. Though, you can easily fix this issue on your Windows 10 laptop by uninstalling Dolby related programs and audio driver from your computer and then reinstall it.
To do this, follow these steps:
- Go to the Device Manager ( check out the steps in the previous solution to open the Device Manager)
- Locate and click on the Sound, video and game controllers
- Right-click on the Conexant SmartAudio, Realtek High Definition Audio, or IDT High Definition Audio, and click on the Uninstall
- Type Control Panel in the Windows Search box and open the Control Panel

- Go to the Programs & Features.
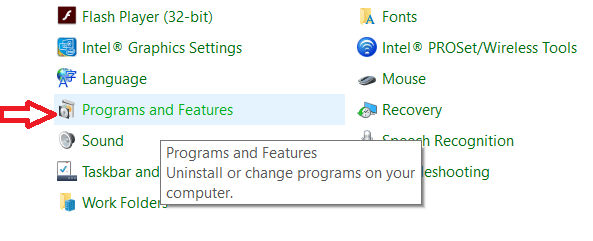
- Uninstall all the programs related to the IDT & Dolby, Realtek or Conexant
- Now restart your computer
After uninstalling these drivers and programs, reinstall Windows 10 audio driver and all Dolby related programs.
If this solution didn’t work for you then visit the Lenovo support website to find out other support and solutions.
Easy Solution to Fix Various Issues on PC/Laptop
You can easily fix the various stubborn errors or issues on your PC/laptop, by using the PC Repair Tool. It will fix all the PC/laptop errors and issues without any hassle.
This is a highly advanced repair tool, specially designed to resolve the various PC/laptop errors, such as Windows update/upgrade errors, BSOD, DLL, registry, game errors, repairs corrupted system files, keeps your PC/laptop secure from virus/malware, and much more.
It also optimizes the PC to enhance its performance and make it work like a new one.
Get PC Repair Tool to Fix PC/Laptop Errors and Issues
Conclusion
Lenovo laptops usually work fine with Windows 10, but sometimes it becomes quite annoying when it started causing issues. And, most of these issues start appearing either after upgrading to the Windows 10 or after updating Windows 10.
So, if you are using Windows 10 Lenovo Laptops and facing any of the issues mentioned here, then try these fixes. All the solutions mentioned in this article is considered as the best solutions as affected users have successfully fixed issues using these solutions.
So, do not miss to try out these solutions. And, I am sure these fixes will help you to resolve the Windows 10 errors in Lenovo laptop. Also, these solutions are very easy to perform and you don’t need any prior technical skills to execute these solutions.
Above this, if you have any other queries or suggestions then write it to us on – Facebook or Twitter.
Hardeep has always been a Windows lover ever since she got her hands on her first Windows XP PC. She has always been enthusiastic about technological stuff, especially Artificial Intelligence (AI) computing. Before joining PC Error Fix, she worked as a freelancer and worked on numerous technical projects.