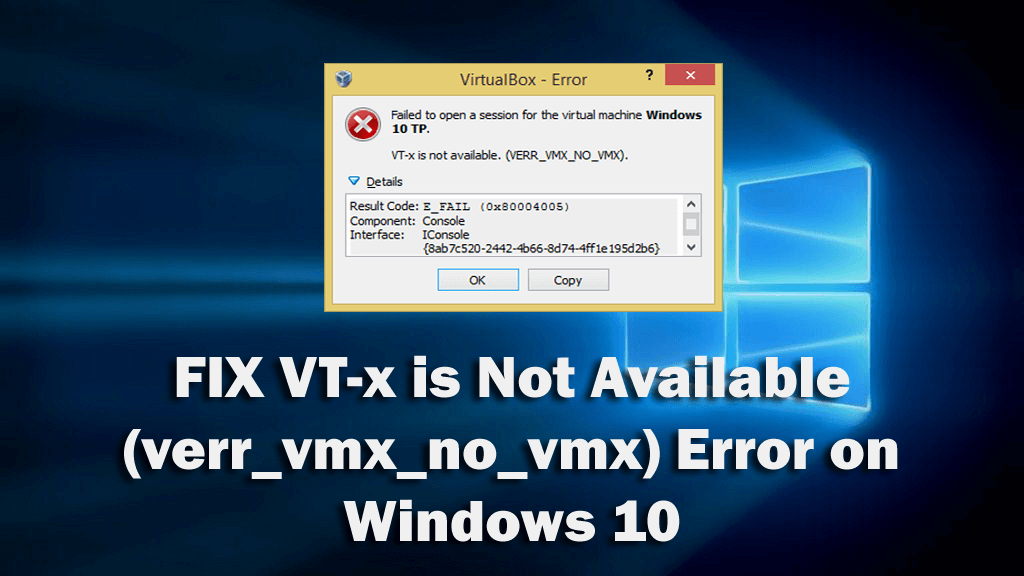
There are some of the Windows users who are getting the VT-x is not available (verr_vmx_no_vmx) error while trying to open the virtual machine using the VirtualBox.
So, if you are one of those users who received the same error message for their VirtualBox, then here you will get the required solutions to fix this error on Windows 10 computer.
Well speaking of the error, the VirtualBox error “VT-x is not available” can appear on any Windows version(Windows 7/8/8.1/10) which supports the Intel® Virtualization Technology (VT-x).
Now, talking about its causes, the “VT-x is not available” error in the VirtualBox can be caused due to several reasons. So, in the next section, you are going to learn about the possible reasons that can cause this VirtualBox error on the Windows 10 computer.
What Causes VT-X is Not Available (verr_vmx_no_vmx) Error?
- VT-X disabled in BIOS settings – If the VT-X is disabled on your BIOS settings, then it will cause this error on your computer while opening the VirtualBox.
- Your computer’s CPU doesn’t support the VT-X – Though this happens very rarely, still there are some instances where this error occurred due to the system didn’t equip with the CPU to support VT-X technology.
- Hyper-V virtualization enabled on your computer – This is the other most common reason that can cause this error on your computer. Hyper-V technology of Microsoft is known for conflicting with the VT-X. Hence, if the Hyper-V virtualization is turned on the system, then your OS will disable the VT-X.
- June 2017 Update of Avast disabled the VT-X – Avast June 2017 released update turned out as the reason for disabling the VT-X.
- Core Isolation enabled on PC – Core isolation is a security option in the Windows Defender that conflicts with the VT-X if it is enabled on the PC.
How to Fix VT-X is Not Available Error on Windows 10 Computer?
Fix 1: Disable Hyper-V Virtualization
The most familiar case where you may get the vt-x is not available error on Windows 10 is when the Hyper-V virtualization is enabled on your computer.
So, if the Hyper-V virtualization is enabled on your computer, then it will interfere with the VT-x virtualization and will make it disable automatically.
You might also get this error after installing any specific application on the computer. So, uninstalling the app that enabled the Hyper-V is not going to help you becuase being it enabled on the system will prevent VT-x virtualization from running.
So, to fix the VirtualBox VT-x is not available, you need to disable the Microsoft Hyper-V. Follow these steps to disable it on your computer:
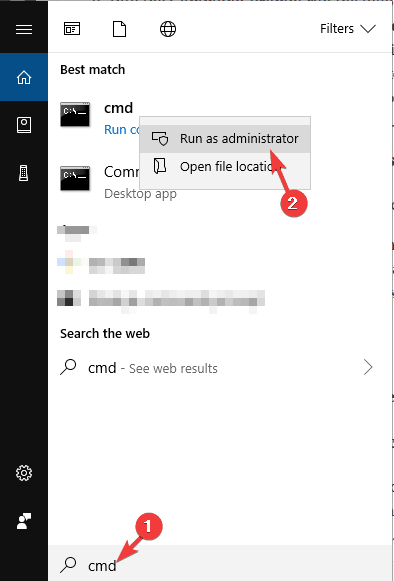
- Go to the Windows Search box and type cmd.
- Right-click on the Command Prompt and select Run as administrator.
- Type the following command in the Command Prompt and press the Enter key after each command:
dism.exe /Online /Disable-Feature:Microsoft-Hyper-V
bcdedit /set hypervisorlaunchtype off
- After executing the commands, exit the Command Prompt
- Restart the computer.
Now, open the VirtualBox and check if it resolves the VT-x is not available (verr_vmx_no_vmx) error.
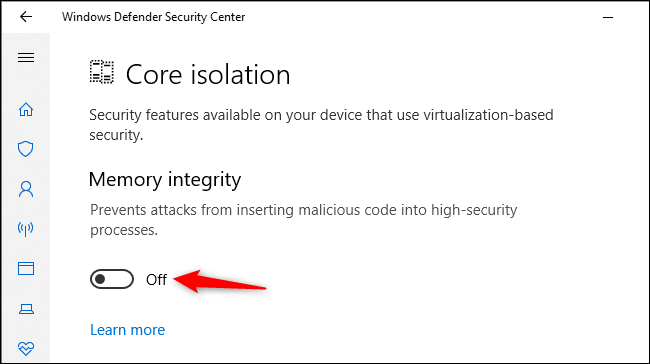
Fix 2: Disable Core Isolation on Windows Defender
Windows Defender’s Core isolation is a security option of the device, and according to some users, this option is used to conflict with the VT-x.
So, if you are using the Windows Defender as the default antivirus and receiving the VT-x is not available (verr_vmx_no_vmx) error, then you are needed to disable the Core Isolation option.
Here are the steps you need to follow to do this:
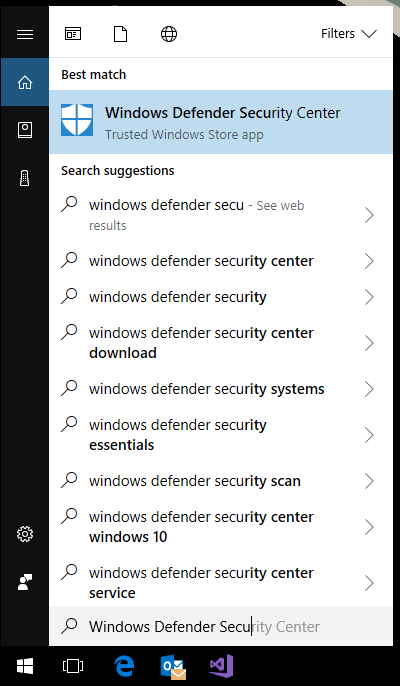
- First, go to the Windows Search box and type Windows Defender.
- Select the Windows Defender Security Center from the search results.
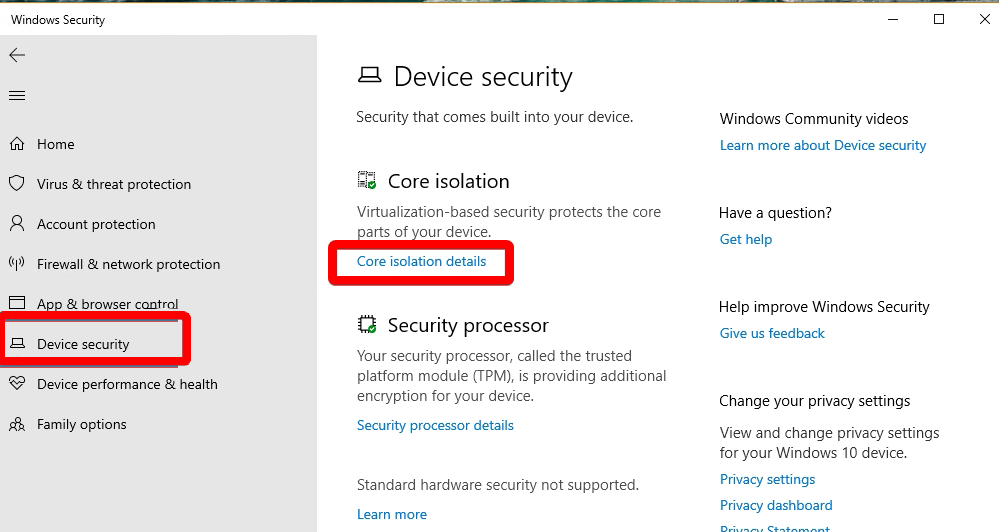
- On the Windows Defender Security Center window, click on the Device Security tab located on the left pane of the window.
- Next, click on the Core isolation details option under the Core Isolation section.
- Now, turn off the toggle button given under the Memory Integrity.
- Lastly, restart your computer.
Now, check whether you are able to run the Virtualbox VM without receiving the VT-x is not available error. If not, then move to the next solution.
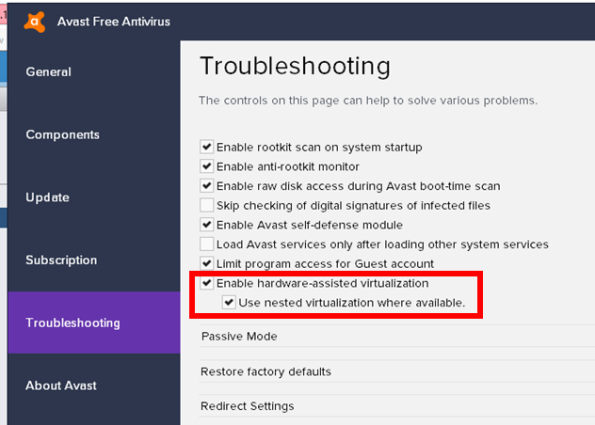
Fix 3: Enable the Nested Virtualization on Avast
If you are using the Avast antivirus, then you need to know that the June 2017 update of this application had added a new automatic feature to this antivirus. And this feature is problematic for the VirtualBox as it prevents the VT-x from running on the device.
However, you can fix this issue without uninstalling this antivirus tool. So, follow these steps to rectify the issue:
- Open the Avast Settings.
- Go to the Troubleshooting.
- Select the checkboxes given next to the Enable hardware-assisted virtualization and Use nested virtualization where available.
Fix 4: Uninstall Third-Party Antivirus Program
As it is mentioned in the previous solution that the antivirus program can cause the VT-x is not available error on Windows 10 computer. So, try to uninstall the third-party antivirus from your computer to check if this will help you to fix the error.
To uninstall the antivirus, follow the given steps:
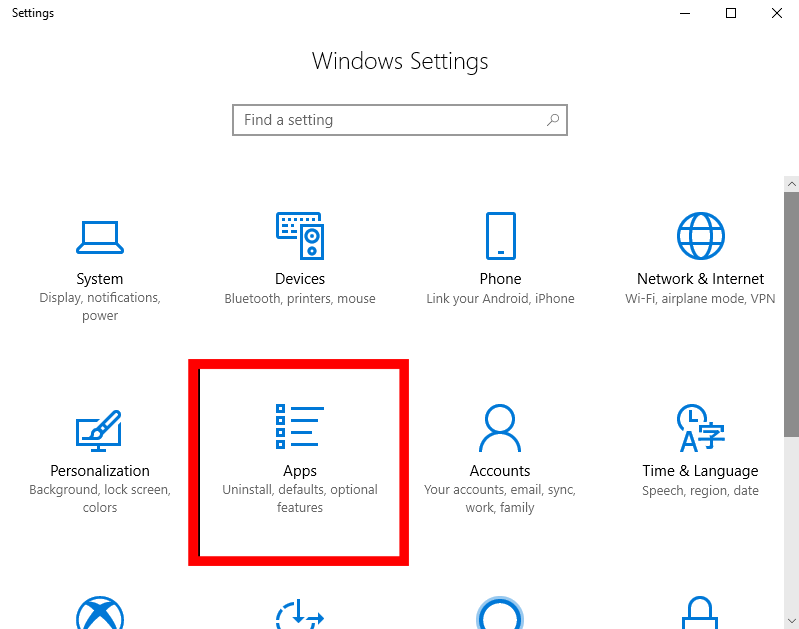
- Press Windows + I keys to open the Windows Settings.
- In the Settings app, click on the Apps.
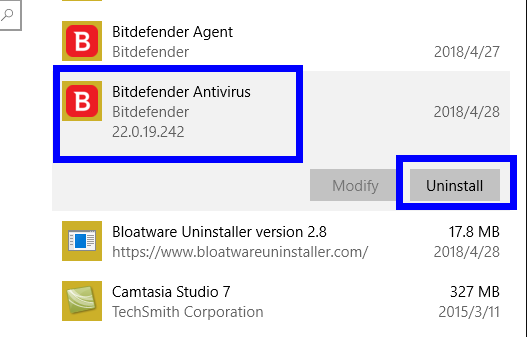
- Search your antivirus in the list of installed applications and select it.
- Click on the Uninstall button.
- Now there will prompt a window, here click on the Yes button to confirm your action.
- Once the antivirus is uninstalled, restart your computer.
Now, check if the VT-x is not available error is resolved or not. If doing this has fixed the error on your computer, then it clearly indicates that your antivirus tool was causing the issue.
So, now it would be better to switch to another antivirus tool that doesn’t interfere with other programs on the computer. If you will ask me, then I will suggest you use the Spyhunter.
It is an advanced antimalware tool that keeps the PC secure without interfering with any other Windows process or program.
Get Spyhunter to Keep the PC Secure From Virus/Malware Attack
Fix 5: Enable VT-X from BIOS Settings
If you have tried out all the fixes and got no result, then it is likely to get the VT-x is not available (verr_vmx_no_vmx) error due to the VT-x is disabled in the BIOS settings.
It usually happens when the third-party apps override the BIOS settings. So, to fix this issue, you simply need to enable the VT-x in the BIOS.
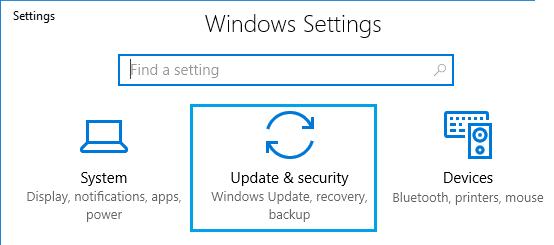
- First, press the Windows + I keys > select Update & Security.
- Go to the Recovery tab > click on the Restart now button under the Advanced startup section.
- Now, Windows will restart and enter into the Windows recovery environment.
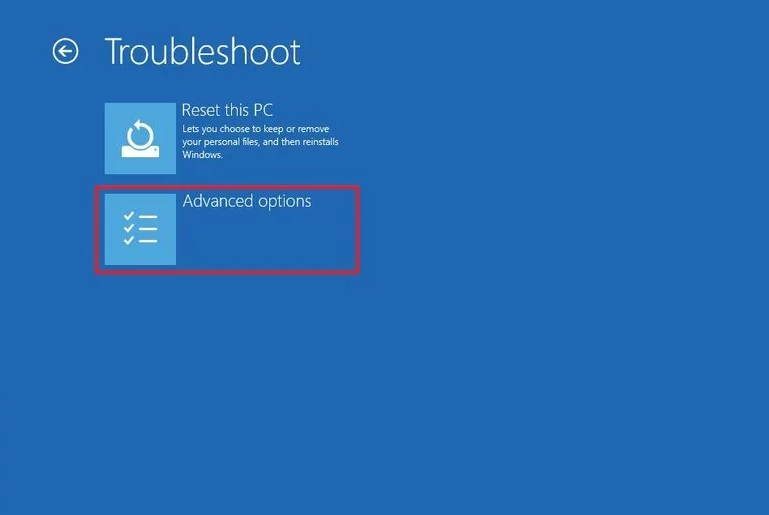
- On the pop-up screen, click on the Troubleshoot -> Advanced options.
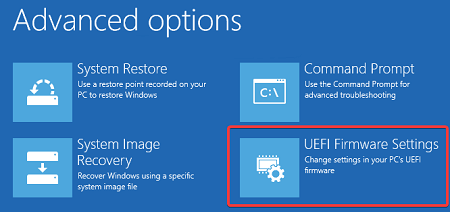
- In the Windows Advanced options screen, click on the UEFI Firmware Settings to enter BIOS.
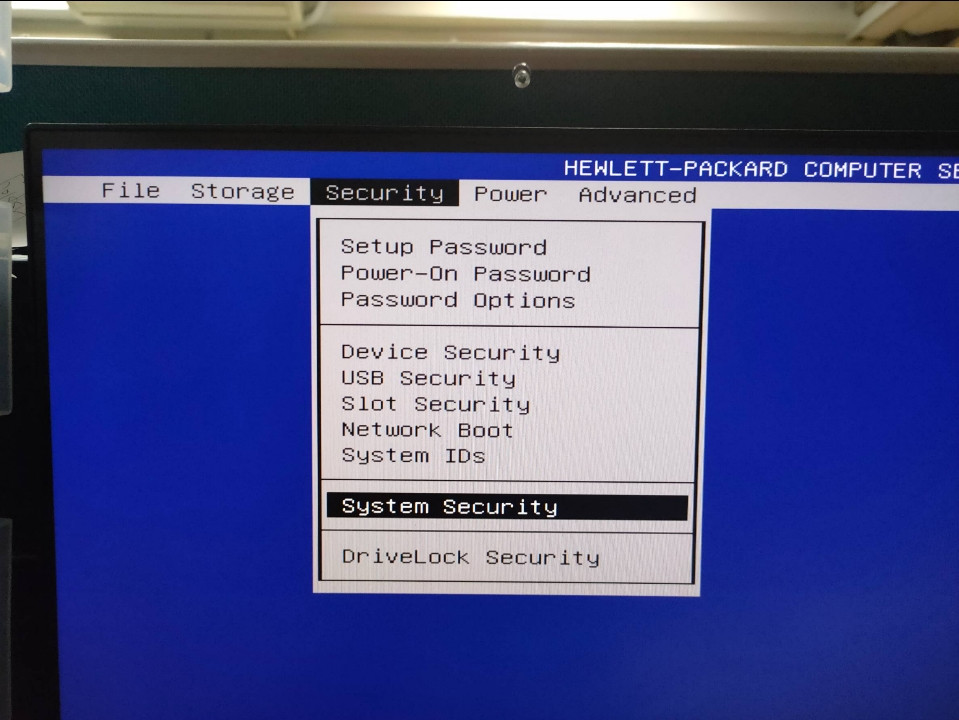
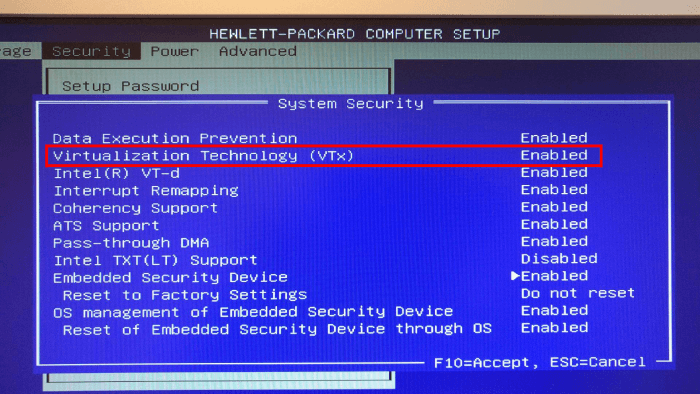
- After entering into the BIOS, go to the Security tab and go to the System Security.
- Now, check if the Virtualization Technology or VTx/VTd is enabled or not. If not, then enable it.
Recommended Solution: To Fix Various Windows 10 PC Problems
If your PC is showing errors and causing various problems then here it is suggested to scan your system with the PC Repair Tool.
This is a multifunctional tool that just by scanning once, detects, and fixes various PC problems. With this, you can also fix many computer fatal errors like BSOD errors, DLL errors, Runtime errors, repair registry entries, and much more.
This is completely safe to use, so feel free to scan your system and make it blazing fast.
Get PC Repair Tool, to Fix Errors and Optimize PC Performance
Conclusion
So, this was all about the VT-x is not available error. If you are also facing the same error message on your Windows 10 PC, then go through this guide and fix it right away.
After following the fixes you would be able to run the VirtualBox without facing this error message anymore.
But, if even after following the given solutions, you are still getting the error, then contact us on Facebook or Twitter.
Hardeep has always been a Windows lover ever since she got her hands on her first Windows XP PC. She has always been enthusiastic about technological stuff, especially Artificial Intelligence (AI) computing. Before joining PC Error Fix, she worked as a freelancer and worked on numerous technical projects.
