
Summary: Dealing with the ‘Hamachi cannot get adapter config’ error on your Windows 10 and 11 OS? Then in this article tutorial, you will get step-by-step instructions to fix the error.
Hamachi is considered a Desktop tool that can build and maintain virtual private networks (VPN) across numerous distant computers.
However, most users complained that they encountered the Hamachi cannot get adapter config error in their Windows 10 and 11 while attempting to connect to the Hamachi VPN service.
Luckily there are ways that help many users to get past failed to connect to Hamachi network adapter error, but before heading towards the fixes here, look at some of the common reasons that trigger the error.
To fix common Windows PC Errors, we recommend Advanced System Repair:
This software is your one stop solution to fix Windows errors, protect you from malware, clean junks and optimize your PC for maximum performance in 3 easy steps:
- Download Advanaced System Repair rated Excellent on Trustpilot.
- Click Install & Scan Now to install & scan issues causing the PC problems.
- Next, click on Click Here to Fix All Issues Now to fix, clean, protect and optimize your PC effectively.
Why I am Getting the “Hamachi Cannot Get Adapter Config” Error?
- Outdated Drivers: There is a high scope that drivers you installed on your device might be updated or incompatible with your Windows system and causes the error. Updating or reinstalling your Hamachi driver can fix the error.
- Antivirus/Firewall: Another reason that causes the error on your device might be the Antivirus/Firewall you installed on your system as this conflicts with other application and start causing issues
- Missing Admin permission: In some cases, admin permission is required to run some functions and tools smoothly. So, if you are running as a user then you may see the error.
- Network Adaptor failure: Another common reason the Hamachi cannot get adapter config error is Hamachi failed to connect to the network failed and is unable to process the request.
So these are some of the top reasons that cause the error in your Windows 10 and Windows 11. Ensure to download and install the newest version of Hamachi to fix the error.
Now without further delay, follow the fixes given one by one to fix cannot get adapter config error on your Windows 10 and Windows 11.
How Do I Fix “Hamachi Cannot Get Adapter Config” Error?
Solution 1 – Disable 3rd Party Antivirus & Firewall
To fix the’ Logmein Hamachi cannot get adapter config’ error, you temporarily need to disable your third-party antivirus and Windows Firewall.
For disabling antivirus, press and hold the right mouse button and select the stop or disable option.
To disable Firewall, you need to follow some simple steps-
- First, you need to search for Firewall and click on the first result.
- Then, Navigate to Advanced Settings and pick Windows Defender Firewall Properties.
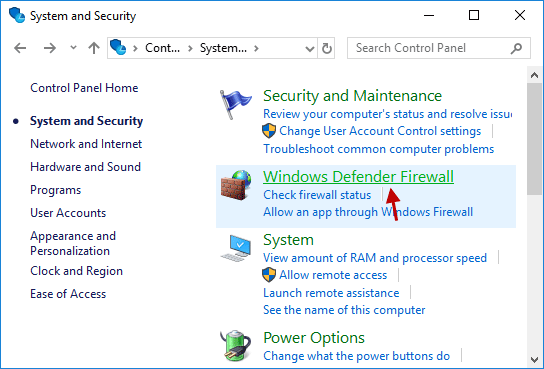
- Now, select Customize in front of the Protected Network Connections button by clicking on Domain Profile from the top.
Finally, deselect the Hamachi option and then hit the Apply and OK buttons to save the changes. Ensure to restart your computer and check if you see the error.
Solution 2 – Run Hamachi as an Admin
Many users managed to solve the problem by running the application with administrative privilege.
So, here it is suggested to try running the program as an admin, below follow the steps given to do so:
- First, find the Hamachi shortcut, and select Run as Administrator by right-clicking it.
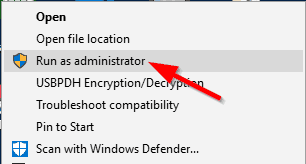
- If this works for you to fix then try running the application but still see the error then follow the next solution.
- Now, Select Properties by right-clicking on the Hamachi icon.
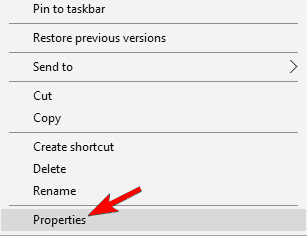
- Then, In the Properties window, go to the Compatibility tab and check the box that says Run this application as Administrator.
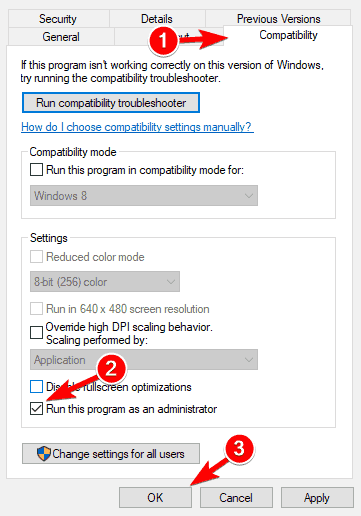
- Finally, click on the Ok button, then restart the Hamachi VPN application with Admin rights to save the modifications.
Solution 3 – Disable & Enable the Hamachi Connection
Sometimes the problem occurs due to internal glitches on the internet so, try disabling and enabling the Hamachi connection as this may work for you to solve the error:
Follow the steps to do so:
- First, to open Internet Connection Settings, press the Windows + R keys and type ncpa.cpl in the Run dialogue box then hit the Ok button.
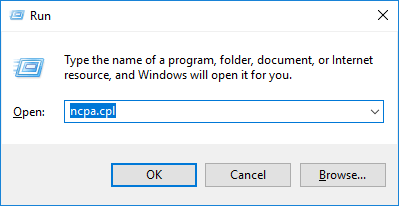
- Then, Find and right-click Hamachi, then choose ‘Disable.’ Wait for a few minutes before right-clicking on it and selecting Enable. Please double-check to see if the problem has been resolved.

Solution 4 – Download & Update Hamachi Driver
If you are running an outdated Hamachi driver then this might be causing the error, so check for the incompatible or outdated Hamachi drivers and update them on your Windows 10 & 11 system.
Follow the steps to do so:
- First, on the keyboard, press the Windows + X button and choose Device Manager.
- Now, Expand Network Adapters, click on Virtual Ethernet Adapter Entry and choose Update Drivers.

- Finally, to complete the update process, follow the instructions shown on the screen. After that, restart your computer to see if the problem has been solved.
Solution 5 – Install Hamachi as Legacy Hardware
- First, Go to Network Adapters in Device Manager, click on Virtual Ethernet Adapter Entry, and choose Uninstall.
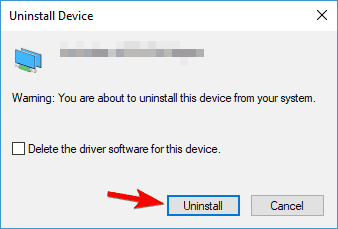
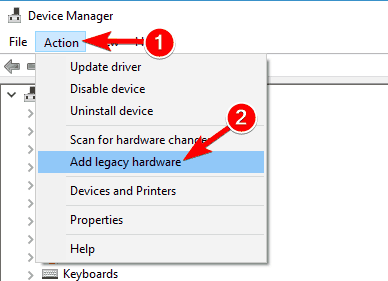
- Then after uninstalling, go to the top menu and click on Action, then click the Add Legacy Hardware option.
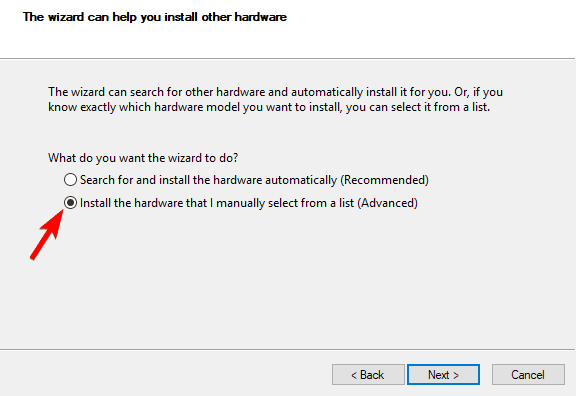
- Click Next and then choose the option Install the hardware that I manually select from a list (Advanced) in the newly opened window. Now, press the Next button.
- Open Show All Devices > Next > Have Disk…from the dropdown menu. Then, navigate to the location where Hamachi was installed and choose the .inf driver file from there.
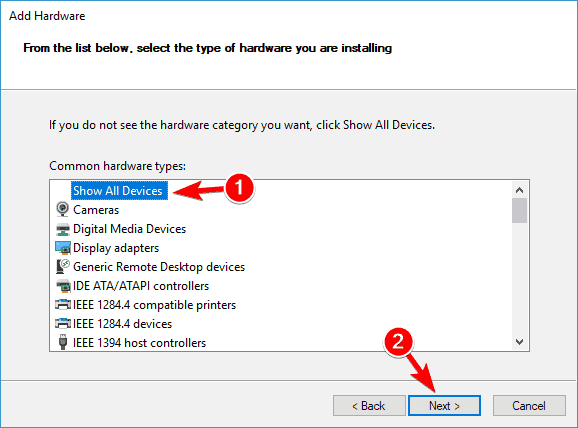
Finally, once you’ve finished, double-check to see if cannot get adapter config Hamachi Error is resolved or else head to the next potential fix.
Solution 6 – Change your Network Adapter’s Priority
If the above solution won’t work for you then try changing the Network Adapter’s priority by following the steps given below.
This trick worked for many users to troubleshoot the cannot get adapter config hamachi error.
- Open Control Panel from the Windows start menu > then go to Network and Internet
- Then click Network and Sharing Center, and then Change Adapter Settings in the Control Panel.
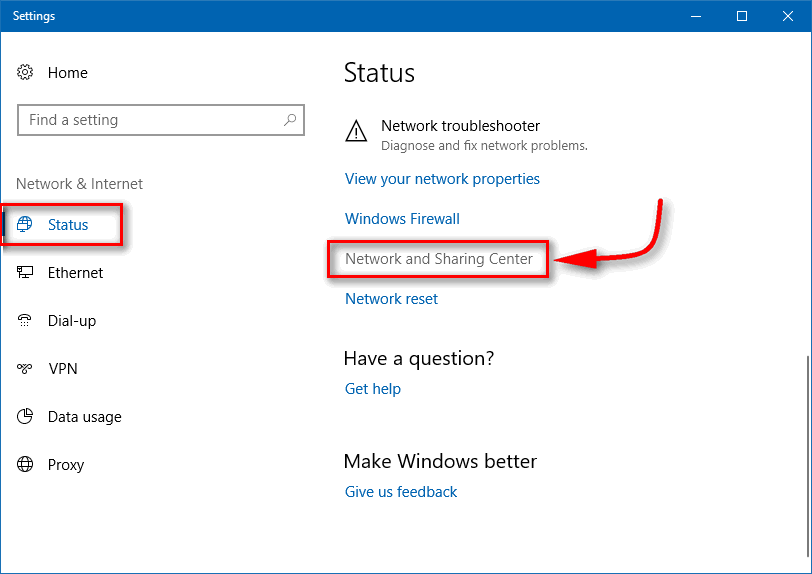
- Then, Open Properties by double-clicking on Hamachi, then locate and untick the Microsoft Network Adapter Multiplexor Protocol.
- Now, Select Properties and then Advanced > IP Settings.
- Finally, Uncheck Automatic Metric, and in Interface Metric type 9000, and click the Ok button. Please double-check that the problem has been resolved.
Solution 7 – Disable Microsoft Network Adapter Multiplexor Protocol
Some users confirmed that the Microsoft Network Adapter Multiplexor Protocol option is conflicting with the Hamachi application, so try disabling it.
Follow the instructions given:
- Launch Control Panel, then go to Network and Internet > Network and Sharing Center in Windows 10 and 11’s Control Panel.
- Select Change Adapter Settings then double-click Hamachi to view its Properties.

- Then, launch Properties and untick the checkbox next to Microsoft Network Adapter Multiplexor Protocol to disable it.
- Finally, save the modifications and restart Hamachi VPN to see if the problem has been repaired.
Solution 8 – Enable LogMeIn Hamachi Tunneling Engine service
If you find the LogMeIn Hamachi Tunneling Engine service is not running then this might be blocking Hamachi and you see the Hamachi cannot get adapter config error.
Follow the steps to do so:
- First, to open the Services window, press the Windows + R keys on your keyboard, type services.msc in the opened Run dialog box, and then hit the Ok button.
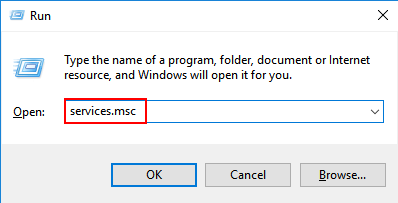
- Then, right-click on LogMeIn Hamachi Tunneling Engine service and choose Restart.
- Then, right-click it and select Properties, select Automatic from the Startup Type dropdown in the General tab, and then hit Apply and OK to save the changes.
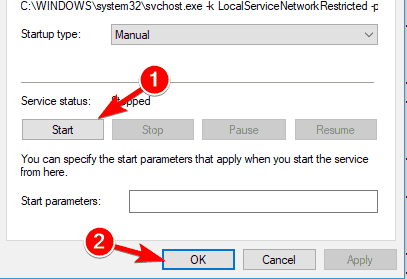
- Finally, restart your computer to see if the problem has been repaired once you’ve completed it.
Solution 9 – Delete Hamachi Registry Entries & Reinstall the Application
After trying all the solutions if you are facing the same problem then here it is suggested to clean the registry of your Hamachi application. Cleaning the application registry can solve numerous problems and give the Application a new start.
Here are the manual instructions from which you can clean your registry:
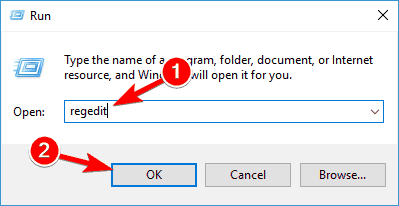
- First, click on Windows Key + R and in the search box type Regedit to start a Registry Editor.
- Now it is recommended to create a backup of your registry after launching the Registry editor.
- After doing that, click on the files and click on the Export option and also select the location where you want to export your backfile of the registry.
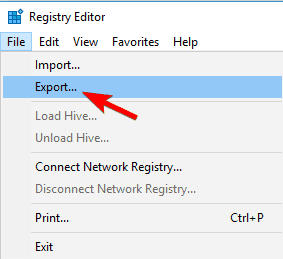
- While exporting make sure to click on ALL, and then click on the Save button to save the export of your registry. If in case something gets wrong then click on the file and then click on the Restore option to restore the registry folder back.

- Now click on the Ctrl + F key together and in the text box type hamachi and hit on the Enter button.
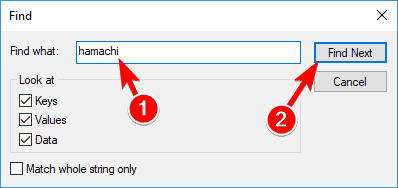
- If you get any key Delete it.
- Now press the F3 key to find the next Hamachi key. Repeat this step until you delete all.
- After deleting all the Hamachi keys now install the new Hamachi application.
Apart from this, if you don’t want to use this manual solution then I recommend you use CCleaner to clean the registry. This powerful tool not only cleans your registry but also creates a backup of your data automatically.
Get CCleaner to Clean Registry Entries & other Unnecessary Junk Files
Recommended Solution To Fix Windows Issues & Errors
Scan your Windows system with the PC Repair Tool, to optimize your Windows PC performance by regularly maintaining it automatically.
This is an advanced repair tool that just by scanning once detects and fixes various Windows problems and stubborn computer errors.
With this, you can fix various update errors, repair corrupted Windows system files, DLL errors, registry errors, prevent virus or malware infection, and much more.
This not only fixes errors but also optimizes your Windows PC performance like a new one to optimize the gaming performance.
Get PC Repair Tool to Optimize your Windows PC Performance
Conclusion
So, this is all about the Hamachi cannot get adapter config error on Windows 10 and Windows 11.
Here we tried to list down the best possible solutions that worked for several affected users. And it is estimated one of our solutions managed to circumvent the error Logmein Hamachi cannot get adapter config error.
So, make sure to follow the solutions given one by one till you find the one that works for you.
Feel free to connect with us on our Facebook page, if you are having any problems related to your Windows system, also don’t forget to hit the like and share button.
We will get back to you as soon as possible.
Good Luck..!
Hardeep has always been a Windows lover ever since she got her hands on her first Windows XP PC. She has always been enthusiastic about technological stuff, especially Artificial Intelligence (AI) computing. Before joining PC Error Fix, she worked as a freelancer and worked on numerous technical projects.