
Safe Mode is the way through which you can detect and sometimes troubleshoot your Windows 10 System issues. This is one of the popular boot option, that allows the users to boot their PC or Laptop with limited services and apps.
This mode is basically a troubleshooting option for Windows that boots the computer with a limited source or application. In this mode, you will see the words “Safe Mode” appear in the corners of your monitor.
Safe Mode becomes a great key to fix any issues with Windows computers. If any installed application on your PC is triggering the problem, then you can detect the culprit service/app by booting your system into the Safe Mode.
Today we will discuss the several methods that allow Windows 10 boot into safe mode, read this blog till the end and pick the suitable one from the given methods to start Windows 10 in safe mode.
How to Start Windows 10 in Safe Mode?
Method 1: Advanced Option to Boot Windows 10 into Safe Mode
- Go to the Settings app-> Update and security -> Recovery. In the right pane of the Recovery screen given below, click on the Restart now present under Advanced startup.

- Windows will restart.

- After it, choose the Troubleshoot option:

- Pick Advanced options that is present under the Troubleshoot screen:

- Click on Startup Settings:

- From the Startup Settings window, you need to click on the Restart button to change the Windows Startup option:

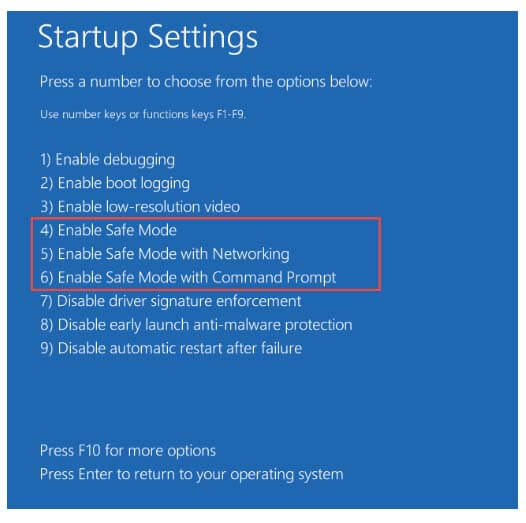
- In the end, you need to press F4 (for Safe Mode), F5 (for Safe Mode with Networking), and F6 (for Safe Mode with Command Prompt). If you are using Windows 10 on a virtual machine via software such as Oracle VirtualBox, then you need to press number keys 4 (for Safe Mode), 5 (for Safe Mode with Networking), 6 (for Safe Mode with Command Prompt), respectively.
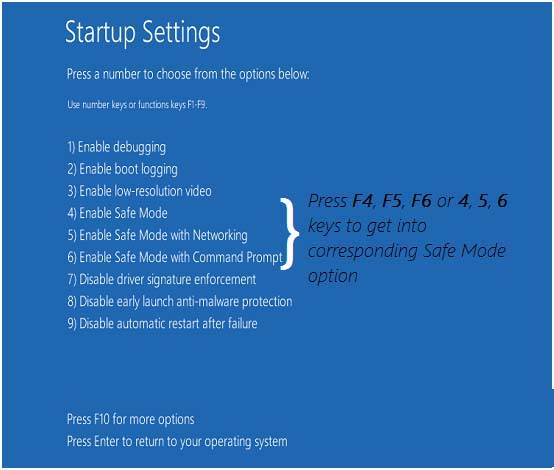
- Finally, Windows 10 will boot into Safe Mode.
To get back into normal mode simply restart your system. This will not only safe mode windows 10 but also speed up Windows 10.
Method 2: Recovery Options to Access the Safe Mode
In order to open the Windows 10 Safe Mode, you can also use the Recovery options present in the Settings app.
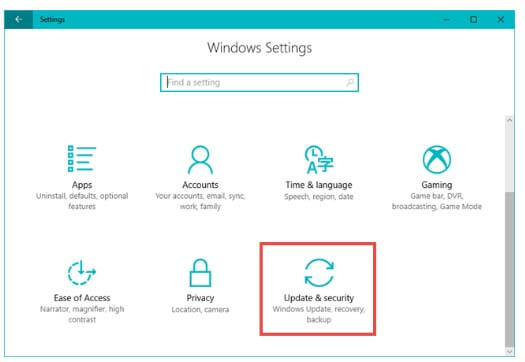
- First, you have to open the setting window, press Windows + I from your keyboard, and click on the Update & security.
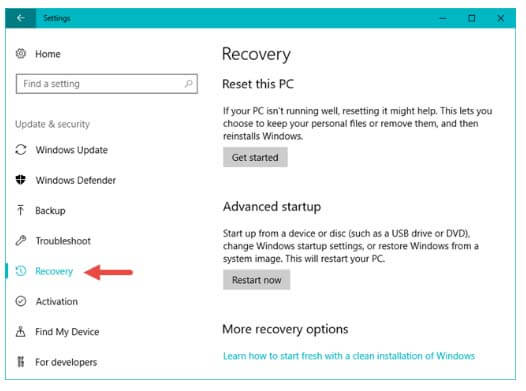
- Press the Recovery option present on the left side of the Settings window.
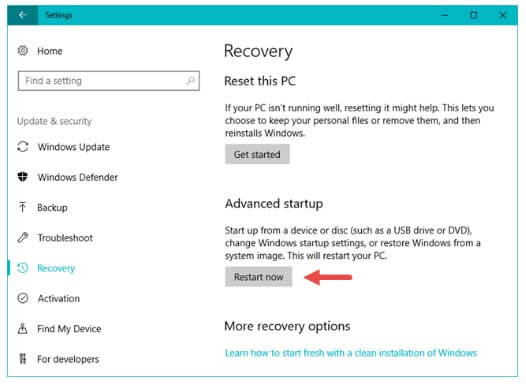
- Now, under the Advanced startup section, you need to click on the Restart now button.
- Your Windows 10 PC/Laptop will reboot, now again follow the same steps as we’ve described in the second method of this guide (Go to the “Troubleshoot -> Advanced options -> Startup Settings -> Restart”).
- Now you have to press the F4 key from your keyboard to start into the Safe Mode.
- You can press the F5 key from your keyboard to boot into “Safe Mode with Networking.“
- Keep pressing F6 to access the “Safe Mode with Command Prompt.“
Method 3: Use the System Configuration Tool (msconfig.exe)
With the help of this method, one can easily boot your system into the Safe Mode. This trick is especially for those who are new to their computer.
- To open the System Configuration Window you can use the Run dialogue box.
- Press the Windows + R key to open the run dialogue box, in the run box you need to type msconfig and hit the Enter key or press OK.

- Now, after opening the System Configuration window, navigate to the Boot tab. In the Boot Options section, choose the “Safe boot” option.
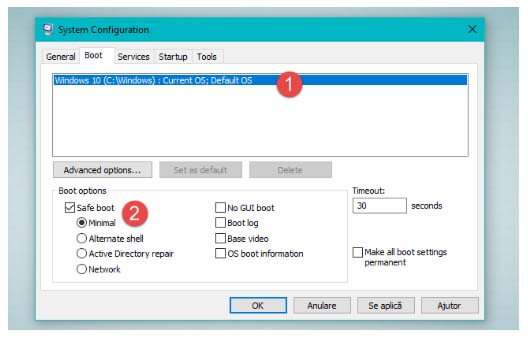
- At last, click on the OK.
- Reboot your system, and you will see that your computer/laptop will automatically boot Windows 10 into Safe Mode.

Method 4: Use the “Shift + Restart” Combination
In this method, we will know how to get into Safe Mode by using the Shift + Restart keys. Follow the below-given steps:
- First, open the Start menu and click on the Power button.

- Now, keep pressing the Shift key and then click on Restart.
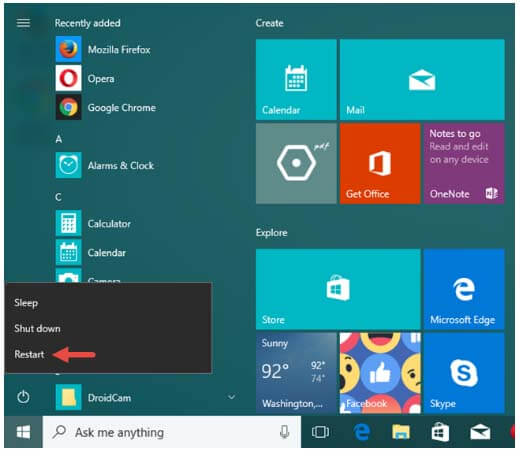
- If you want to use the Shift + Restart key combination from the Sign In Window then click on the Power-> keep pressing the Shift key and then tap Restart.

- After this, your Windows 10 system will reboot and show different options to select. Here you have to select the Troubleshoot.

- Now, you will see the Troubleshoot window and then choose Advanced Options.
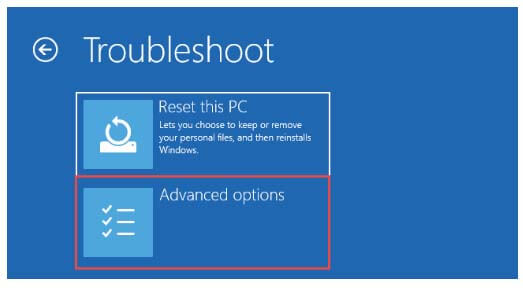
- From the Advanced options window, select the Startup Settings.

- Now, reboot your Windows 10 PC/Laptop to apply the changes.
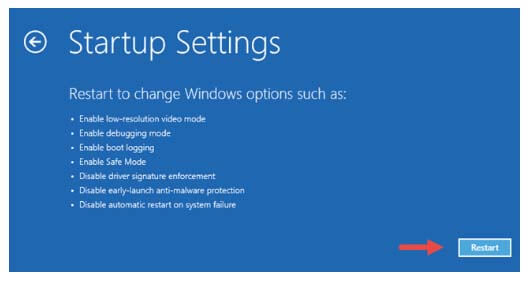
- Once your system reboots, you can select an option according to your need. There are mainly 3 different options to boot into the Safe Mode.

- Simply enable “Safe Mode” Press the F4 key
- Turn on the “Safe Mode with Networking,” by pressing the F5 key
- In order to enable “Safe Mode with Command Prompt”, you have to press the F6 key.

Method 5: Windows 10 Bootable DVD/USB drive and the Command Prompt
To apply this method, you need a Windows 10 installation DVD or USB.
This method is for those PCs/Laptops that are not booting normally or completely unbootable.
- Now, turn on your system and insert the bootable DVD or connect the bootable USB drive.
- Press the physical restart button of your computer/Laptop to reboot it, now when a message appears “Press any key to boot from the CD or DVD” then press any key from the keyboard.
- Wait until the installation Window appears and then select the language and keyboard layout you prefer and click on Next.

- When you will see the “Repair your computer” option then click on it.

- After it, click on the Troubleshoot option.

- Now, at the “Advanced options” screen, click on the “Command Prompt (Use the Command Prompt for advanced troubleshooting)”.
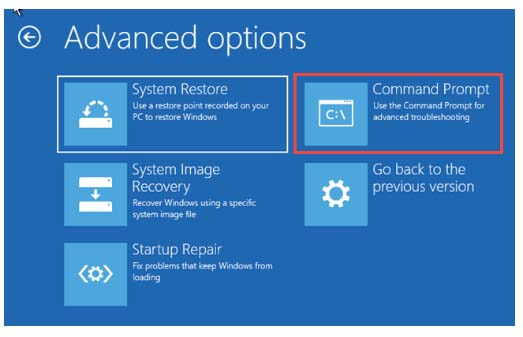
- Once loading the Command prompt, now you have to run the below-given commands:
bcdedit /set {default} safeboot minimal
- Press the Enter key to run this command.
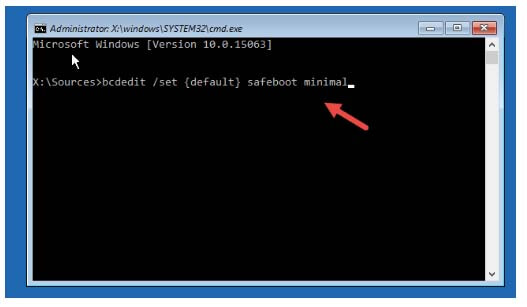
- After a few seconds, a message will prompt telling us that “The operation [was] completed successfully.”
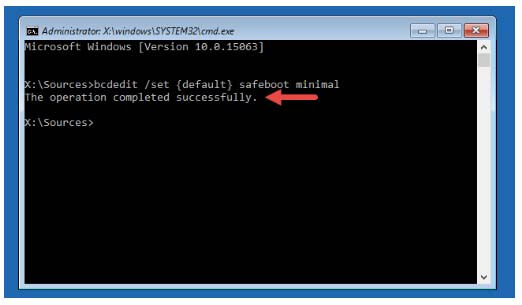
- Then you need to exit from the Command Prompt and select to Continue on the next screen.
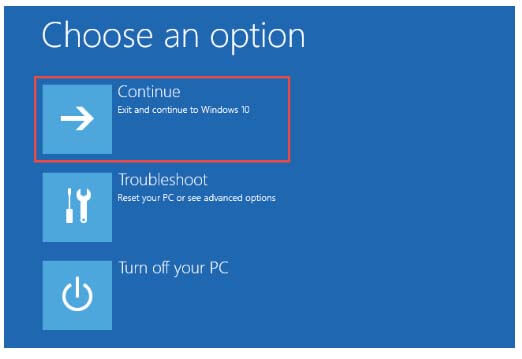
- At last, when you reboot your PC/Laptop then Windows 10 safe mode will automatically be done.
Method 6: In Windows 10 Interrupt Normal Boot/Startup Process
To activate the Automatic Repair mode you need to interrupt Windows 10 normal booting process three times consecutively and the fourth time it will enter the Automatic repair mode by default.
- When Windows 10 enter Automatic Repair mode, you will see in the screen that displays your operating system is in “Preparing Automatic Repair”.

- Choose an account that has administrator permission, if not asked then skip to the next step.

- Wait while Windows 10 trying to make the automatic diagnosis of your system.

- On the “Automatic Repair” screen, click on “Advanced options”.

- Select Troubleshoot.

- Again, click on Advance option >startup setting >Restart
- Now, Press F4 to boot into minimum safe mode, F5 key for “Safe Mode with Networking” or F6 for “Safe mode with command prompt”
And in this way, you can start Windows 10 safe mode.
What Are the Benefits of Launching Windows 10 in Safe Mode?
Starting Windows 10 in safe mode has its own benefits. So, let’s go and check out some of its benefits:
- If you are struggling to launch Windows normally, such as getting a blue screen on startup or it is taking longer than normal to start, then booting the Windows 10 in safe mode will fix such issues.
- As starting Windows in a safe mood disables the non-essential things, if you have any malware-infected files, you can easily detect them with the help of safe mode.
- If any of the apps are conflicting with other programs and services and you are unable to detect it, then launching your Windows 10 PC in the safe mode will help you to find out the troublesome app.
Though starting the computer in safe mode will not always troubleshoot the issue, but it can definitely help you to know what’s going wrong with your system.
Make Your Windows PC/Laptop Error-Free
To make your Windows PC/Laptop error-free it is suggested to run the PC Repair Tool. This tool is easy to use and does not require the need for any professional.
If your system is displaying any kind of Windows error such as DLL error, registry, Update error, application error, game error & others. This tool will help you fix it automatically by scanning your PC and fixing the issue.
It will only not resolves PC related error but also improves the performance of your old computer.
Get PC Repair Tool to Fix Various Error & Issues.
Conclusion
All the above-given methods are completely tested and able to boot safe mode windows 10, so don’t worry about its working. Apply them one by one according to the condition of your PC.
Hope you liked this article and it helped you in how to boot in safe mode windows 10.
We would love to help you with more queries and suggestions regarding this article. Feel free to reach us via the Facebook page.
Hardeep has always been a Windows lover ever since she got her hands on her first Windows XP PC. She has always been enthusiastic about technological stuff, especially Artificial Intelligence (AI) computing. Before joining PC Error Fix, she worked as a freelancer and worked on numerous technical projects.