Summary – Troubled with a Logitech G533 gaming headset Microphone not working, then this guide is for you. Here in this article, you will get to know how to fix Logitech G533 Mic not working problem in no time.
Logitech G533 is best suited for your Windows PC if you are a game lover. This wireless microphone is very popular due to its 15 hours of battery life, incredible noise cancellation technology, and lightweight feature.
Although this is an amazing piece of hardware, gaming can be difficult when you face troubles like Logitech G533 Mic not working.
Yet, don’t worry! You are lucky enough that you are reading this guide right now. You will come through a list of all possible troubleshooting fixes that will help you fix the problem with ease!
Why is My Logitech G533 Headset Mic Not Working?
There are a lot of reasons that cause audio problems in Logitech G533 Mic on your Windows PC. Some of them are as follows.
- Any common technical glitch on your hardware is causing audio trouble.
- Any other audio application or program like Skype, Zoom, or Google meet is preventing audio access in Logitech G533. In this case, you have to exit all the background applications to fix the problem.
- The audio output is not set to the Logitech G533 device. Some other headphones or wireless/wired devices like Bluetooth may be connected unintentionally.
- The necessary audio permissions for the devices and programs on your PC are not granted.
- The Logitech G533 microphone settings are not appropriate.
- A few essential audio services on your computer are disabled.
- The audio drivers on your PC are not updated to their latest version to enjoy uninterrupted audio streaming. In addition, the operating system is not updated to its latest version.
- Any misconfigured files of Logitech Gaming software are blocking the audio processes. These corrupt game files can only be fixed when you reinstall the app.
So, these are some of the common culprits responsible for Logitech G533 microphone not working on the Windows system. Now follow the potential workarounds to solve the problem easily.
How to Fix Logitech G533 Mic Not Working Problem?
Solution 1: Reconnect the Device
Before you move ahead to troubleshoot the audio issues associated with the Logitech G533 headset, you have to physically check if there are any external damages to the device.
- Disconnect your Logitech G533 headset from your PC.
- Disconnect all other external devices and cables connected to your PC. Restart the computer.
- Wait for a while and re-connect the Logitech G533 headset. Check if you can hear the audio in the headset. If not, move to the next solution.
Solution 2: Check Audio Output
If in case you have connected many audio devices to your PC, you must definitely confirm a default device that must be used for output. Follow these steps to ensure the output device is on your Windows 10 PC.
- Press the Speakers option at the bottom of the taskbar.
- Press the arrow symbol to expand the connected devices list on your PC.
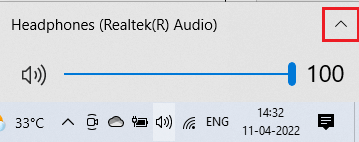
- Then, click on the Logitech G533 device (headphones) and ensure that the audio plays through the headset.
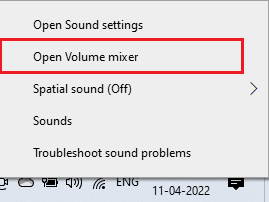
- Then, right-click on the same Volume icon and press the Open Volume mixer as shown.
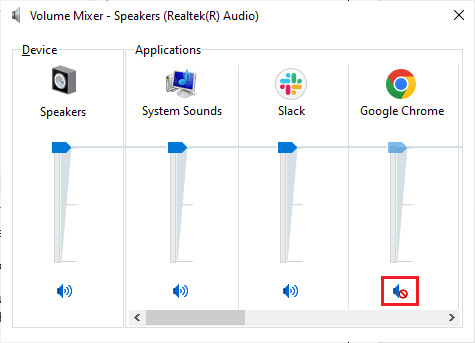
- If any of the tabs in the Volume Mixer – Speakers window are muted, click on them and unmute them.
- Now, go to Windows Settings ( Click Start + I keys )
- Then, press System.
- Go to the Sound tab in the left pane and press Device properties below the Output

- Uncheck the Disable box if it is checked.
- Follow the above two steps for Input devices This will fix sound issues in Logitech G533 Mic.
Solution 3: Run Hardware & Devices Troubleshooter
If there are any problems with the Logitech G533 microphone, you can easily fix them by using an inbuilt troubleshooting tool present on your PC. Follow these instructions to run the hardware and devices troubleshooter.
- Open the Run dialogue box by pressing Win + R keys.
- Then, enter msdt.exe -id DeviceDiagnostic and click on OK.

- Now, press the Next
- If the drivers of your device are not updated to their latest versions, you will get the below prompt. Finish installing them by following the instructions and Restart your PC.

- This troubleshooting will let you know whether it can explore any problem with the hardware. If there are any, follow the on-screen instructions to complete the troubleshooting.
- You will see this prompt if there are no hardware issues. In this case, move to the next solution.

Solution 4: Close Other Programs that are Using Audio
If multiple background audio-related tasks are running on a PC, they will consume a lot more resources of your computer. This will cause can’t to hear the audio in the Logitech G533 Mic problem. We recommend you exit all the unnecessary tasks as demonstrated below.
- Click Ctrl+ shift+ ESC keys at the same time to open Task Manager.
- In the Processes tab, click the unnecessary task and select the End task option at the right corner as shown.
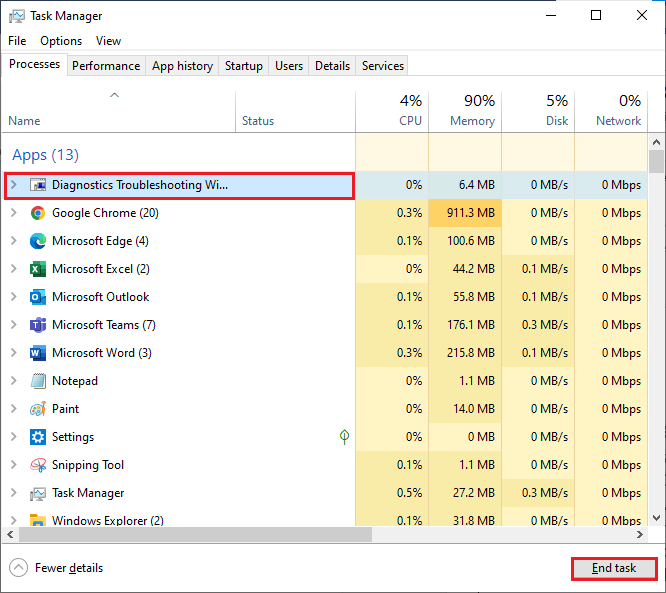
- Repeat the same steps for all background tasks and restart the PC.
Solution 5: Check Microphone Settings
Once you have confirmed that your audio is not being used by other audio apps on your PC, it is time to check the microphone settings on your PC, whether it is properly configured or not.
Follow the below-listed instructions to resolve sound issues in Logitech G533 Mic.
- Type the control panel in the search bar and open it.
- Now, set View by to Small icons and then, press Sound.
- In the upcoming window, go to the Recording
- Choose any empty space on the list of Microphones available on your PC and from the next context screen, press Show Disabled Devices.

- If you can see Logitech G533 in the list, right-click on it and press Enable. As soon as you do this, this Logitech G533 microphone will be available on the Recording tab.

- Now, click on the Logitech G533 microphone and select the Set default
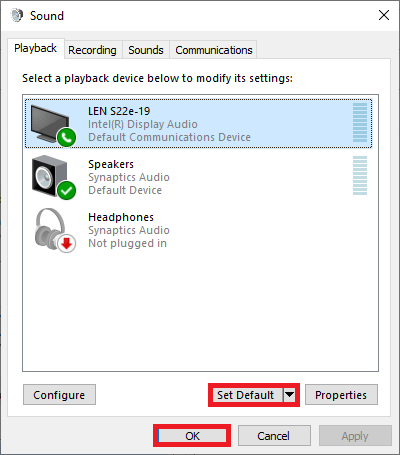
- Then, right-click on Logitech G533 and press the Properties
- In the next window, go to the Levels tab and move the slider button towards the right to make it 100%.
Now, you can head audio from the Logitech G533 microphone.
Solution 6: Allow Access to Logitech G533 Microphone
Your Windows 10 PC will have a list of apps that will have access to audio devices. If your audio program (Logitech Gaming Software) is not in this enabled list, you will face a Logitech headset mic not working issue. Follow these steps to allow access to the Logitech G533 headset.
- Click Windows and I keys together to open Settings.
- Now, press the Privacy
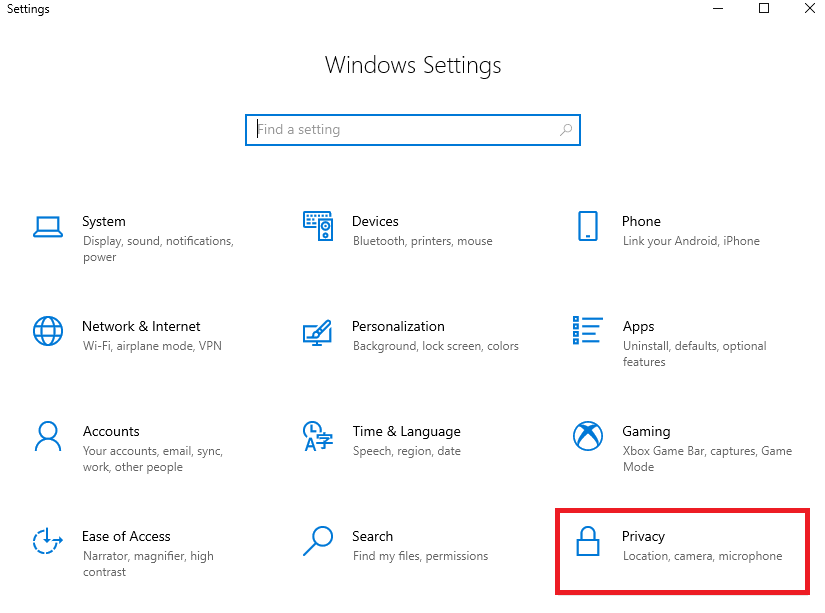
- In the left pane, press the Microphone
- Then, toggle on Allow apps to access your microphone

Solution 7: Re-enable Sound Card
The sound card in your device is responsible for communication services between the hardware and the Operating System. If there are any corrupt components in this sound card or if they are disabled by default, you have to re-enable them to fix the Logitech G533 headset mic not working issue.
- Go to the search menu and type Device manager. Now, press Open to launch the results.
- Now, double-click on the Sound, video and game controllers This will expand a list of all available sound cards on your device.
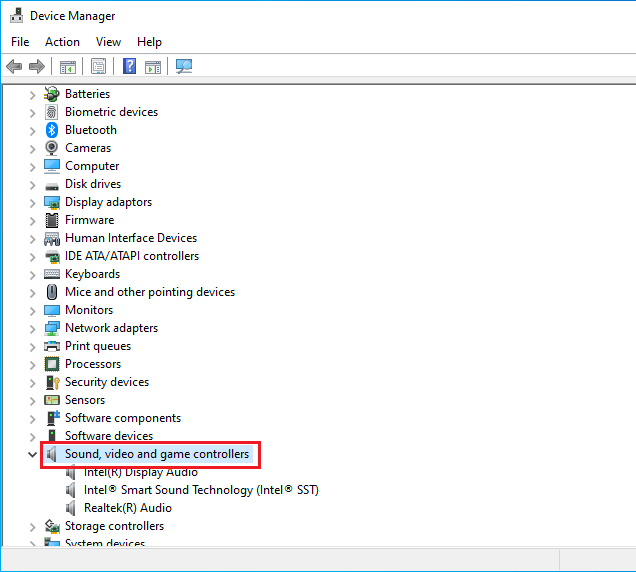
- Now, right-click on your sound card.
- Then, press the Disable device
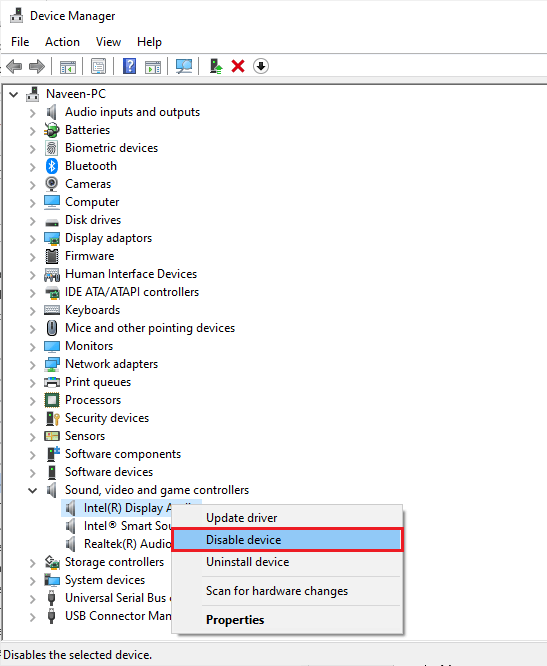
- In the next prompt, you have to tap Yes to continue. Now, reboot your computer.
- Again, open Device Manager and right-click on your sound card as you did earlier.
- Now, tap Enable device as shown.
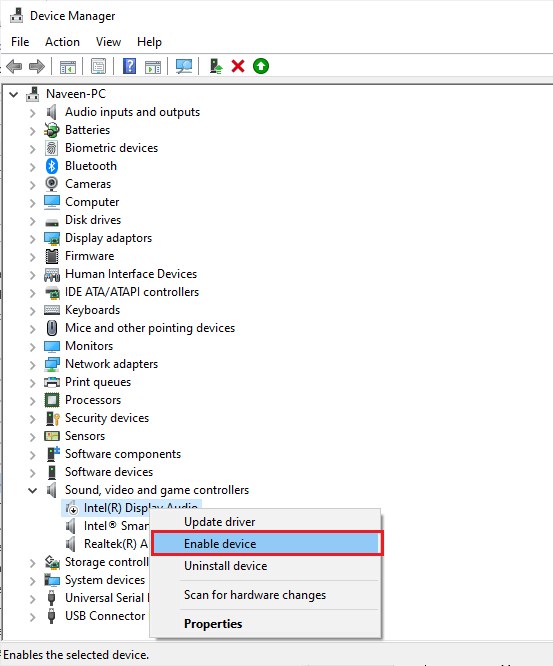
Finally, play any sound in Logitech G533 and check if the microphone issues associated with the device are resolved or not.
Solution 8: Restart Audio Services
There are a few essential audio services on your Windows computer that start causing problems due to conflicting or some sort of internal glitches. In this situation restarting the audio services helps you to solve the glitches and might fix the problem for you.
Follow these steps to enable the audio services.
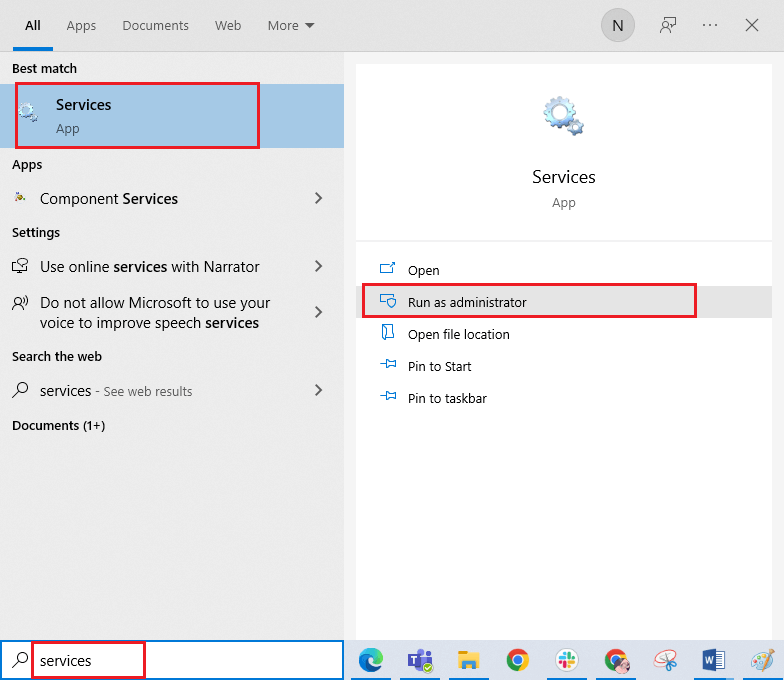
- Go to the search menu and enter Services.
- Now, tap on Run as administrator.
- Then, move down to the entire list and double-click on the Windows Audio
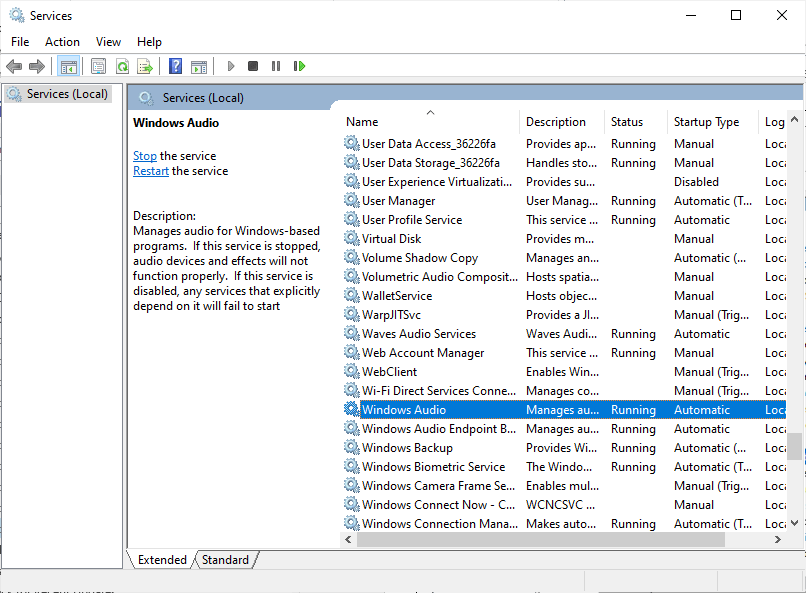
- Now, press the Startup type and set it to Automatic from the drop-down list.
- If you see the Service status as stopped, then tap the Start
- On the other hand, if the Service status is Running, then tap Stop, wait for a while and then tap Start
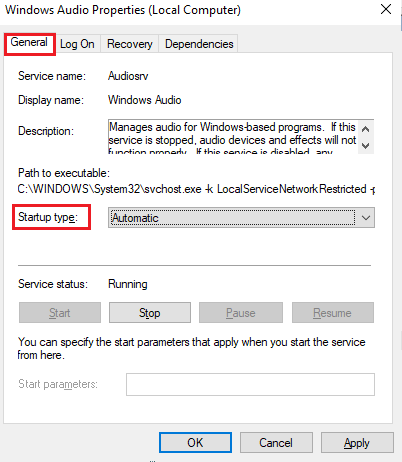
- Save the changes by pressing Apply and then OK.
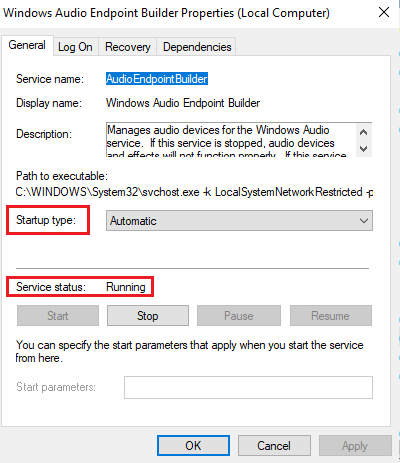
- Repeat the same steps for the other few necessary Windows services like Windows Audio Endpoint Builder and Remote Procedure Call (RPC). This will help you fix the can’t hear the audio in Logitech G533 Mic issue.
Solution 9: Deny Exclusive Access for Audio Device
Even if you have implemented all the above-listed solutions, yet still if you are frustrated with the Logitech G533 headset mic not working issue, try denying exclusive access to other audio devices as instructed below.
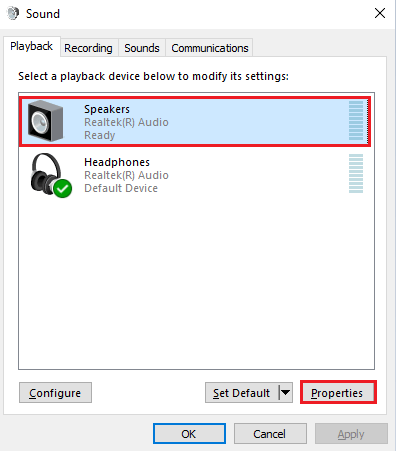
- Right-click on the Speakers icon from the taskbar.
- Now, press the Sounds option from the list.
- Then, tap your audio device (Logitech G533 Mic) and press the Properties
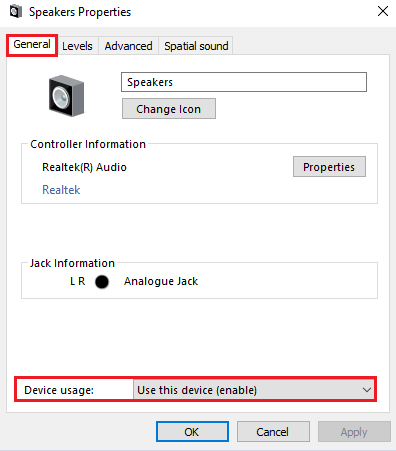
- Now, stay in the General tab and change the Device usage set to Use this device (enable).
- Then, tap Apply and press OK to save the changes.
- Then, move to the Advanced tab and deselect the below-listed options under Exclusive Mode.
- Allow applications to take exclusive control of this device.
- Give exclusive mode applications priority.
Note: When you deselect the Allow applications to take exclusive control of this device option, the Give exclusive mode applications priority setting will be simultaneously deselected.
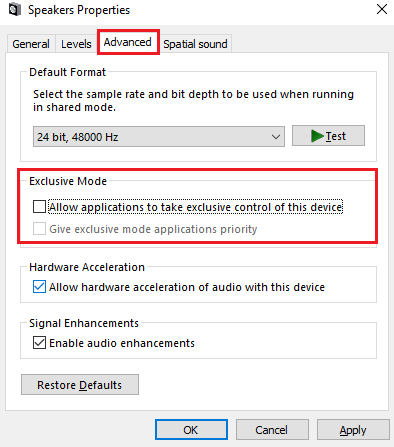
- Again, press Apply followed by OK to save the changes. Then check if you can hear the audio in the Logitech G533 device.
Solution 10: Update Audio Drivers
Another significant reason that causes sound issues in Logitech G533 Mic is, that the audio drivers are not updated to their latest version. Follow the listed instructions to update audio drivers.
- Press the Windows key and type Device Manager. Open the results.
- Double-click on Audio inputs and outputs. This will expand the list of audio drivers.
- Right-click on the audio driver (for example Microphone (2- High Definition Audio Device)) and choose Update driver.
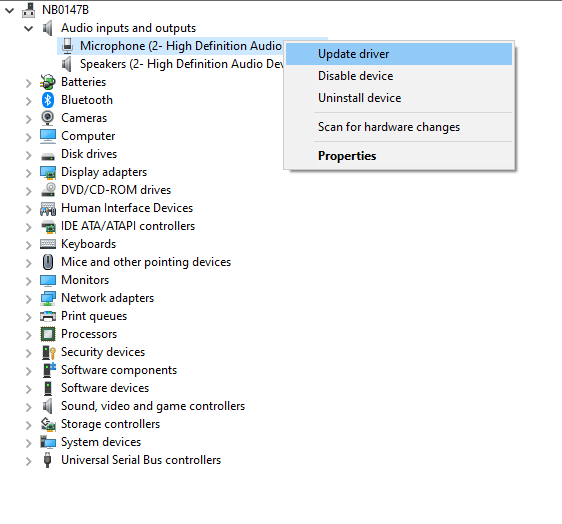
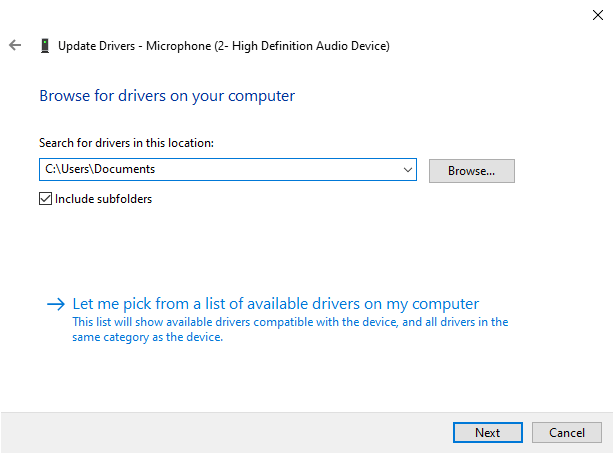
- Press Browse my computer for drivers. This will find and install the drivers manually.

- Tap the Browse button to locate any directory where you can find the drivers and press the Next
- If drivers are already updated, you will receive The best drivers for your device are already installed promptly on the screen. Else, follow the on-screen prompts to complete the installation.
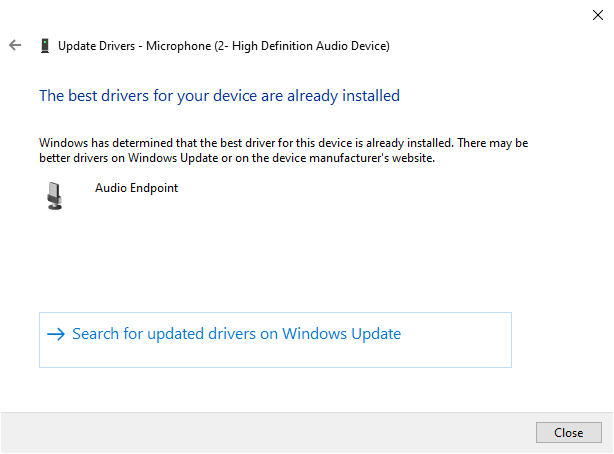
- Exit the window and reboot your PC once you have installed the latest drivers.
Many times Windows fails to detect and update the driver, therefore, it is best to use the automatic Driver Updater tool, this is an advanced tool that just by scanning once detects and updates the entire system drivers.
Get Driver Updater to update the entire system drivers automatically
Solution 11: Reinstall Logitech Gaming Software
If none of the above-listed troubleshooting hacks has helped you fix audio problems in the Logitech G533 Mic issue, then you can try reinstalling the software as instructed below.
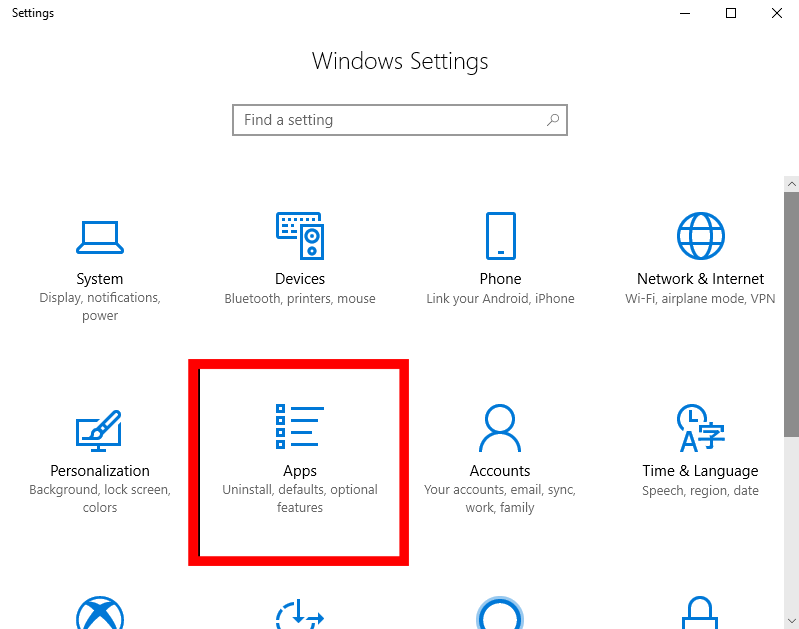
- Go to Settings on PC by pressing Windows and I keys.
- Now, press Apps.
- Now, scroll down the screen and search for Logitech gaming software. If you find any, click on it and select Uninstall.
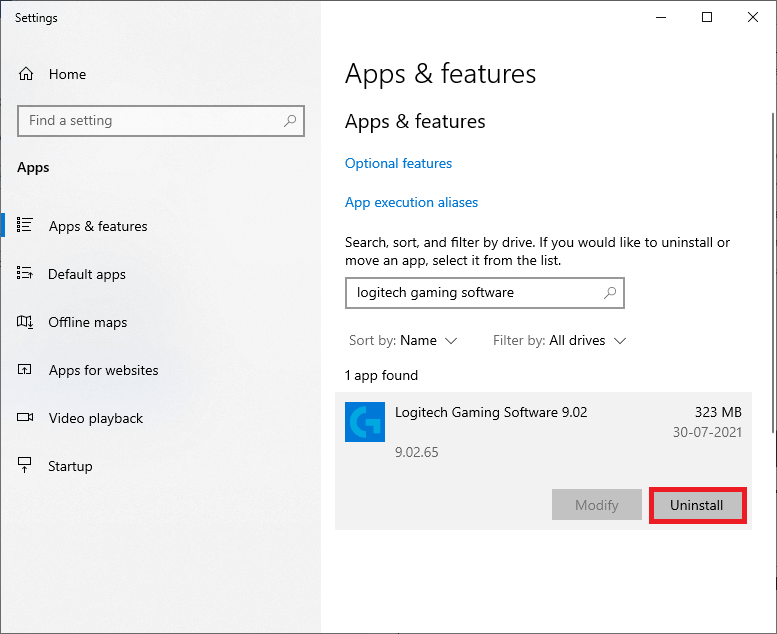
- If you are prompted again, then tap on Uninstall.
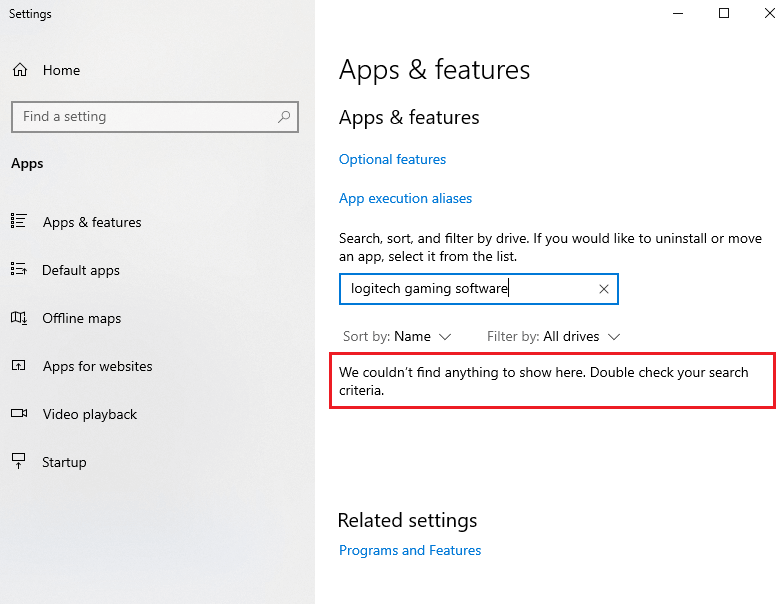
- Now, again confirm whether you have deleted the software by We couldn’t find anything to show here. Double-check your search criteria message when you search for the program again.
- Now, go to the Windows search bar and type %appdata%.
- Then, click on the AppData Roaming folder and move to the following path:
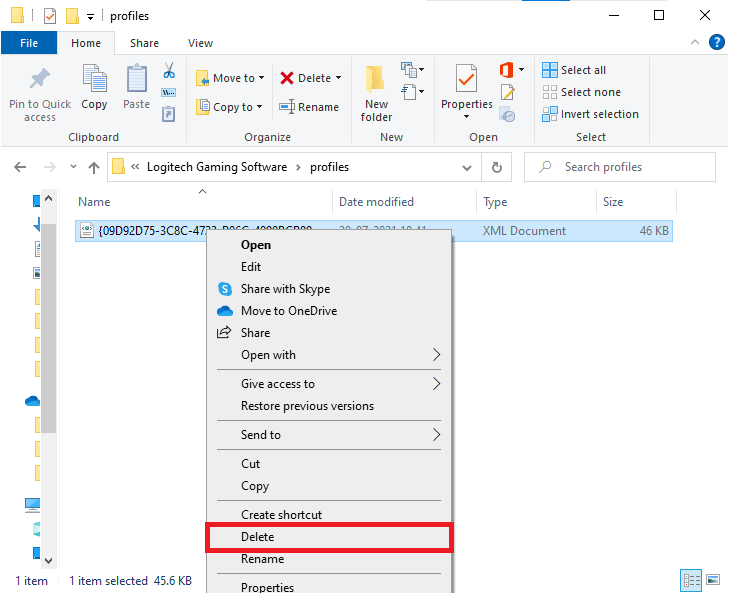
C:\Users\USERNAME\AppData\Local\Logitech\Logitech Gaming Software\profiles
- Then, select all the files and delete
- Again go to the Windows menu and type %LocalAppData%.
- Then, search for the Logitech Gaming Software folder and remove all the folders.
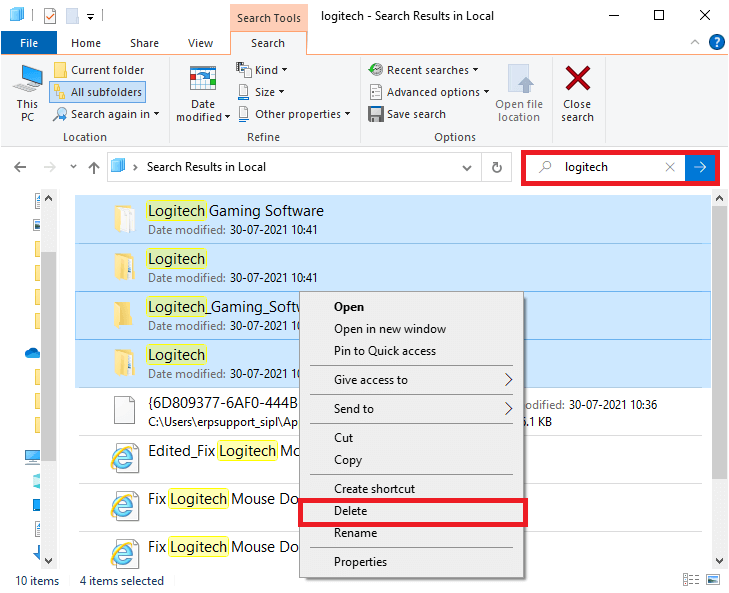
- After deleting all the files/folders associated with the Logitech gaming software, follow the below steps to reinstall it.
- Click on this link to download the software from the Logitech download site.
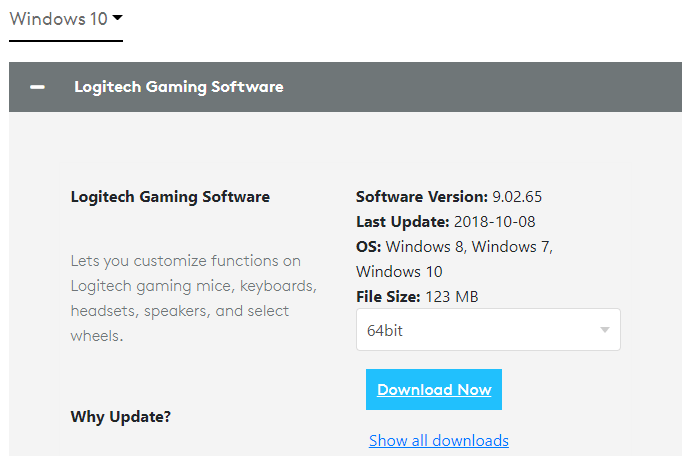
- Once the file is downloaded, go to My downloads and then double-click on 02.65_x64_Logitech ( the version may vary according to your file) to run it.
- Keep pressing the Next button until you see the installation screen.
- Once the software is installed, check if you have fixed the Logitech G533 headset mic not working issue.
FAQ Related to Logitech G533 Mic Not Working Problem:
1- How do I unmute my Logitech headset?
Follow these steps to unmute your Logitech headset:
- Type control panel in the search bar and open it.
- Now, set View by to Small icons and then, press Sound.
- In the upcoming window, go to the Recording tab.
- Then, right-click on Logitech G533 and press the Properties option.
- In the next window, go to the Levels tab and move the slider button towards the right to make it 100%.
2 - How do I factory reset my Logitech G935?
Firstly, connect the G935 headset to the USB power, and on the mic side, demount the side plate. Now, you can see the interior structure. Take a small pin and find the hardware reset button. Press and hold it for 2 seconds. This will reset the device.
3 - Can I use G533 while charging?
Yes, you can use G533 while you are charging it. If your headset is dying out of charge you can wait until it’s charged or you can use it even when it is plugged in.
4 - How do I connect my Logitech G533 to PS4?
Logitech G533 supports Mac and PS4. To connect your Logitech G533 to your Play Station, charge the headset with the help of a USB cable. Then, plug the USB adaptor into your console. Now, turn on your headset and wait until the blue light stops blinking. When your device is paired with a PS4, you will be able to see a solid blue colour. This indicates perfect pairing.
Best Solution to Fix Various Windows PC Problems
If your Windows computer is running slow or showing various stubborn computer errors, then it is recommended to run the PC Repair Tool.
This is an all-in-one multi-functioning tool that just by scanning once detects and fixes various computer errors and issues.
With this, you can fix various errors like DLL repair, clean your registry entries, and BSOD errors, protect your system from virus/malware infection, repair corrupted Windows system files, and much more.
This also tune-up, optimize, and enhance Windows PC performance.
Get PC Repair Tool, to Fix Errors & Enhance the PC Performance
Conclusion
That’s it!
It is very simple to get rid of Logitech G533 Mic not working issue by following these 11 solutions .listed here.
I tried my best to list down the entire possible solutions to get past the problem and get your Logitech G533 mic working again.
If you have any doubts or queries, feel free to drop them on our Facebook page. We would love to hear from you!
Good Luck..!
Hardeep has always been a Windows lover ever since she got her hands on her first Windows XP PC. She has always been enthusiastic about technological stuff, especially Artificial Intelligence (AI) computing. Before joining PC Error Fix, she worked as a freelancer and worked on numerous technical projects.