Summary: If you are one of those users who are confronting the Windows 10 update error 0x80242006, then this article is for you. As in this article, I am going to discuss this another irritating update error and how can you fix it with simple steps. So, keep reading this article to explore all fixes.
Likewise, any other Windows 10 update errors, 0x80242006 also strikes when users trying to install the major updated rolled out by Microsoft.
After the in-depth analysis, our team came to know that this error doesn’t only trigger while installing updates but also when users rolled back the build updates.
This error code generally appears due to the Windows Defender incompatibility or stopped BITS service. According to computer professionals, the damaged database of Windows Defender is the root cause of this error.
However, you can easily fix the update error code 0x80242006 by applying the below-given solutions one by one and hopefully these solutions will work for you to install the available updates again without any error.
So, let’s start applying the given solutions carefully.
How Can You Fix Windows Update Error 0x80242006 in Windows 10?
Method 1: Try to Start BITS Manually to Fix Update Error 0x80242006
As stopped BITS service is one of the major factors for this error appearing on the Windows 10 computer, hence you need to start this service manually. You can do this easily with these steps:
- Go to Cortana and type services.msc command on the Cortana text field and click on the Services.
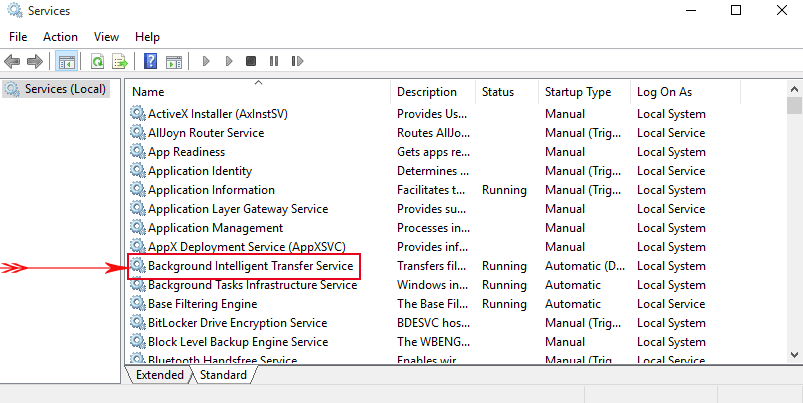
- After opening the Services Window, you need to find the “Background Intelligent Transfer Service” (BITS) service.
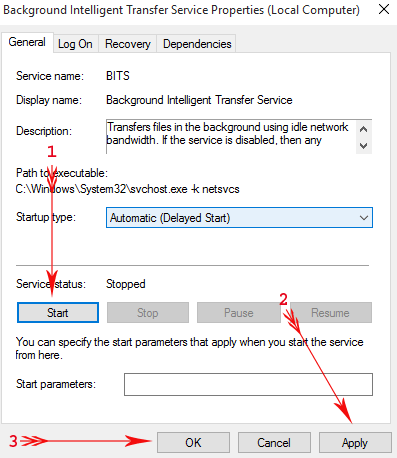
- Now, double-click on the BITS, you will see a dialog box showing several options, click on the Start. At last, click on the Apply and then OK. This will start the BITS manually.
After it, try to install the available update on your Windows system and check for the error 0x80242006.
It is hoped that after applying the above method you should circumvent this stop error code completely.
Method 2: Run Windows Update Troubleshooter
If you are still experiencing Windows 10 error 0x80242006, then you have to run Windows Update Troubleshooter once. This troubleshooter will help your system to get rid of this error by repairing the corrupted database.
- Press the Windows + I key to open the Windows Settings.
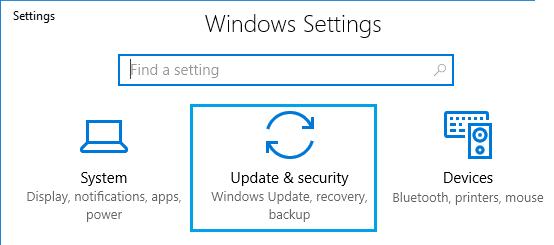
- Now, from this window go to the icon Update & Security.
- Click on the Troubleshoot option present on the left sidebar.
- Go to the Windows Update section, then click on the Run the troubleshooter button.
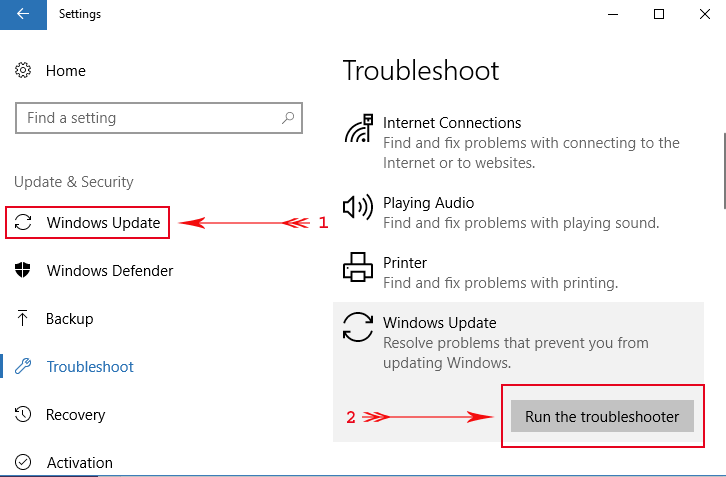
This windows troubleshooter will scan the entire system and it finally repairs the corrupted database.
Method 3: Disable Windows Defender
It is already discussed that most of the error code appears because of the Windows Defender. So, we will try to update our system after disabling the Windows Defender. Apply the below-given steps one by one to do so:
- Go to the Windows Search box -> type gpedit.msc on Cortana and press the Enter key.
- After it, navigate to the below-given path present on the left sidebar of Local Group Policy Editor.
Computer Configuration => Administrative Templates => Windows Components => Windows Defender Antivirus.
- Now, go to the corresponding right side, find and double-click on the Turn off Windows Defender Antivirus.
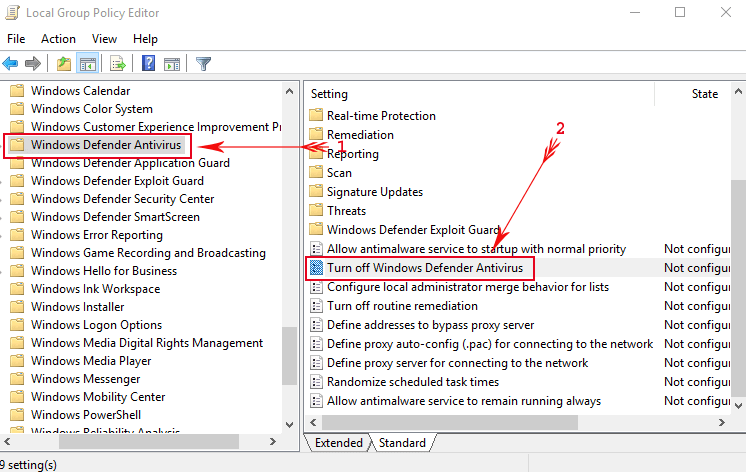
- Another window will appear, from here choose Enabled -> press Ok and then Apply to save these changes.

After applying this method, now you can update your windows smoothly and fix error 0x80242006 in Windows 10.
Method 4: Use Group Editor to Address Windows Update
- Open the Run dialogue box by pressing Windows + R key
- Type gpedit.msc on Run box, then press the Enter key.
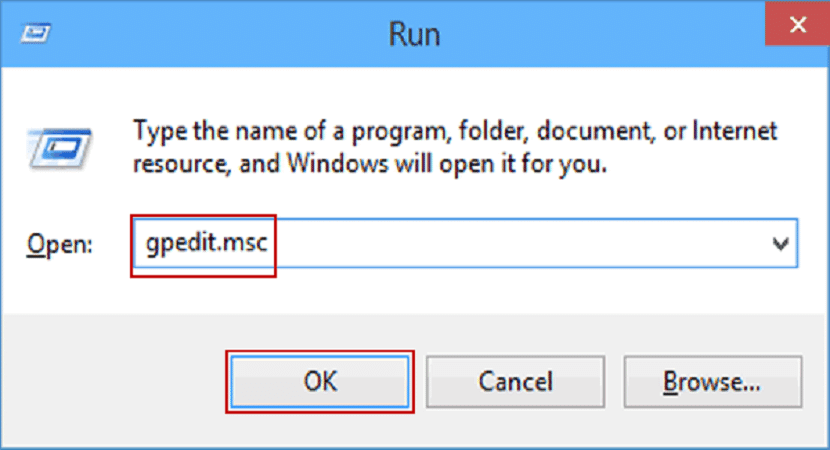
- Choose the Computer Configuration and click on the Administrative Templates.
- Open the System and then double-click on the Specify settings for optional component installation and component repair.
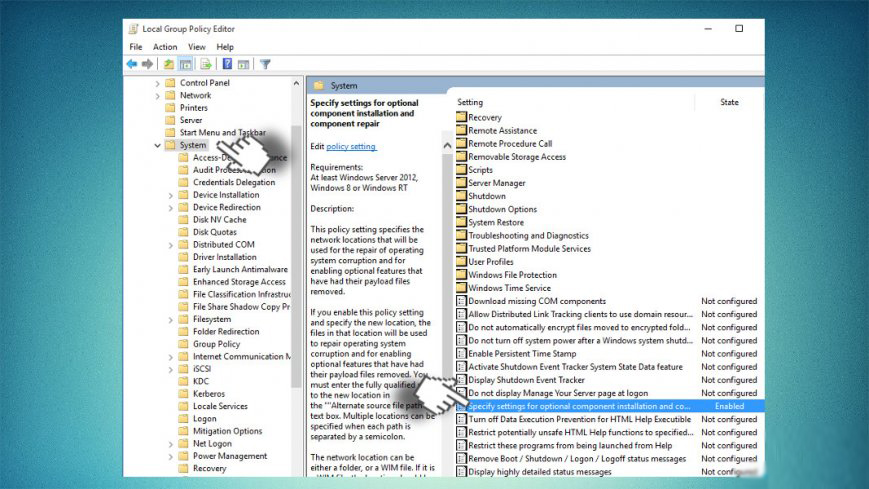
- Select the Enabled and tick out the checkbox present along with the Contact Windows Update directly.
- At last, save the changes by clicking on the Ok then Apply.
Method 5: Go With the Command Prompt
- First, you have to open the Command prompt with the admin privilege. To do this, right-click on the Windows Start button and choose Command Prompt (Admin).
- After opening the Command Prompt window, copy and paste the following commands one by one. Press the enter key after each of the commands.
WSReset.exe
dism /online /cleanup-image /restorehealth
dism /online /cleanup-image /StartComponentCleanup
sfc /scannow
powershell
Get-AppXPackage -AllUsers |Where-Object {$_.InstallLocation -like “*SystemApps*”} | Foreach {Add-AppxPackage -DisableDevelopmentMode -Register “$($_.InstallLocation)\\AppXManifest.xml”}
After executing thee commands one by one, close the Command window and reboot your PC.
Now try to download and install the Windows 10 update. It is hoped that your system is completely error-free.
Method 6: Reset Windows Update Cache
If the Windows update cache has broken package, then you are likely to encounter the Windows 10 update error 0x80242006. Though you can easily fix this issue by resetting the Windows update cache.
To do so, follow these steps:
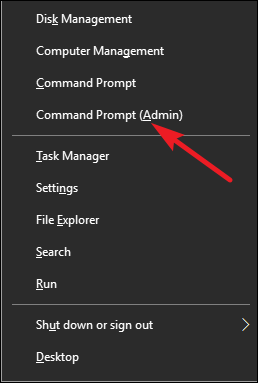
- Press Windows + X key and select the Command Prompt (Admin)
- In the Command Prompt, type the given commands and press Enter key after each one:
net stop wuauserv
net stop bits
rd /s /q %windir%\SoftwareDistribution
net start wuauserv
net start bits
- Lastly, close the Command Prompt and restart the Windows update process to check if the issue is fixed or not.
Method 7: Rename the Windows Update Folder
The next method you can try to resolve this update issue is to rename the Windows update folder and to do so, follow the given instructions:
- Open Notepad on your computer
- In Notepad, write down these commands:
net stop wuauserv
CD %systemroot%\\SoftwareDistribution
Ren Download Download.old
net start wuauserv
- Then click on the File tab and select Save As.
- Name the Notepad file as rename.bat, then click on Save button
- Now go to this notepad file and right-click on it, then select the Run as administrator option from the menu.
Method 8: Reset the Windows Update Components
Many of the affected users fixed this Windows 10 error code 0x80242006 by resetting the Windows Update components. Therefore, you should also try this if none of the fixes helped you yet. Follow these steps, to do this:
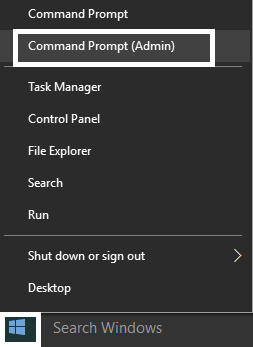
- Right-click on the Windows Start button and click on the Command Prompt (Admin)
- In Command Prompt execute the given commands and don’t forget to press the Enter key after each command:
net stop wuauserv
net stop cryptSvc
net stop bits
net stop msiserver
- Next, type the following commands to rename the SoftwareDistribution and Catroot2 folders and press the Enter key after each of them:
ren C:\\\\Windows\\\\SoftwareDistribution SoftwareDistribution.old
ren C:\\\\Windows\\\\System32\\\\catroot2 Catroot2.old
- After this, type the following commands and press the Enter after each command:
net start wuauserv
net start cryptSvc
net start bits
net start msiserver
- Finally, close the Command Prompt and restart your PC.
Easy Method to Fix Update Error Code 0x80242006
If none of the above-given manual solutions worked to fix this Windows 10 update error, then try the PC Repair Tool. This is capable of fixing the common PC errors and might help you to fix the update error code 0x80242006 on your computer.
This is a specialized Windows repair tool that diagnoses your PC. It scans, detects, and fixes errors such as BSOD error, game errors, application errors, registry issues, keeps secure from viruses, and many others.
It also optimizes PC to enhance its performance so that users can run PC without any lagging issue.
Get PC Repair Tool to Fix Windows 10 Error 0x80242006
Conclusion
So, these are some of the best working solutions affected users applied to resolve the Windows 10 update error 0x80242006. Hence, these fixes should work in your case too.
And, these solutions are easy to execute and one doesn’t need to have prior technical knowledge. In case, neither of the above-mentioned fixes helped, then try the mentioned tool.
Apart from these, if you have any other solutions or any queries, then feel free to share it with us on Facebook or Twitter.
Hardeep has always been a Windows lover ever since she got her hands on her first Windows XP PC. She has always been enthusiastic about technological stuff, especially Artificial Intelligence (AI) computing. Before joining PC Error Fix, she worked as a freelancer and worked on numerous technical projects.