Steam is no doubt one of the top video game digital distribution services that distribute games all around the world. It was developed by Valve and launched in 2003.
This software makes things much easier for the gamers as they don’t need to wait anymore for the installation disc of the game after purchasing it. Thanks to Steam now we don’t need to care for CDs/DVDs damage.
By using Steam, gamers can install the game on their PC. Simply, install Steam on your computer, create the Steam account, log in to Steam software and download the game of your choice.
Steam works so well on Windows PC and usually doesn’t create an issue, but keep in mind it is also prone to errors. Sometimes, Steam does weird things and Steam needs to be online to update error is one such thing.
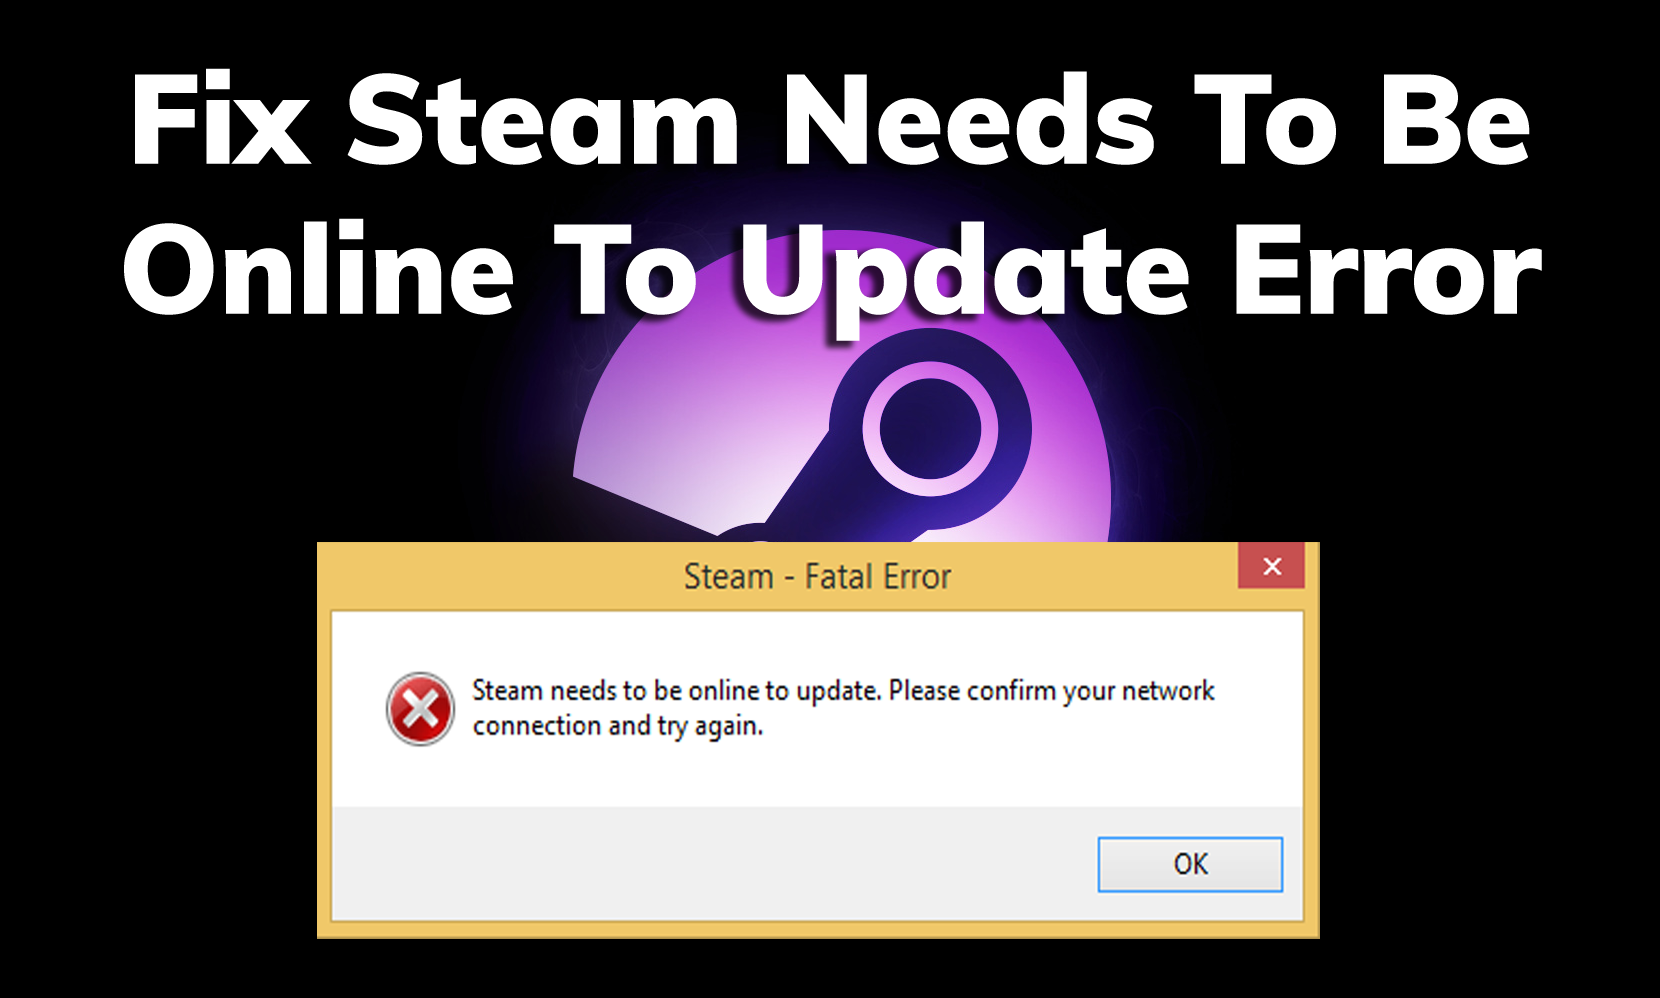
Whenever this error gets triggered, it appears with this error message:
Steam needs to be online to update. Please confirm your network connection and try again.
This issue appears when the user tries to update the Steam app. This error won’t let you update Steam and due to this, you can’t play the games on Steam software. Hence, this issue needs to be fixed asap so that you can run the Steam games.
Now, in order to troubleshoot this issue on your own, you need to follow this tutorial and apply the methods shown below. But before heading to the fixes, take a quick look at the causes responsible for this problem.
What Causes Steam Fatal Error: Steam Needs to Be Online to Update
There are different reasons that are considered for causing the Steam needs to be online to update error in different scenarios. So, here are the most typical reasons listed below:
- Slow internet connection is the first reason that causes this error. In this case, you can either switch to the better network or try to disconnect and reconnect the internet connection to fix this issue.
- If Steam is lacking the essential admin rights.
- Your DNS settings can be another reason as wrong DNS settings can restrict you to update Steam.
- If third-party antivirus or firewall is blocking the Steam app on your PC.
- Steam Client service is not working.
- If Steam game files are corrupted.
How to Fix Steam Needs to Be Online to Update Error?
1: Run Steam as Administrator
Sometimes, Steams requires the admin privileges to work in an intended way. So, make sure Steam has full admin rights, and for this, you need to run Steam as an administrator.
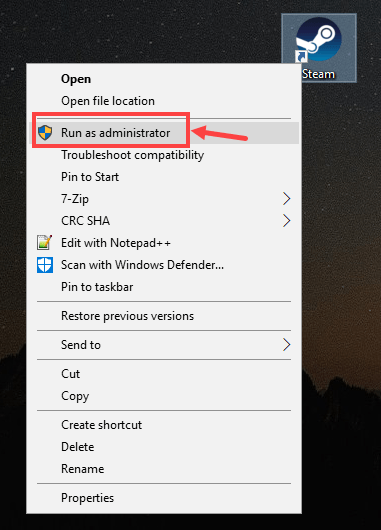
- Right-click on the Steam shortcut on the desktop and select Run as administrator.
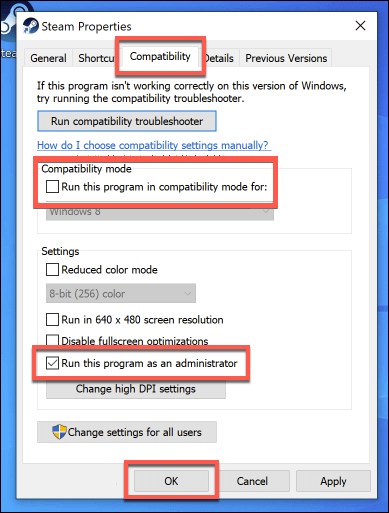
- Again, right-click on the Steam shortcut and select the Properties option from the context menu.
- Switch to the Compatibility tab.
- Check the Run this program as an administrator checkbox.
- Click on the Run compatibility troubleshooter.
- Lastly, click on the Apply and OK button.
2: Disable Antivirus/Windows Firewall Temporarily
In some cases, Steam needs to be online to update error caused by the Windows firewall or any other third party antivirus installed on your computer. Sometimes, Windows Firewall and antivirus block the programs/apps when they don’t seem safe.
So, in this case, you need to disable the Firewall or antivirus temporarily to fix the Steam update issue. To disable the Firewall, follow these steps:
- Go to the Windows Search box and type control panel.
- Click on the Control Panel.
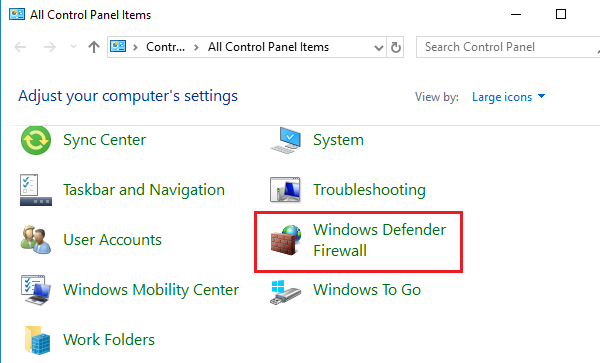
- In the Control Panel window, select View by: as Large icons.
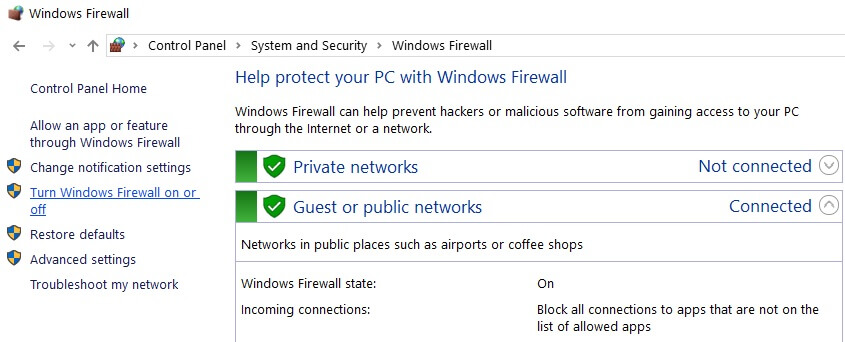
- Click on the Windows Defender Firewall.
- From the left pane of the window, click on the Turn Windows Firewall on or off.
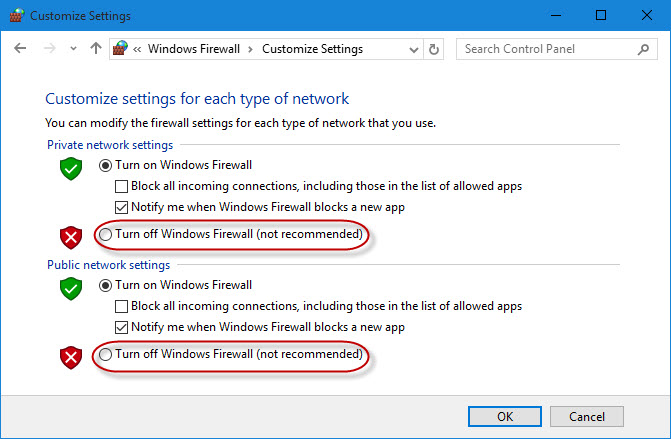
- Select the Turn off Windows Firewall (not recommended) option under the Private network settings and Public network settings sections.
- Click on the OK button.
In the case of third-party antivirus software, follow the steps given in the manual provided with the antivirus. After disabling it, check whether you are able to update Steam on your Windows PC. If not, then move to the next troubleshooting method.
3: Disable Proxy Settings
Proxy Settings interrupt the network traffic coming from the computer, which results in such issues. If the Proxy Settings is enabled on your computer, this might be the reason why you are getting the Steam needs to be online to update error.
So, to fix this error, disable the Proxy Settings. There are two ways to disable it, the first is through Google Chrome, and the second is using the Network Settings.
1: Through Google Chrome
- First, open the Chrome browser on your PC.
- Click on the menu icon given at the top-right corner of the window.
- Next, click on the Settings.
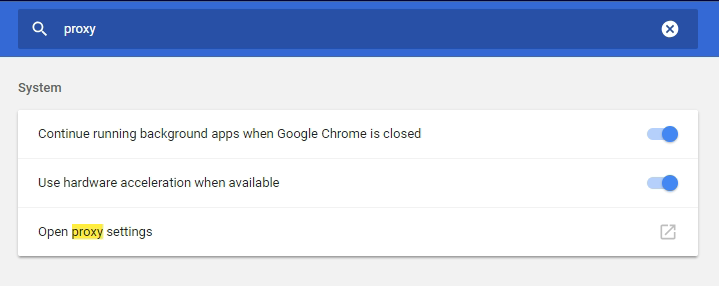
- On the Settings page, type proxy in the search bar.
- Select open proxy settings from the search result.
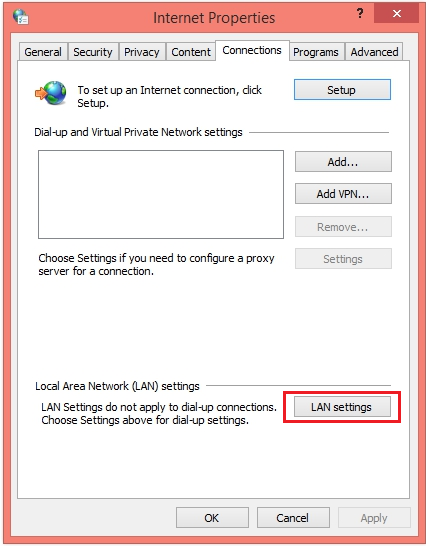
- Click on the LAN Settings button.
- Uncheck the box given next to the Use a proxy server for your LAN.
- Click on the OK button.
2: Trough Network Settings
- Press Windows + R keys together to open the Run application.
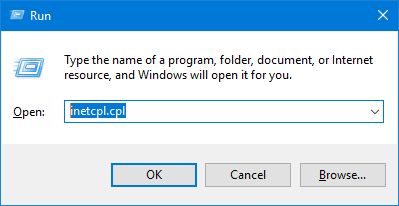
- In the Run box, type inetcpl.cpl and click on the OK button.
- In the Internet Properties window, switch to the Connections tab.
- Click on the LAN settings.
- Now, uncheck the Use a proxy server for your LAN checkbox.
- Click on the OK button to save the changes you have made.
4: Restart Steam Client Service
If the Steam Client service is not working or there is an issue with this service, then you are likely to get this error on your Steam app. As Steam Client service is responsible for several actions of Steam, it needs to be working properly.
So, to fix any issue with this particular service, you need to restart the Steam Client service. For this, follow these steps:
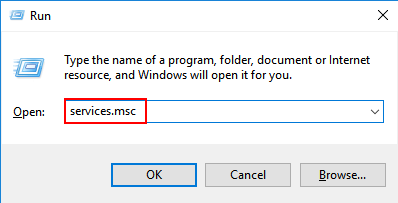
- Press Windows + R keys > type services.msc in the Run window > Click on the OK button.
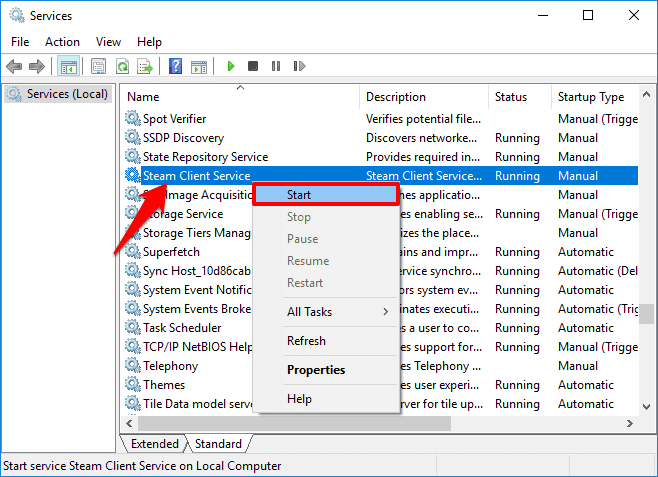
- In the Services window, search for the Steam Client Services and right-click on it.
- If the service is not running, then click on the Start option from the context menu. Otherwise, click on the Restart option.
5: Add -TCP Parameter to Steam Shortcut
By default, Steam uses the UDP for data transmission. So, if you are facing the Steam needs to be online to update error while updating the Steam, then you should switch to TCP.
Doing this helped many users to fix this error, as TCP is more reliable and faster than UDP. Hence, I will suggest you too to try the TCP for data transmission.
- First, go to the Steam directory.
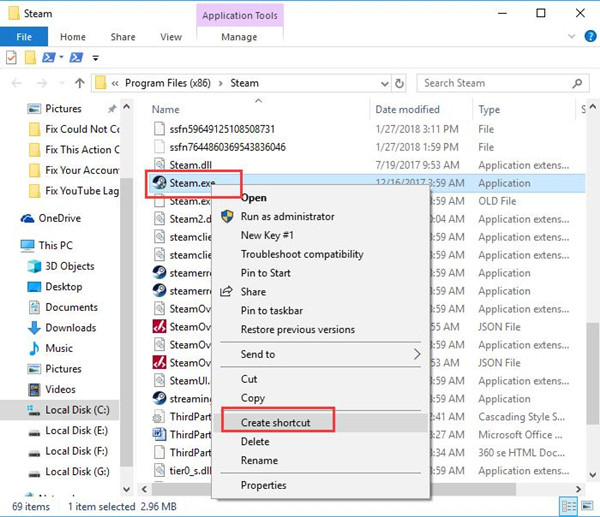
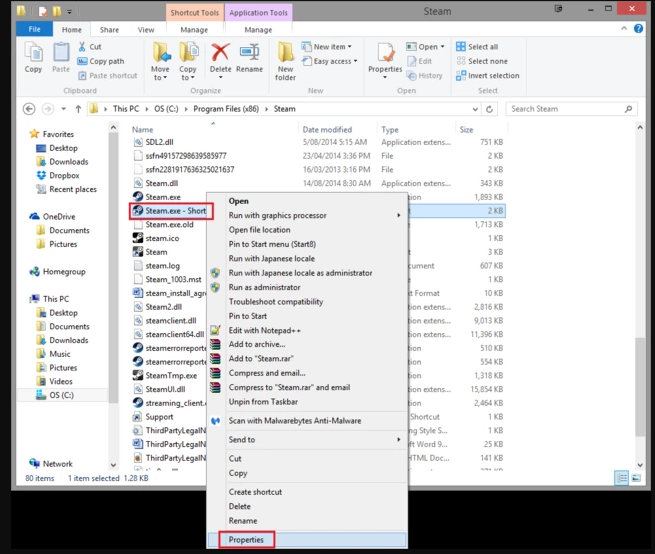
- In the Steam folder, right-click on the steam.exe and select the Create Shortcut option.
- Right-click on the Steam.exe-shortcut and select Properties.
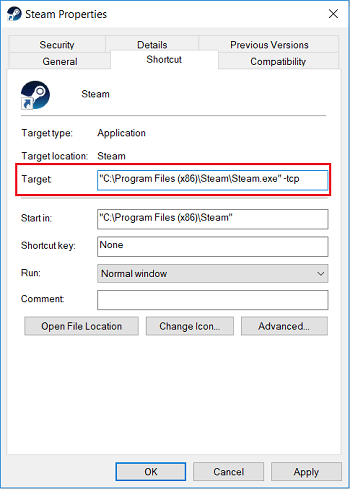
- In the Properties window, go to the box named Target and add -tcp at the end of the given path, like this:
“C:\Program Files (x86)\Steam\Steam.exe” –tcp
Note: Make sure to add space before the -tcp.
- Click on the OK button.
6: Delete Files from Steam Directory
Sometimes, corrupted game files of Steam cause the Steam needs to be online to update error. So, to fix this error, delete all the files from the Steam directory.
- Go to the Steam directory. (Default path of the Steam directory is: C:\Program Files (x86)\Steam).
- Now, delete all the files from the Steam folder except the Steam.exe file and Steamapps folder.
- Restart the computer.
- Once the computer started, go to the Steam directory and run the Steam.exe.
Now, check if doing this helped you to fix the error. If not, then follow the next solution.
7: Use Registry Editor
According to several Steam users, making few changes in the Registry Editor can fix the Steam needs to be online to update error on your Windows 10 PC. Here are the steps you need to follow:
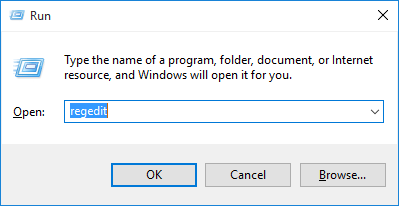
- Press Windows + R keys to open Run window > type regedit in the box > click on the OK button.
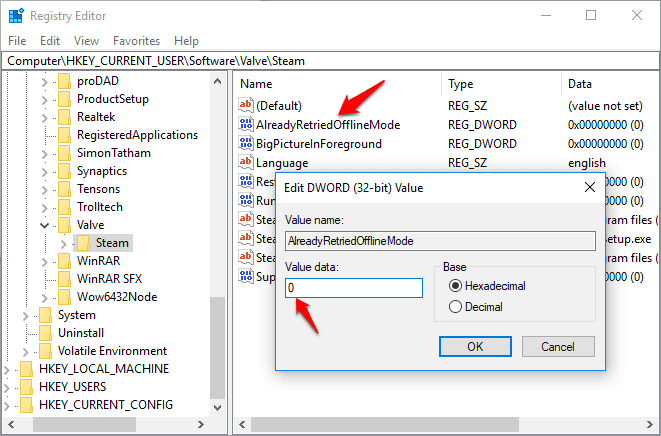
- In the Registry Editor window, navigate to this path:
HKEY_CURRENT_USER\Software\Valve\Steam
- In the right pane of the window, double click on the AlreadyRetriedOfflineMode.
- Now, set the Value Data to 0.
- Click on the OK button.
- Restart your computer and check if the issue is resolved or not.
8: Copy the Steam Folder from Another Computer
Another solution to this issue is to copy the Steam files from another computer on which Steam is working absolutely file. To do this, follow these instructions step by step:
- Go to the Steam directory on another computer.
- Now, copy all files and folders from the Steam folder except the Steamapps folder.
- Next, connect your USB drive to this PC and paste all the copied files/folders.
- Eject USB drive and connect to your PC, then copy and paste the files and folders to your Steam directory.
- When you will be asked to overwrite the files, click on the Yes.
- Run the Steam.exe and if the error is removed.
9: Use Ipconfig
Ipconfig is a console application program of computer OS that displays all current TCP/IP configuration and refreshes the DHCP and DNS settings. You can use Ipconfig to alter the Dynamic Host Configuration Protocol and Domain Name System settings.
So, coming to this solution, you need to use the Ipconfig to refresh the IP address. Many users have tried this method to fix the Steam update error on Windows 10 computers. Here are the steps you need to follow:
- Press the Windows + R keys to launch the Run window.
- In the Run dialogue box type “cmd” and press the Enter key to open the Command Prompt.
- On the Command Prompt window type this command to release the IP address of your computer. Press Enter after entering the command:
ipconfig /release
- After running the above command, this is the next command you need to execute to request a new IP address. Type it on the Command Prompt and press the Enter key:
ipconfig /renew
- After this, type this command to clear the DNS cache and press the Enter key:
ipconfig /flushdns
- Now, restart your computer.
- Again open the Run dialog box by pressing the press Windows + R keys together.
- Type services.msc in the Run box and click on the OK button.
- On the Services window, search for the DNS Client service, then right-click on it and select the Properties option from the context menu.
- On the DNS Client Properties window, first, click on the Stop button and then click on the Start button to start it.
- Lastly, run Steam as an administrator and check whether the error got resolved or not.
10: Use Google DNS
If there is any issue with your IP address or your IP address is blocking Steam from downloading the update, then switching to the Google DNS may help you to resolve this error. To perform this solution, you need to do the following:
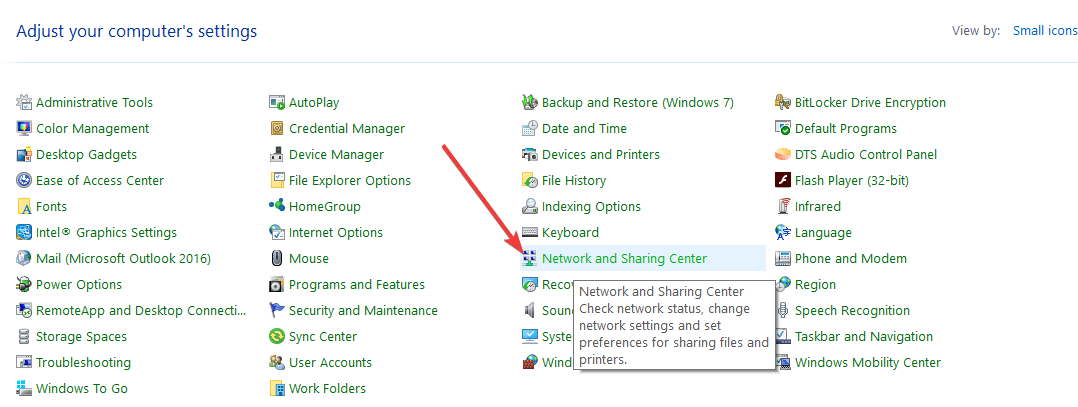
- Go to the Windows Search box and type Network and Sharing.
- Click on the Network and Sharing Center.
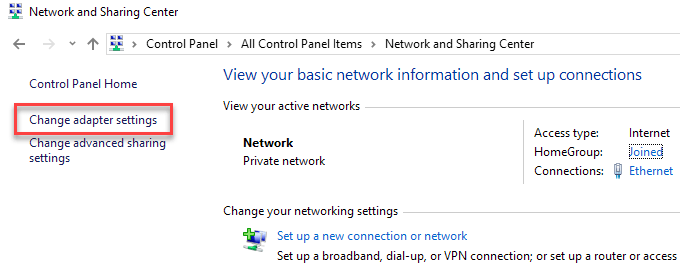
- Next, click on the Change adapter settings.
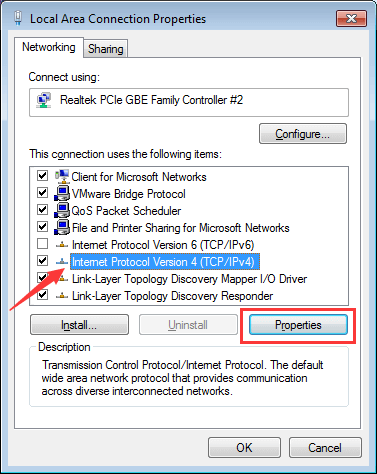
- Go to your network adapter > right-click on it and select Properties.
- Select the Internet Protocol Version 4 (TCP/IPv4) option.
- Click on the Properties button.
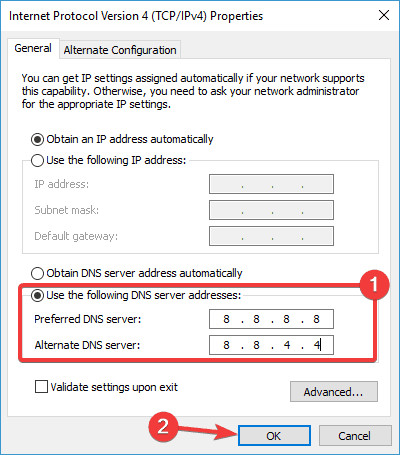
- Select “Use the following DNS server addresses”.
- Now, enter the following DNS server:
Preferred DNS server: 8.8.8.8
Alternate DNS server: 8.8.4.4
- Click on the OK button to save the changes you have made.
- Restart the network connection.
- Try to start Steam again.
Now, check if using the Google DNS server helped you to fix this Steam error.
11: Edit Hosts File
This solution has confirmed by many users in order to fix this Steam issue. To apply this trick, follow the below-given steps:
- Go to the Windows Search box and type notepad.
- Right-click on the Notepad and select Run as administrator.
- On the Notepad, go to the File tab and click and on the Open.
- Now, navigate to the given below folder:
C:\Windows\System32\drivers\etc
- Double click on the host’s file.
- If you can’t see any file, then select the All Files option from the dropdown list given at the bottom right corner of the window.
- After opening the host’s file, add these lines at the end:
68.142.122.70 cdn.steampowered.com
208.111.128.6 cdn.store.steampowered.com
208.111.128.7 media.steampowered.com
- Save the changes and close the Notepad.
- Press the Windows + X Keys together and click on the Command Prompt.
- On the Command Prompt, type this command and press the Enter key:
ipconfig /flushdns
- Close the Command Prompt.
If adding the above-given lines to the host’s file didn’t work, then alternatively, you can add the following lines to the host’s file:
208.64.200.30 media1.steampowered.com
208.64.200.30 media2.steampowered.com
208.64.200.30 media3.steampowered.com
208.64.200.30 media4.steampowered.com
87.248.210.253 media.steampowered.com
12: Set the Steam Client Services Startup Type to Automatic
- Press the Windows + R keys, then type services.msc in the box and click on the OK button.
- Double-click on the Steam Client Service.
- On Steam Client Service window, search for Startup type, then change it from the Manual to Automatic.
- Click on the Apply and OK button to save the changes.
- Now, reboot your computer.
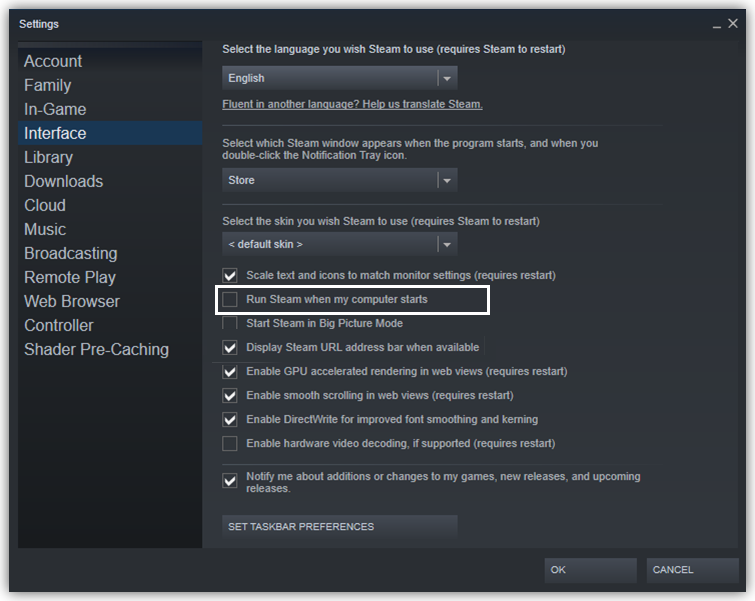
13: Disable Automatic Start of Steam
This Steam update error might also occur due to the automatic start of Steam. Hence, disabling this feature on Steam may help you to get rid of the error.
- Launch Steam on your computer.
- Go to the Steam > Settings.
- Click on the Interface tab.
- Uncheck the Run Steam when my computer starts checkbox.
- Click on the OK button to save the changes.
14: Run SteamTmp.exe
Another potential way to fix the Steam needs to be online to update error is to try running the SteamTmp.exe file. You can find this file in the Steam directory. Some Steam users reported that they fixed this error by running this file.
So, give it a try and see if doing this can fix the error or not.
15: Reinstall Steam
If none of the above-mentioned manual solutions fixed this Steam error, then as a last solution reinstall the Steam. If there is an issue with the app itself, then reinstalling it may resolve the problem. or doing this, you need to follow these instructions:
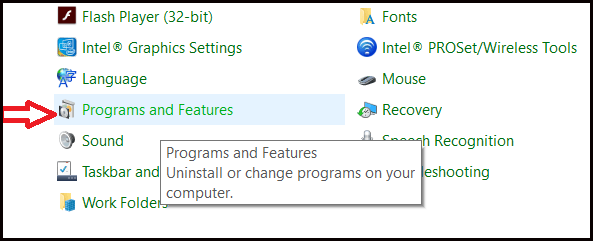
- First, open the Control Panel on your PC.
- On the Control Panel window, click on the Programs and features.
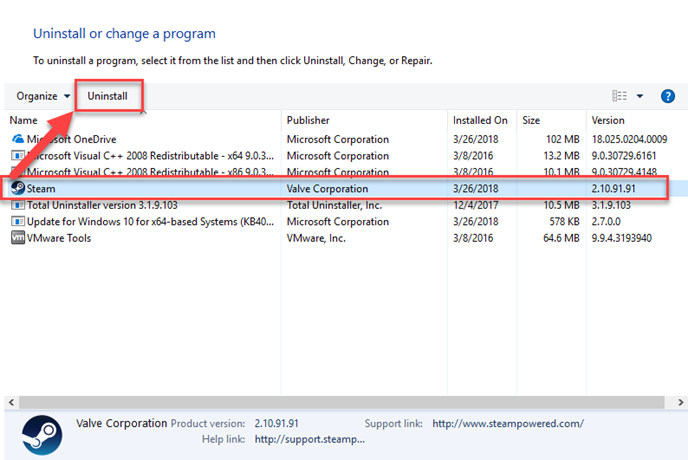
- Now, from the list of installed programs/apps, select Steam and click on the Uninstall button.
- Once Steam is uninstalled completely, restart your PC.
- Now, it’s time to reinstall the Steam. For this, visit here: http://store.steampowered.com/.
- Click on Install Steam given at the top right corner of the screen.
- After downloading the executable file, run it on your system to install the Steam.
Recommended Solution – Fix Various Computer Errors/Problems
If you find your Windows PC/laptop is running slow or you are encountering various stubborn computer errors and issues then it is suggested to scan your system with the one and only PC Repair Tool.
This is an advanced repair tool that just by scanning once detects and fixes various Windows problems and stubborn computer errors.
With this, you can fix various update errors, repair the corrupted Windows system files, DLL errors, registry errors, prevent virus or malware infection, and much more.
This not only fixes errors but also optimizes your Windows PC performance like a new one to optimize the gaming performance.
Get PC Repair Tool to make PC Error Free & Speed up
Conclusion
The Steam needs to be online to update error won’t let you install the updates on your Steam app and this may lead to other issues. Hence, this issue needs to be fixed as soon as possible.
And, here is the list of solutions that will help you to fix this error easily on your Windows 10 computer. Apply all of the solutions one after another until you find the one working for you.
I hope using the mentioned methods fixed the error on your computer and you are now able to update Steam. If you liked this article, then share it with your Steams users facing the same error.
Besides, if you have any queries or suggestions regarding the mentioned topic, then you contact us on Facebook or Twitter.
Hardeep has always been a Windows lover ever since she got her hands on her first Windows XP PC. She has always been enthusiastic about technological stuff, especially Artificial Intelligence (AI) computing. Before joining PC Error Fix, she worked as a freelancer and worked on numerous technical projects.
