When listening to music or playing games in Windows 11, it’s not uncommon to hear a crackling sound from the speakers or headphones. The first assumption is that Windows 11 sound crackling or bursting sounds come from the audio output source.
The sound distorted problem is generally caused by external interference, such as malfunctioning hardware, faulty ports, and even the transmission medium on rare occasions. But this isn’t always the case.
So, here in this guide, we looked into the issues, listed the potential fixes shared by the Microsoft experts in the forums threads, and helped many affected users get past the audio/sound popping/crackling issue in Windows 11.
To repair corrupted Windows system files, we recommend Advanced System Repair:
This software is your one stop solution to fix Windows errors, protect you from malware, clean junks and optimize your PC for maximum performance in 3 easy steps:
- Download Advanaced System Repair rated Excellent on Trustpilot.
- Click Install & Scan Now to install & scan issues causing the PC problems.
- Next, click on Click Here to Fix All Issues Now to fix, clean, protect and optimize your PC effectively.
But before heading towards the fixes, let’s have a look at the possible culprits triggering the problem.
What is Causing “Sound Cracking” Issue on Windows 11?
The following is a list of possible reasons which are most likely to blame for the Windows 11 audio crackling issue:
- Audio driver corruption or incompatibility: An incorrect or partially degraded audio driver is among the most typical reasons for this problem. This problem is most commonly reported when Windows 11 is installed via an update instead of a fresh installation.
- Selection of hearing drive is not set to default: If the user uses a headset designed to flip across mono and stereo channels based on their task, it can be expected to run across this problem. On Windows 11, this form of channel switching is known to cause problems.
- Due to sound enhancement interference: A software enhancement bug that results in popping or cracking troubles as the audio output is ‘improved’ is another probable source of this issue.
- Insufficient Quality of Format stream: When a user is connecting the headset to a high-end sound system, they might notice sound cracking when trying to play high-quality audio content when the format stream is set to a lower value than what the playback device can handle.
- Instead of WDM, Voicemeter uses MME: While using Voicemetrer or other applications that use Virtual Audio I/O, the users may probably notice these audio artifacts if they’re using the default MME or ASIA audio driver. One can resolve this issue by switching Voicemeter’s (or similar software’s) preferred audio driver to WDM.
- Interference of Wi-Fi Transmit Power frequency with the Bluetooth audio stream: The sound abnormalities are likely caused by the transmission frequency while using a BT headset when Intel (R) Wi-Fi driver powers Wi-Fi connectivity. Users must alter the transmission frequency in the Wi-Fi driver’s Properties settings to solve it.
- Outdated version of BIOS or UEFI firmware: When running an outdated BIOS or UEFI version that prevents a PC from producing high-quality audio streams, one may encounter this problem.
- Damaged System File: Windows 11 is expected to run into this problem if any important sound dependencies are harmed by system file corruption. Because there’s no way to pinpoint the exact source of the problem, the best solution is to perform a Windows clean-up.
How to Fix Windows 11 Sound Crackling Issue?
Fix 1: Basic Troubleshooting Steps to Solve Sound Crackling issue in Windows 11
It’s a good idea to do some basic hardware troubleshooting before starting on the software side of things to fix Audio cracklings on Windows 11. If you have wired headphones or speakers, ensure they’re connected. Make sure both ends of the cable are securely connected. Try a different cable to see if the problem persists.
Still, the speaker crackling persists; try unplugging other devices from your PC one at a time and testing each one to ensure no other devices are interfering with your sound. If you’re using wireless headphones, make sure the connection between your computer and your headphones isn’t disrupted – especially if you’re in a kitchen with metal objects like pans and utensils.
Check if your Windows 11 audio still crackles after this; try using a different pair of headphones or speakers and a different cable in the same port to see if the problem persists. The issue is likely motherboard or software interference rather than the speakers, if it does.
To be certain, try plugging your original device into a different jack or USB port and see if the popping persists. You can use a USB-3.5mm audio adapter instead of an additional port if you don’t have one.
If you’re still getting crackling or popping after all of that, it’s worth looking into the software side of things. It’s either software or a problem with your computer’s internals. It’ll be free to fix it with software, but a hardware fix could be expensive, so it’s worth checking the software before taking it to a repair shop.
Fix 2: Change the Sound Settings
The steps to change sound settings are as follows:
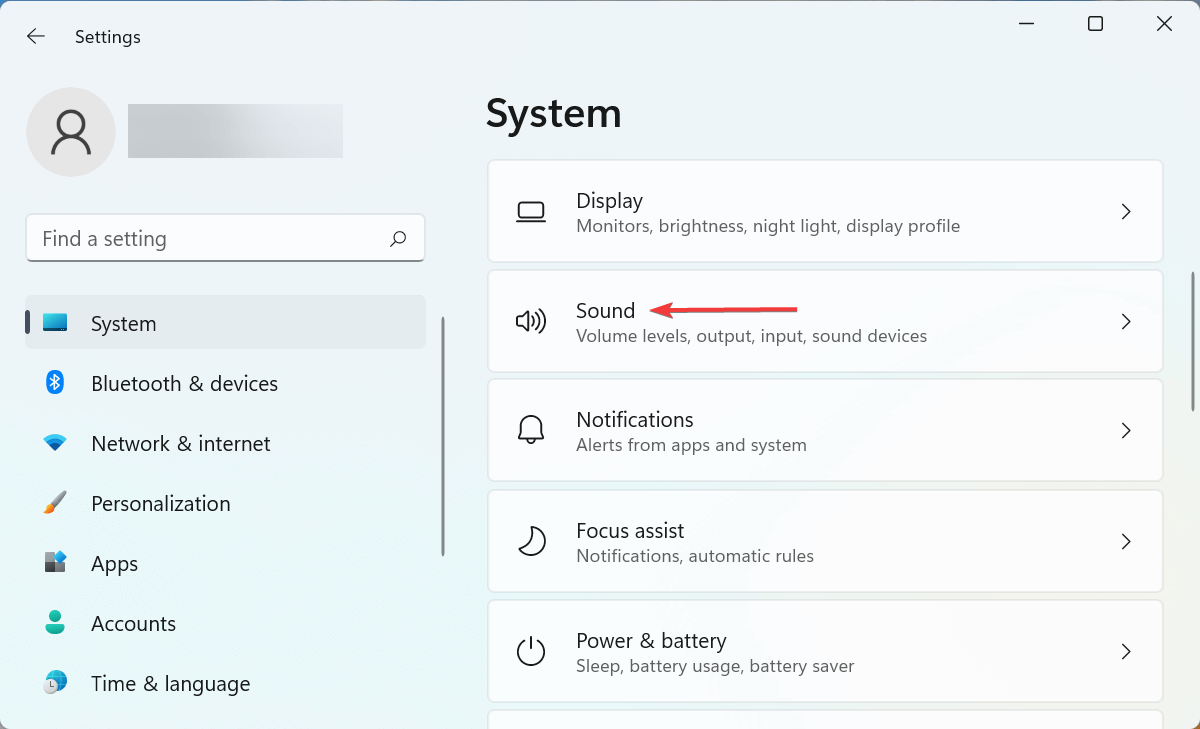
- To open the Settings app, press Windows + I and then click on the option Sound.
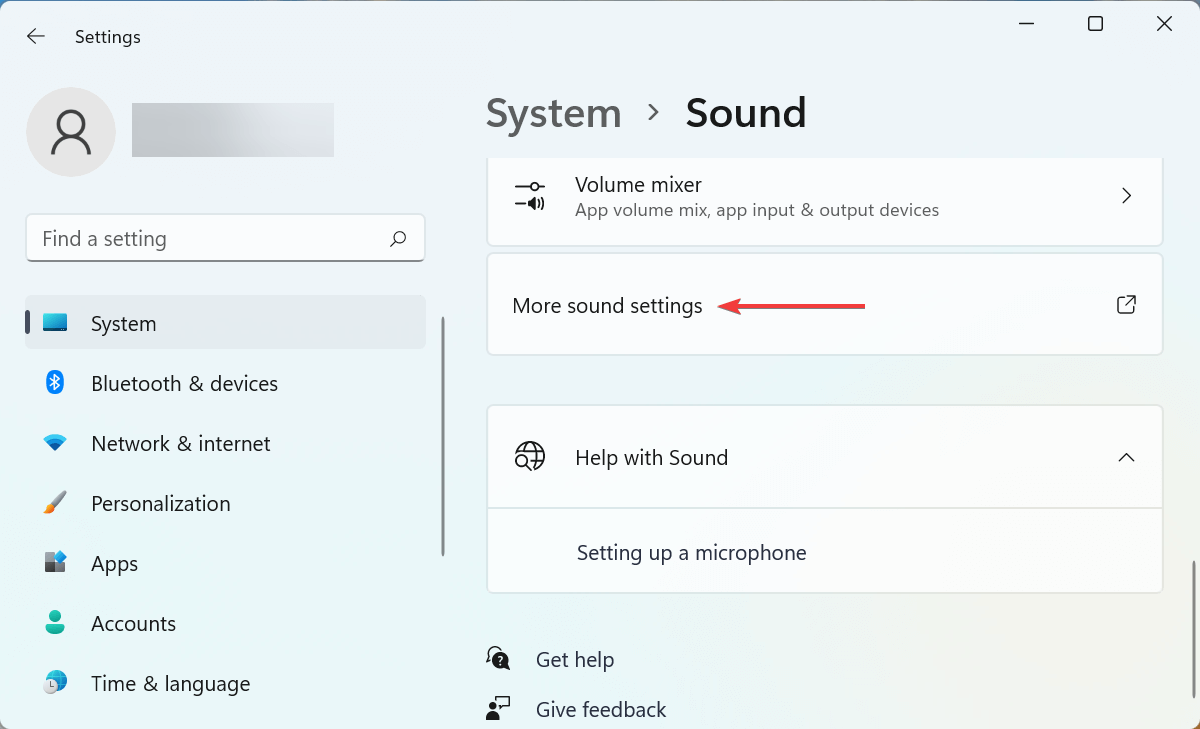
- More sound settings can be found at the bottom of the page.
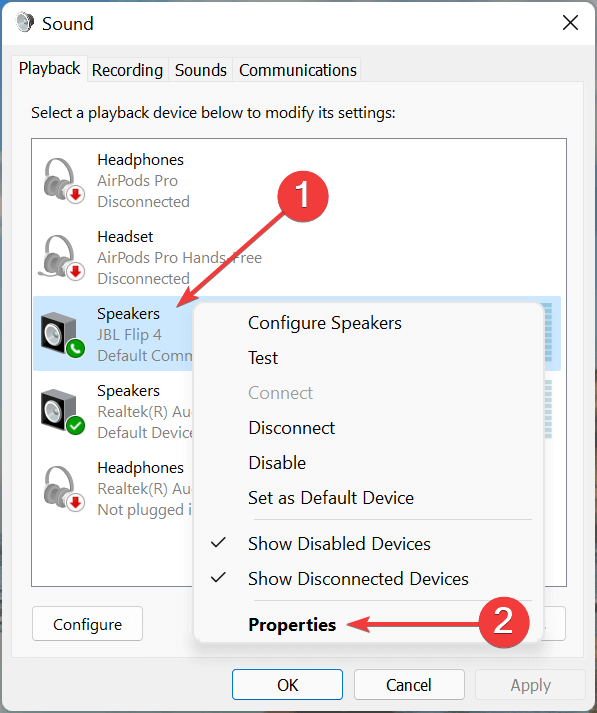
- Right-click the speakers that are producing poor audio quality and choose Properties from the context menu.
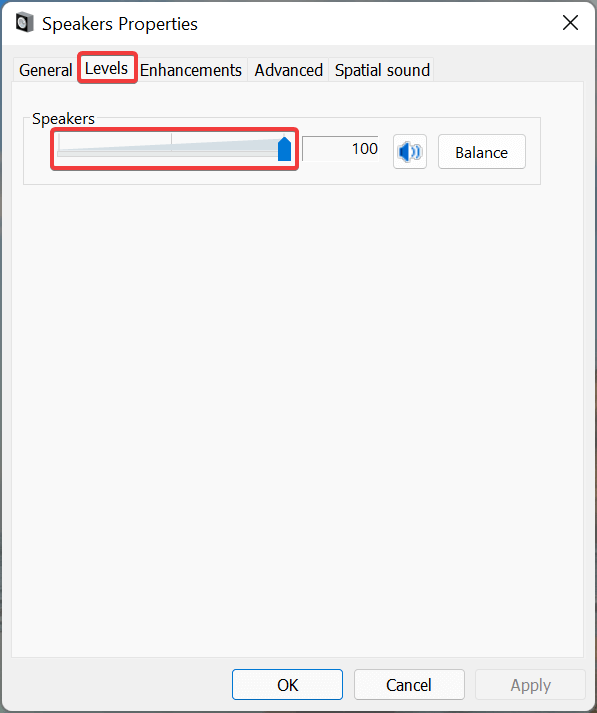
- Go to the Levels tab and drag the volume slider towards the right completely.
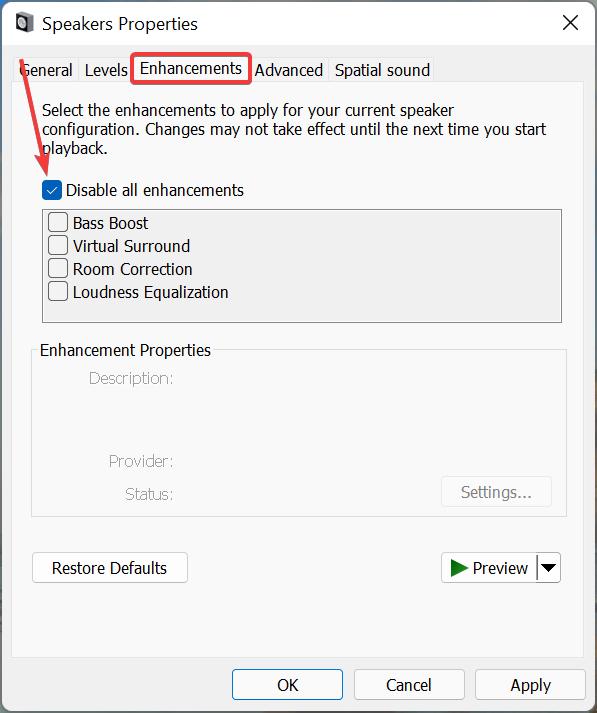
- Next, go to the Enhancements tab and select the Disable all enhancements checkbox.
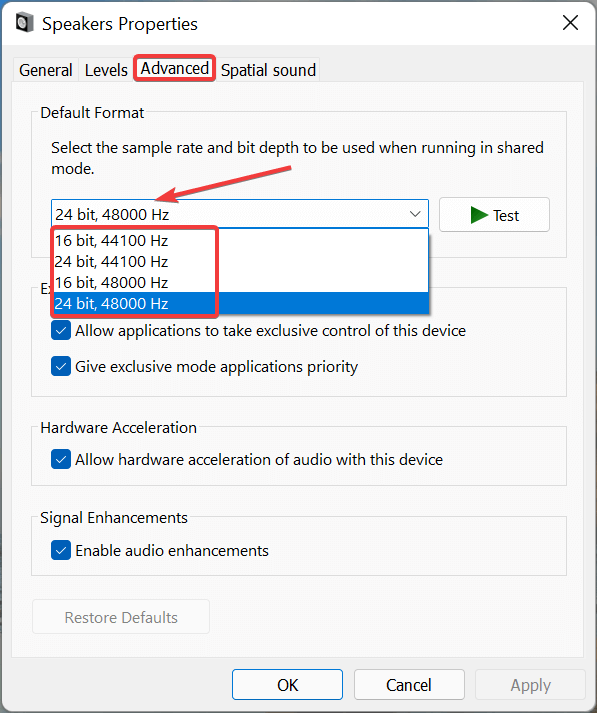
- Now go to the Advanced tab, click the Default Format dropdown menu, choose a different format from the list of options, and see if the distorted sound problem in Windows 11 has been resolved.
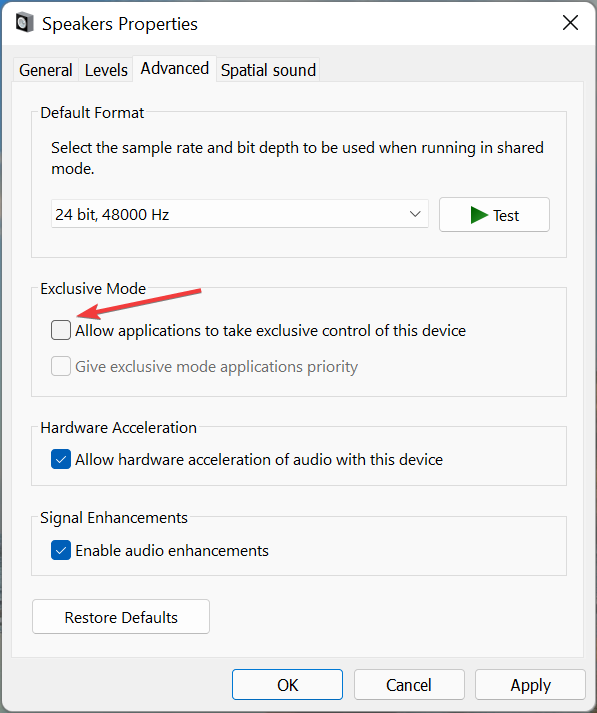
- Allow applications to take exclusive control of the device should be unchecked.
- Finally, at the bottom, click OK to save the changes.
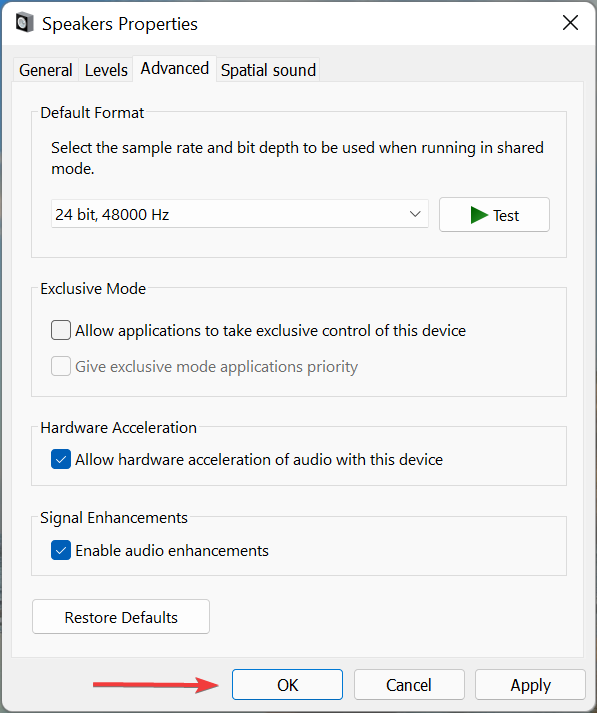
Even if you haven’t changed the properties manually, a few tweaks here may be enough to get things back up and running. Check if the problem with Windows 11’s bad audio quality has been resolved after saving the changes.
Fix 3: Change the Sound Format
- The steps to change sound format are as follows:
- For opening run box, hold down the Windows key and the R key at the same time
- Click OK after typing mmsys.cpl
- Select your speaker by clicking on it with a green tick, then choose Properties.
- Go to the Advanced tab.
- Click Apply after selecting 16 bit, 44100 Hz (CD Quality) from the available option in the dropdown menu.
- If that doesn’t work, try selecting a different format from the dropdown menu and testing it.
Fix 4: Make Playback Device the Active Default
You can expect to deal with Windows 11 sound crackling problems if you use a headset that switches between Mono and Stereo channels. This is due to a playback glitch that appears to be affecting certain Windows 11 builds.
Fortunately, you can quickly resolve this issue by going to the Sound settings and making sure that the active audio device is also set as the default device and default communication device. Several affected users have confirmed that this minor change was the key to permanently resolving the sound cracking problem.
For specific instructions on how to set the active playback device as the default in order to fix the sound popping issues in Windows 11, follow the below steps:
- To open the Run dialogue box, press the Windows key + R. Then, from the classic Control Panel menu, type ‘mmsys.cpl’ and press Enter to bring up the Sound menu.
- Select the Playback tab from the menu at the top of the Sound menu, then right-click on the playback device that’s causing the cracking sounds and select Set as default device.
Next, right-click the same playback device and select Set as the default communication device from the context menu.
After you’ve made these changes, restart your computer and see if the problem has been resolved after the next startup.
Fix 5: Re-config Audio Services
- To open the Services app, press Windows + R to open the Run command, type services.msc in the text field, and either hit Enter or click OK.
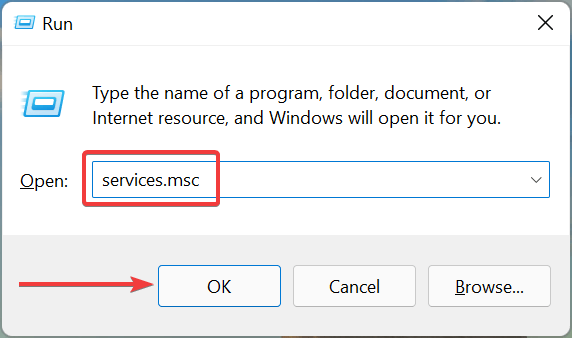
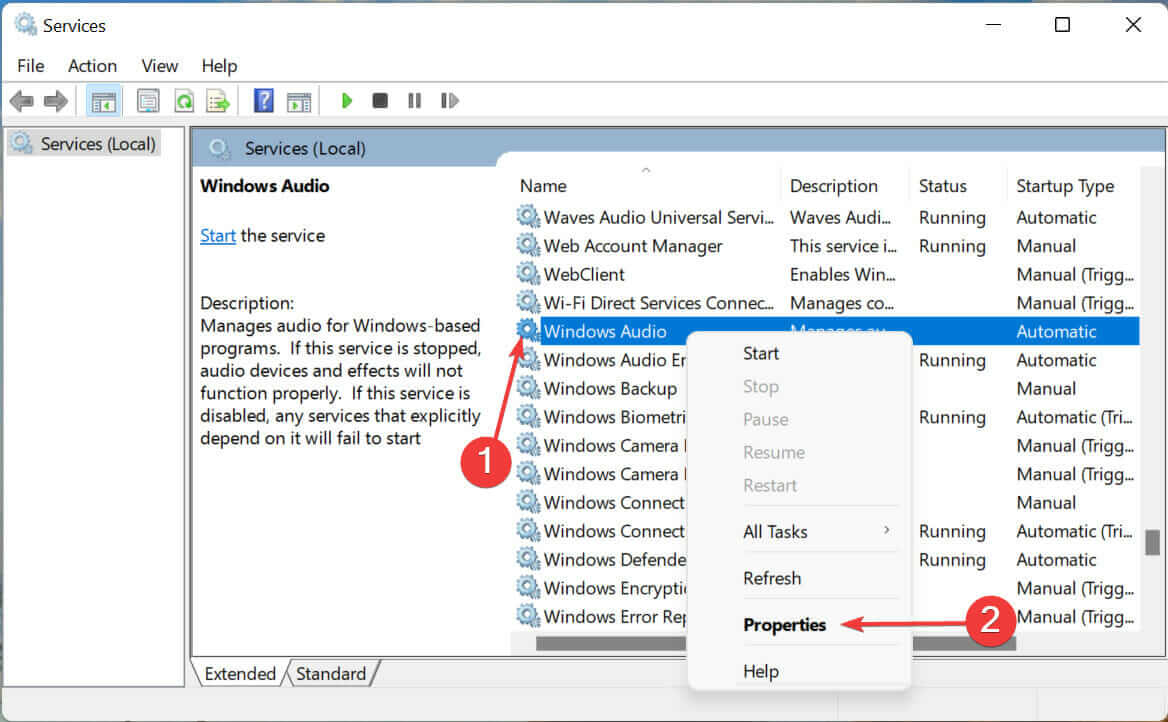
- Now find the Windows Audio service, right-click it, and choose Properties from the context menu.
- Select Automatic from the list of options in the Startup type dropdown menu.
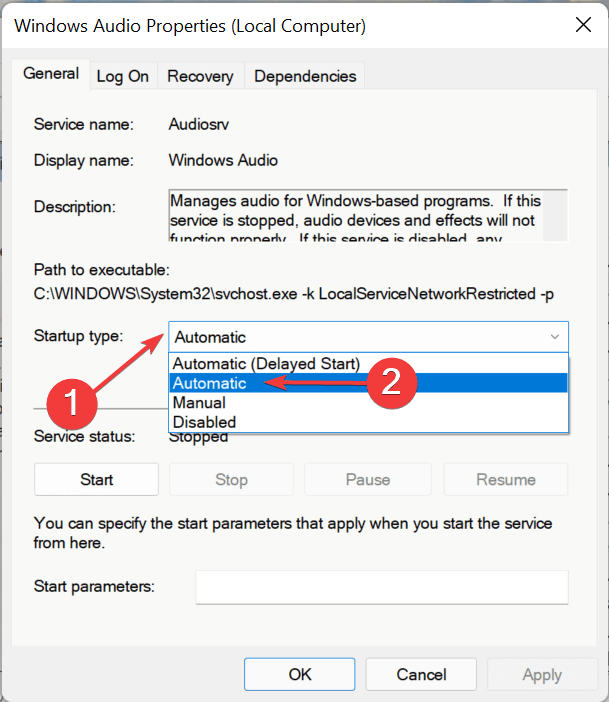
- To fix distorted sound in Windows 11, change the startup type to automatic.
- To start the service if it isn’t already running, click the Start button under Service status.
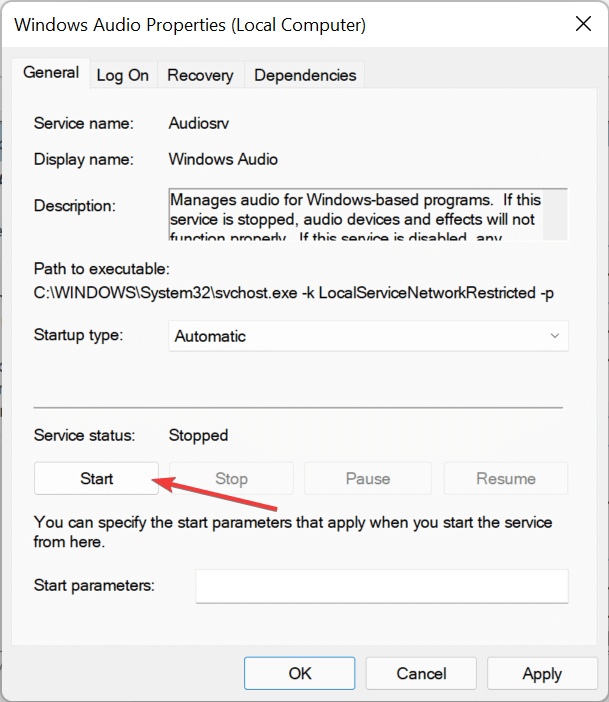
- After you’ve made your changes, click OK at the bottom of the window to save them and close them.
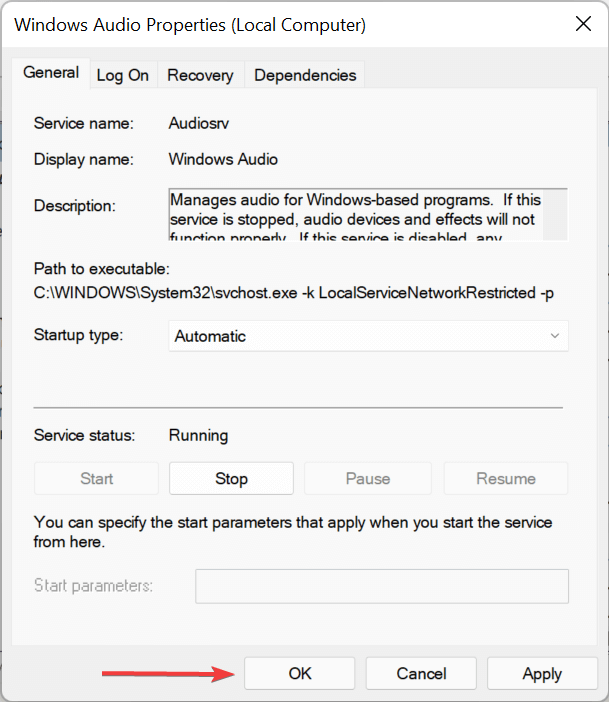
- Make the same changes to two other critical services in Windows 11 that are responsible for audio output.
- Call for a Remote Procedure
- Audio Endpoint Builder for Windows
After you’ve finished, restart your computer to see the changes to fix Windows 11 sound crackling.
Fix 6: Turn off the ATI HDMI audio.
The ATI HDMI Audio can sometimes cause audio to come out of your device; shutting off the device ensures it is not the cause. To disable ATI HDMI Audio, follow these steps:
- On your keyboard, push the Windows key & S at the same time, then look for Device Manager.
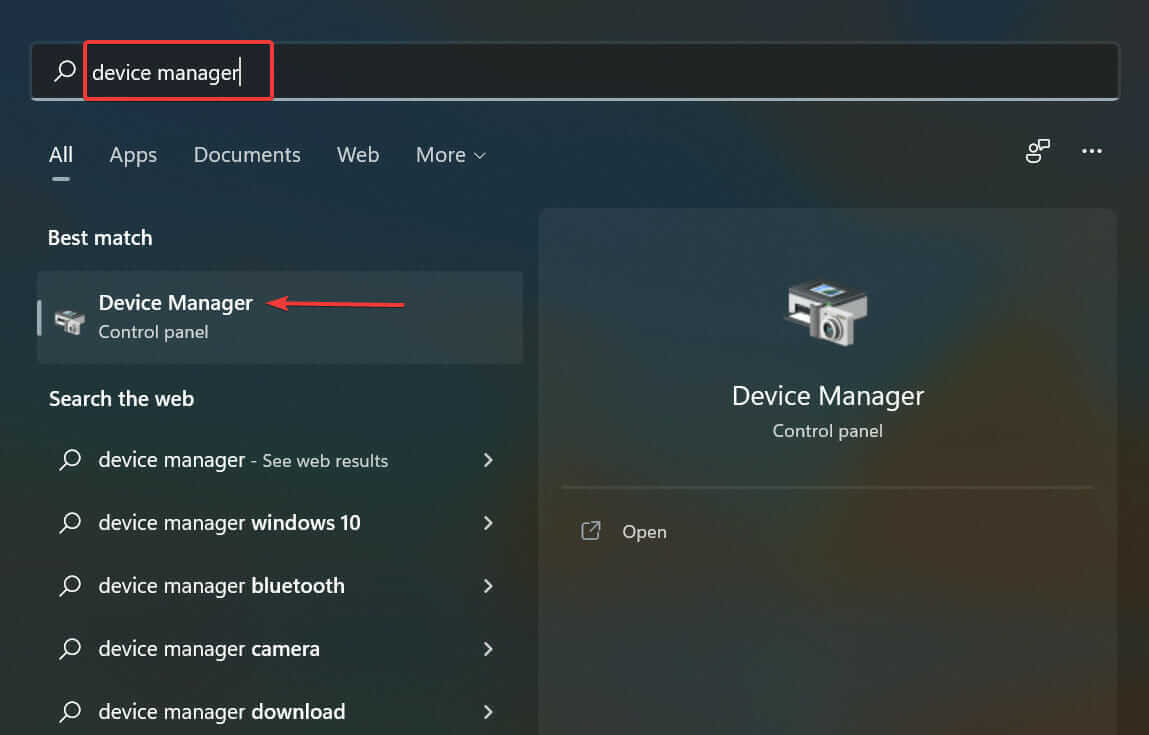
- Right-click on the ATI HDMI Audio device driver disable the device in the Sound, video, and game controllers category.
Fix 7: Adjust the Intel (R) Wifi Transmit Power Level
As it turns out, a power inconsistency in your Wi-Fi card driver may be contributing to the Sound Cracking Issue on Windows 11. You can expect to hear these sound artifacts in certain scenarios because the current power transmission level is interfering with the audio content delivery.
Several affected users who are also experiencing this issue have reported that the issue was finally resolved after using Device Manager to access the advanced properties menu of their Intel (R) Wi-Fi drivers and modifying the default power level. Changing the level to 3 appears to produce the most consistent results.
For specific steps on changing the transmit power level in a way that won’t interfere with audio content delivery, see the instructions below:
- To open the Run dialog box, press the Windows key + R.
- To open Device Manager, type ‘devmgmt.msc‘ and press Enter.

- If the User Account Control (UAC) prompts you, select Yes to grant admin access.
- As you are in the Device Manager, then expand the menu related to the Network Adapters.
- Then right-click the Intel Wi-Fi driver and click on Properties
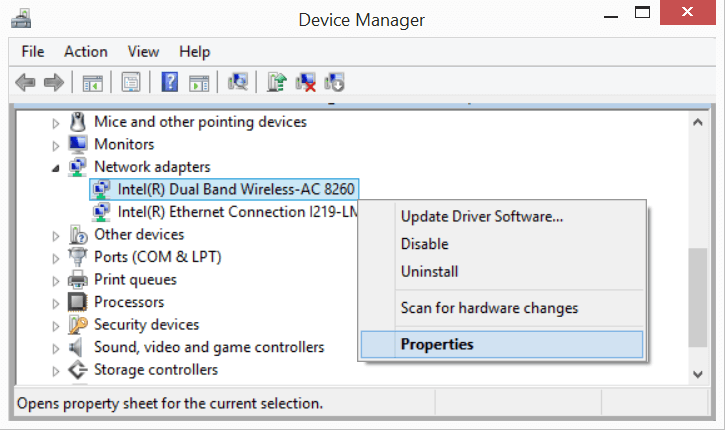
- Now click the Advanced tab and go to the Property and choose Transmit Power entry.
- Then in the Transmit Power, change the value to 3 before hitting the OK button for saving the changes
- And as the changes are saved, restart your system to save the changes.
It is estimated now the Windows 11 audio crackling problem is resolved but if you are still facing the problem, then head to the next solution.
Fix 8: Increase the Processor’s Usage to 100%
The crackling sound from your speaker and/or headphones could be due to a driver issue. To update your driver, follow these steps:
- In the Windows taskbar search box, type Edit Power Plan.
- Click Edit power plan from the search result that appears.
- Select advanced power options.
- Expand the Processor Power Management section, as well as the Minimum processor state, by scrolling down. Apply the settings after changing the Minimum Processor state to 100%.
- Now test your audio output device; if the pop sound persists, continue reading this guide.
Fix 9: Install the Latest Sound Drivers
Drivers are essential for the proper operation of any piece of hardware because they relay commands between it and the operating system. As a result, it is advised that you keep them up to date. Follow the below steps to update sound drivers:
- To open the Search menu, press Windows + S, type Device Manager in the top text field, and then click the relevant search result that appears.
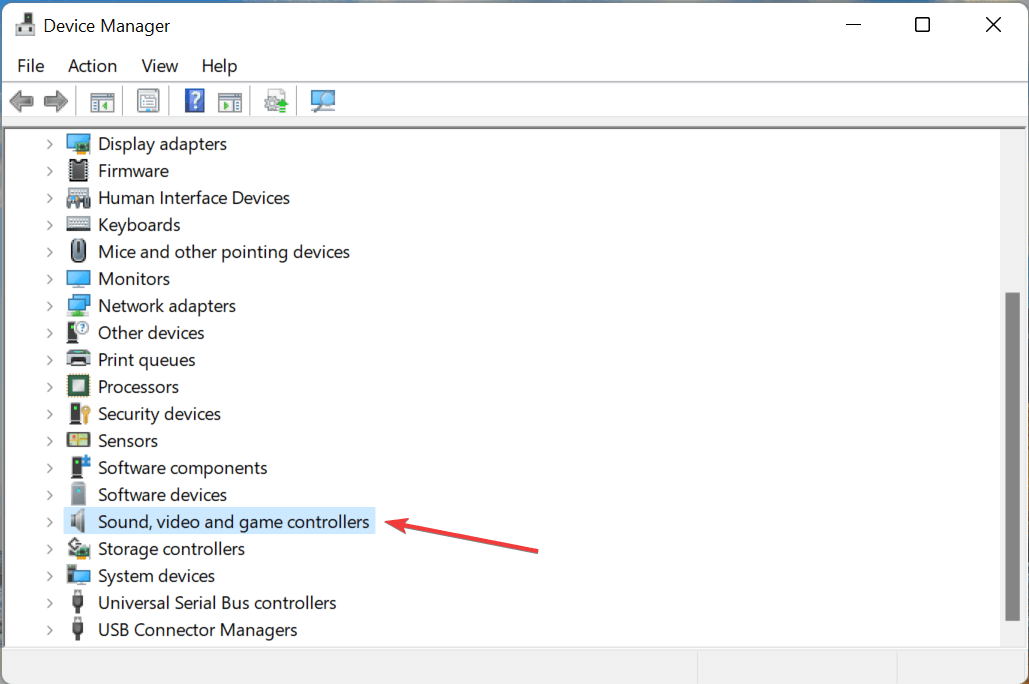
- To see the devices under the Sound, video, and game controllers entry, double-click it.
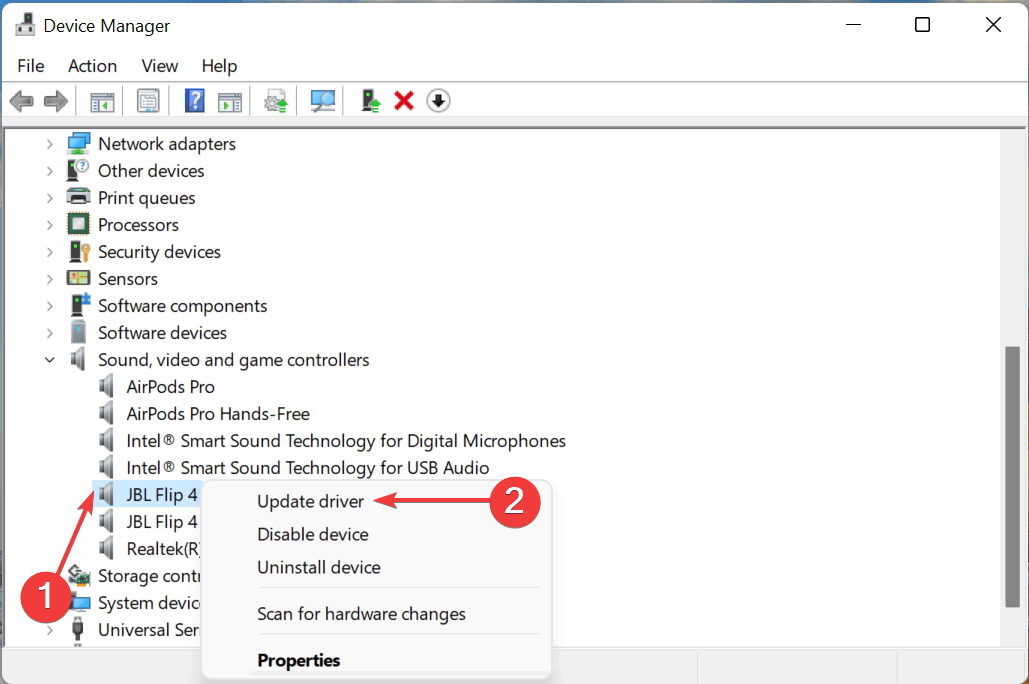
- Select Update driver from the context menu when right-clicking on the speakers or headsets that are producing crackled or distorted sounds.
- In the Update Drivers window, select Search automatically for drivers.
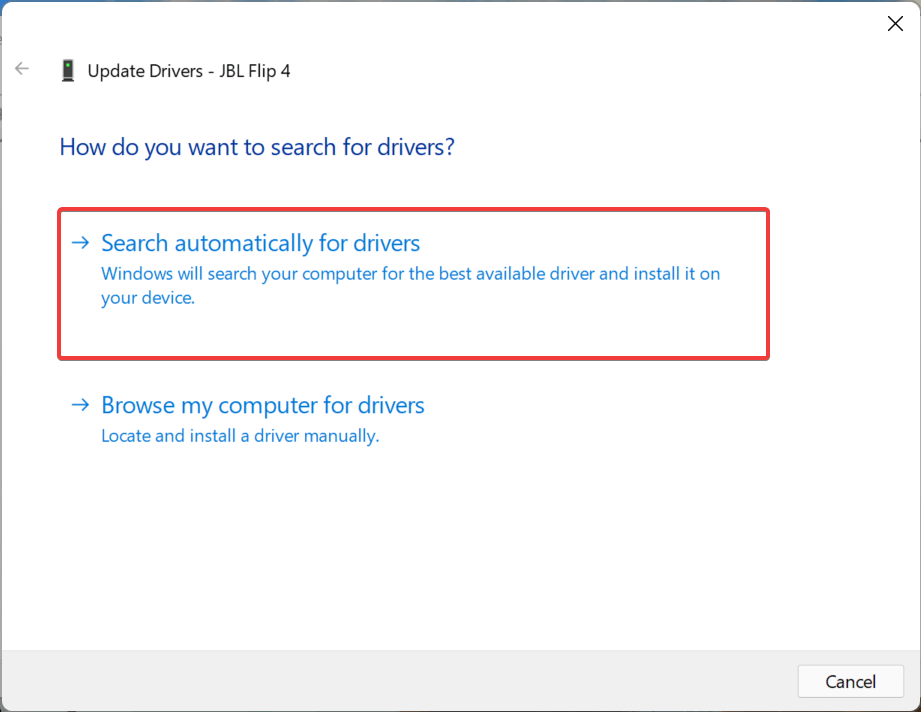
- Windows will now search the system for the best available driver for the problematic device and install it.
If Device Manager is unable to locate an updated version for the peripheral, check Windows Update for the latest driver version or download and install the setup from the manufacturer’s website.
The distorted sound problem in Windows 11 should be resolved by updating the relevant driver. If the audio playback does not improve, move on to the next step.
You also update the entire device driver using the automatic Driver Updater Tool. This scan and update the entire system drivers just by scanning once.
Get Driver Updater tool, to update the drivers automatically
Fix 10: Turn off fast startup
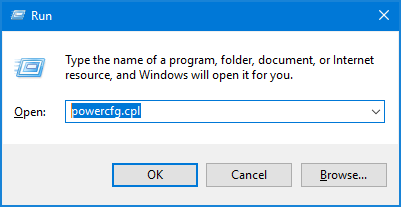
- To open the Run box by pressing Windows key + R at the same time.
- Type powercfg.cpl and hit Enter.
- From the left menu, select Choose what the buttons do.
- Select Change settings that are currently unavailable from the drop-down menu.
- Uncheck the option to turn off fast startup.
Fix 11: Reinstall Windows 11
If none of the solutions listed above has worked, you’ll have no choice but to reinstall Windows 11 to fix sound crackling.
To try reinstalling the Windows 11 and fix the problem in your case
Remember that a reset will erase all data on the system, including apps and settings, and the computer will be as good as new once it’s finished.
Best & Easy Solution to Fix Windows 11 Problems
To fix various Windows PC problems like freezing, crashing or hanging, scan your system with the PC Repair Tool.
This advanced, multifunctional tool detects and fixes DLL-related errors just by scanning. It is a highly advanced and trusted tool that repairs corrupted Windows system files, prevents your PC from file loss, removes virus or malware infection, and much more.
So, free to run this automatic utility and make your Windows PC error-free.
Get PC Repair Tool, to fix Windows 11 Problems
Conclusion:
So, this is all about the Windows 11 sound or audio crackling problem.
Try the fixes given one by one till you find the one that works for you to get past the problem in your case.
Moreover, you can now connect with our experts simply by messaging us on our Facebook page. Also, do like, share, and subscribe to our channel.
Good Luck..!
Hardeep has always been a Windows lover ever since she got her hands on her first Windows XP PC. She has always been enthusiastic about technological stuff, especially Artificial Intelligence (AI) computing. Before joining PC Error Fix, she worked as a freelancer and worked on numerous technical projects.