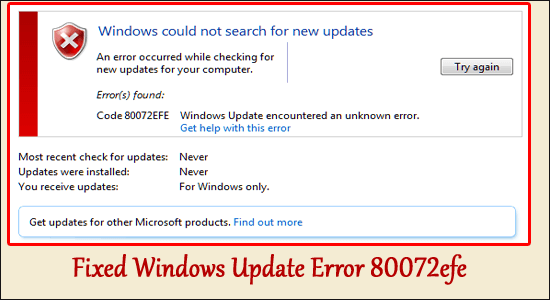
Summary – The article contains step-by-step instructions on how to fix Windows Update Error 80072efe in no time. The error generally appears after performing a clean install on Windows 7 or while trying to update or search for the latest Windows updates.
The error arises due to the interrupted or default connection between the Windows Update server and PC. The error code 80072EFE not only appears on Windows 7 but on the latest Windows 10 & 11.
So, if you are also dealing with the error, then follow the fixes given one by one carefully.
Let’s begin..!
To fix Windows Update Error 80072efe, we recommend Advanced System Repair:
This software is your one stop solution to fix Windows errors, protect you from malware, clean junks and optimize your PC for maximum performance in 3 easy steps:
- Download Advanaced System Repair rated Excellent on Trustpilot.
- Click Install & Scan Now to install & scan issues causing the PC problems.
- Next, click on Click Here to Fix All Issues Now to fix, clean, protect and optimize your PC effectively.
How to Fix “Windows Update Error 80072efe”?
The error code 80072efe Windows 7 generally appears due to the defective setup of the network it creates a hurdle or difficulty while updating the Operating System. So try the below-given fixes and get past the error.
Fix 1 – Install KB3138612 Update Patch
Many users managed to fix 80072efe error by installing the latest update so below follow the steps to install the patch.
- Open the link https://www.catalog.update.microsoft.com/Search.aspx?q=KB3138612
- And download the patch KB3138612 for your Windows 7 system
- Click on the Download the Package link
- Click on Downloads and open the folder that you downloaded KB3138612 and click on it to install the latest updated file
Restart your system and check if the error is fixed.
Fix 2 – Run the Inbuilt Update troubleshooter
Here it is suggested to run the inbuilt Windows Update troubleshooter to fix error code 80072efe on your Windows system.
Follow the steps to do so:
- Press the Win+S and in the search option > type troubleshoot
- Click on the Troubleshoot settings and click on Additional Troubleshooters
- Select the Windows Update and then click on Run the troubleshooter.
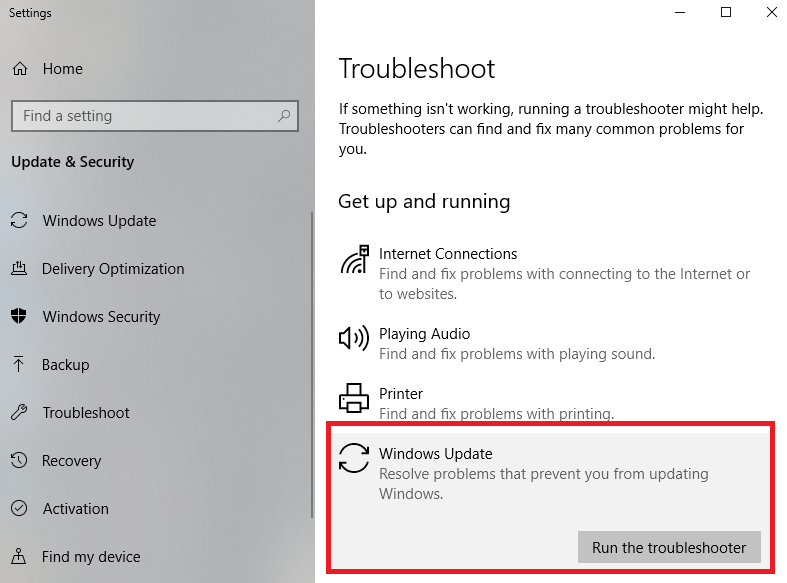
- Then finally go through the suggested troubleshooter solutions
Fix 3 – Delete CatRoot2 folder
CatRoot2 folder is one of the Windows System folders which is required in the process of Windows Updating. Whenever we try to update through Windows Update, the rootkit2 folder is the in-charge that keeps Windows Update package signatures. And deleting the catroot2 folder contents to remove the corruption and solve the Windows Update problem.
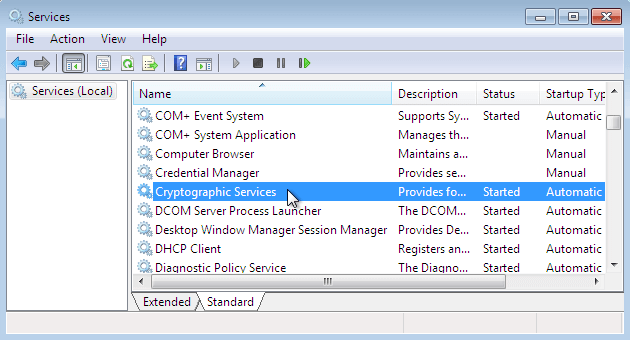
So here you need to stop or quit Cryptographic service as it leans or depends on the CatRoot2 folder.
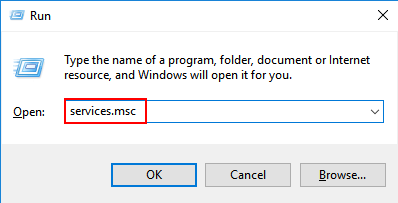
- Press the Win+R button to launch the Run dialogue box
- In the Run box type services.msc and then click on Enter.
- Click twice on Cryptographic Services to launch Windows.
- Click on the Stop option which you can see in Cryptographic Services
- Then click on Apply option and hit OK to quit or exit Windows.
- Press the Win+E keys on the keyboard to open the File Explorer
- Enter the given command C:WindowsSystem32
- Click Right on the catroot2 folder then click on the Delete

- Open or launch Cryptographic Services again.
- Click on Start in order to restart the services and then click on Apply.
- Hit the OK option to close or exit the Window.
Now check if you are still seeing the 80072EFE Update Error in Windows OS, then head to the next fix.
Fix 4 – Delete the Rootkit file
The Windows 7 error code 80072efe is closely associated or linked with the rootkit from a window.32 tdds. This rootkit helps to prevent Security updates and impair the capabilities of Windows Defenders. It is very easy to remove or terminate harmful or toxic rootkit files.
You can remove the rootkit by downloading the executable file from the web, you can download the Kaspersky tdsskiller executable and see if the rootkit is removed and can install the update without seeing the error.
Fix 5 – Disable the 3rd party antivirus
Remove or disable the 3rd part antivirus and firewall suites as they can fail & can harm the Win Update connection. As a result, the Windows OS will be unable to update and apply the necessary updates.
So try disabling the antivirus program temporarily and then install the update. To disable antivirus right click on the antivirus icon in the taskbar and disable it for the time limit you want.
Now if this trick works for you then switch to a different antivirus program or uninstall the current antivirus program completely.
Follow the given instructions:
- Go to the Run by pressing the Win+R button and type ‘appwiz.cpl’, and then click on Enter to open the Programs and Features.
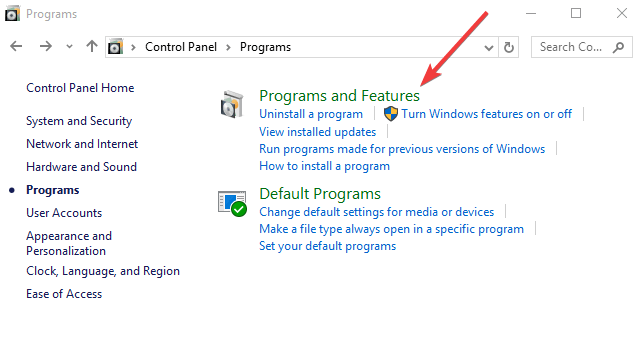
- In the Programs and Features, you will see overprotective suites (antivirus programs).
- Hit the Overprotection site that you want to uninstall. Then select the Uninstall option.
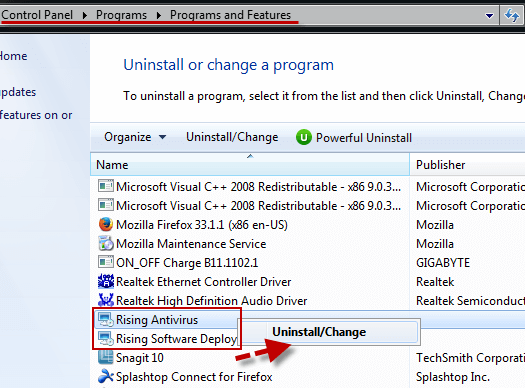
- Do follow the given instructions that appear on your desktop screen to uninstall or remove the security applications
- Next, Reboot the system or device.
Fix 6 – Reset the Windows Update Components
In many cases, you are unable to install the update due to damaged or corrupted update files. So here it is suggested to end the related services as well as delete Windows updates that might be causing conflict.
Follow the steps to do so:
- Launch Command Prompt and Run it as administrator
- Now type or copy-paste the below-given commands one by one and hit Enter after each
net stop wuauserv
net stop cryptSvc
net stop bits
net stop msiserver

- Hit Windows + E and open File Explorer
- And go to the locations and delete the entire content in the folders
C:\\Windows\\System32\\catroot2
C:\\Windows\\SoftwareDistribution

- Again launch the Command prompt and paste the below-given commands and hit Enter after each
net start wuauserv
net start cryptSvc
net start bits
net start msiserver
- Once the process is finished then exit the command prompt and restart your system.
Fix 7 – Run a Clean Boot
Performing the clean boot of your system with any glitches or background programs that conflict with the Windows update and stop it from running.
But here you need to log in as an administrator and follow the steps mentioned below:
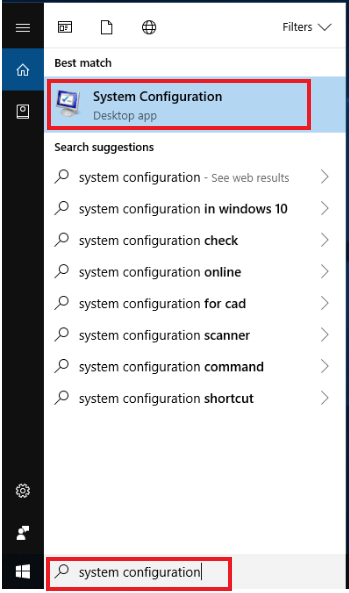
- In the Search box type msconfig
- And open the System Configuration window
- Here click on the Services tab and the below select the “Hide all Microsoft services” option
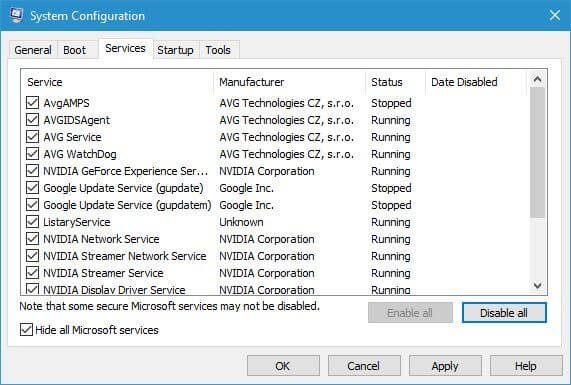
- And click on Disable all
- Now click on the Startup tab and click on Open Task Manager

- Right-click over every process and choose Disable
- Next, close the Task Manager and Ok
- Restart your PC.
Best and Easy Solution to Fix Windows Update Error 80072efe
If your Windows PC is running slow or facing various errors then here it is suggested to scan your system with the PC Repair Tool.
This is a highly advanced tool that just by scanning once detects and fixes various errors like common computer errors, prevents file loss, and protects your computer from virus infection.
This also fixes various computer errors such as BSOD errors, DLL errors, repair registry entries, runtime errors, and many others. Just download and install the tool and make your PC error-free automatically.
Get PC Repair Tool, to fix error 80072efe on Windows
Conclusion
Now it’s time to conclude..!
In this article, we have provided you with the appropriate fixes that will help you to resolve the Windows Update error 80072efe. The above-mentioned fixes are quite simple and effective and very easy to perform.
It is estimated that one of the solutions listed managed to get rid of the error.
I hope you liked the article, also don’t forget to hit the like and share button on our Facebook page
Good Luck..!
Hardeep has always been a Windows lover ever since she got her hands on her first Windows XP PC. She has always been enthusiastic about technological stuff, especially Artificial Intelligence (AI) computing. Before joining PC Error Fix, she worked as a freelancer and worked on numerous technical projects.